Add-ons and more

A soap bubble OSL shader for Blender

The next step in our yourney to develop useful OSL shaders is a soap bubble shader.

The color patterns in soap bubbles and oil films are caused by a phenomenon called thin film interference. Our goal is to recreate those color patterns in a more or less physically accurate way.
Unlike the scales and hexagon shaders we developed earlier, this shader does not simply generate a color pattern but produces colors that are dependent on the angle of incidence. Because the incidence vector I is already provided in OSL as are many vector operations, this irridescence shader is surprisingly simple to implement.

surface irridescence (
 float nmedium = 1, // approximate refractive index of air
 float nfilm   = 1.3, // approximate refractive index of water
 float d       = 1000, // 1000 nm = 1 micron
        output color Color = 0
)
{
 // condition for constructive interference:
 // 2 * nfilm * d * cos(t2) == (m-0.5)*lambda
 // d and lambda in nm
 float eta = nmedium/nfilm;
        // note that N should be the perturbed normal
 vector T = normalize(refract(I,N,eta));
        // no need to divide by (len(-I) * len(T)) as these are normalized
 float cost2 = dot(-I , T);
 float opd = 2*nfilm*d*cost2;

 int mmin = int(ceil(opd/750+0.5));
 int mmax = int(floor(opd/350+0.5));
        // if mmax < mmin the film is too thin to show an effect
 int m = (mmin + mmax)/2;

 if (m > 0){
     float lambda = opd / (m - 0.5);
            color c = wavelength_color(lambda);
            Color =  c;
 }
}

In the code shown above the trick is that we calculate the length of the optical path opd first and then (in line 18) calculate the minimum and maximum number of wavelengths (plus a half to correct for a phase shift, check the Wikipedia article to see why) that fit in this path. The minimum number of wavelengths is calculated by dividing by the wavelength of the longest waelength we can see (red, 750 nm), the maximum by dividing by the shortest wavelength (blue, 350 nm). If the film is too thin, mmin will be smaller tban zero.
The next step is to pick any integer that lies between those extremes (line 21) and calculate the wavelength lambda that corresponds with this integer (line 24). The final trick is converting this wavelength to a RGB-color with OSLs built-in wavelength_color() function.

Example node setup

The shader produces 'just' colors so it is best to combine plug it into a glossy shader and combine it with a general glossy shader too make things resemble a soap bubble. In the node setup shown below we've thrown in some noise to perturb the normal so we get the characteristic color swirls we see in real life soap bubbles.

Future steps

The next article in this series will probably cover weave patterns.

Getting a Light vector in OSL for Blender

OSL works with closures and closures are effectively summed over all lights in the scene. If you would like to alter for example the color based on some completely non physical interaction with a certain light as you do for some toon shaders you still might want to access a light object anyway. This article shows how this might be achieved.
Unfortunately what is described below does not work. Whether this is a bug or not I don't know, but getattribute("Lamp","object:location",L) does not get the location of the object named Lamp but the location of the object being shaded ... So no cel shading until this is fixed ...

The code below determines the light vector L by getting the object:location attribute from an object called Lamp and subtracting the point being shaded P. In Blender getting the location attribute in OSL only seems to work for real objects, not for actual lamps! (Maybe because a lamp has no node shader attached.)
shader oink(
color Color = 1,
output color Cout = Color
){
    vector L;
    getattribute("Lamp","object:location",L);
    P=transform("object","world",P);
    float cost=abs(dot(normalize(L-P),N));
    Cout = color(cost,1-cost,.2);  
}
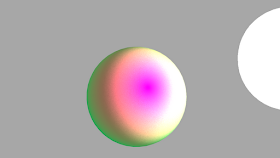
Note that when we plug this calculated color for example into a diffuse shader, normal lighting calculations will still be performed, so in the example image we have a pinkish color on the side of the light object and a greenish color on the sides perpendicular to the light vector (including the side facing the camera). These colors are then diffusely lit by the same Lamp object (a bit too bright in this example :-)

Example node setup


A Toon OSL shader for Blender

A question on Blender Artists made me think about a toon shader. There are of course many ways to implment toon shaders but here is what I came up with.

The basic idea of this shader is to determine how perpendicular the surface of an object is compared to the viewing angle and return black instead of the regular color if some threshold is passed. That is exactly what line 8 does in the code below.
shader outline(
    color Color = 1,
    float Angle = 50,
    output color Cout = 0
)
{
    float angle = cos(radians(Angle));
    if(abs(dot(-I,N)) > angle) Cout = Color;
}

Example node setup

The noodle used to create the sample image of Suzanne looks like this:

A Scales OSL shader for Blender

The second OSL shader I have implemented for Blender is a scales pattern. It provides an overlapping pattern of semicircles that can be used for things like fish scales or roof shingles.


Like the hexagon shader this is a generic shader, i.e. a shader that provides a color pattern irrespective of lighting conditions so it is possible to use it in different contexts. In the code shown below the shader is defined with two input colors, coordinates (typicallt uv-coordinates of the object) and a parameter called n which can be used to alter the shape of the scales.
Beside a color and an index we provide an output for the distance to the center of a scale (which can be used for nice displacement effects) and a vector Vindex which is unique for each scale but the same within the scale. This can be plugged into a texture to provide each individual scale with its own distinct color. In the example noodle for the image shown at the beginning you can see how this is done.
shader scales(
    color Diffuse_Color1 = color(0.2, 0.8, 0.2),
    color Diffuse_Color2 = color(0.8, 0.2, 0.2),
    vector Coordinates = 0,
    float n = 0,
    output color Color = 0,
    output int Index = 1,
    output float Distance = 0,
    output vector Vindex = 0)
{
    float sx = mod(Coordinates[0],1);
    float sy = mod(Coordinates[1],1);
    
    vector p  = vector(sx,sy,0);
    vector p0 = vector(0.5,0,0);
    vector p1 = vector(0.5,1,0);
    vector p2 = vector(0,0.5,0);
    vector p3 = vector(1,0.5,0);
    
    vector cell = vector(floor(Coordinates[0]),floor(Coordinates[1]),0);    
    int oddx = int(cell[0])%2;
    int oddy = int(cell[1])%2;
    
    float dist(vector a, vector b, float n){
        float x = b[0]-a[0];
     float y = b[1]-a[1];
     float r2 = x*x+y*y;
     if ( n != 0.0 ) {
            float theta = atan2(y,x);
         float cost, sint;
            sincos(theta, sint, cost);
         float cost2= cos(theta*2);
         float Y = pow(abs(sint),1+n*(1-cost2*cost2));
         r2 /= cost*cost+Y*Y;
        }
        return sqrt(r2);
    }
    
    float d1 = dist(p,p0,n);
    if ( d1<=0.5 ){
        Color = Diffuse_Color1;
        Index = 0 ;
        Distance = d1;
        Vindex = cell + p0;
    } else {
        float d2 = dist(p,p2,n);
        float d3 = dist(p,p3,n);
        if ( d2 <= 0.5 ) {
            Color = Diffuse_Color2;
            Index = 1;
            Distance = d2;
            Vindex = cell + p2;
        } else if ( d3 <= 0.5 ) {
            Color = Diffuse_Color2;
            Index = 1;
            Distance = d3;
            Vindex = cell + p3;
        } else {
            Color = Diffuse_Color1;
            Index = 0;
            Distance = dist(p,p1,n);
            Vindex = cell + p1;
       }
    }
}

Example node setup

The image of the abstract Koi carp provided at the beginning was created with a node setup that is shown below (click on the image for a larger view):

Future steps

The next shader I will implement I think, will be an irridescence shader so we can all enjoy some soap bubbles.

Example image

Just to illustrate that with scales you do a lot of interesting stuff, here is a picture of the exact same model but with different colors and displacement mapping added to the scales. Looks like a pine cone, right? (Maybe a bit chocolaty one :-)

A Hexagon OSL shader

Now that the Blender Cycles render engine can work with Open Shading Language (OSL) shaders the first task I've set out for myself is to recreate some of the textures I implemented before and the first one we tackle is the hexagon shader.


using an OSL shader in Blender

The hexagon shader in the code below was used to create both the colorfull cube and the chickenwire-like plane in the picture. Provided that you have a Blender build that supports OSL, using the code below requires just two simple steps:
  1. Enable the OSL features in the Cycles render settings (the 'Shading syst')
  2. Load to code below in the text editor
Now you can insert an OSL node anywhere in your node setup by clicking Add -> Script and selecting the name of your text editor buffer in the drop down.

#define A 0.86602540378443864676372317075294 // sqrt(3)/2
#define A2 (2*A)
#define A4 (4*A)
#define SY (1/A)

shader hexagons(
    color Diffuse_Color1 = color(0.2, 0.8, 0.2),
    color Diffuse_Color2 = color(0.8, 0.2, 0.2),
    color Diffuse_Color3 = color(0.2, 0.2, 0.8),
    vector Coordinates = 0,
    output color Color = 0,
    output int Index = 1,
    output float Distance = 0)
{
    // calculate the color
    
    color colors[3] = {Diffuse_Color1,
                       Diffuse_Color2,
                       Diffuse_Color3};   
 
    // we warp the grid so that two adjacent equilateral triangles
    // are mapped to two triangles that fit in a square
    float syc = Coordinates[1] * SY;
    float sxc = Coordinates[0] + 0.5 * syc;
 
    int ind[18] = {1,1,3,3,3,1, 2,2,2,3,3,3, 1,2,2,2,1,1};
 
    int iy = int(mod(syc,3.0));
    int ix = int(mod(sxc,3.0));
    ix = iy * 6 + ix * 2 + ( mod(sxc,1.0) > mod(syc,1.0) );    
 Index = ind[ix];
    Color = colors[Index-1];    
 
    // calculate the distance to the center of the hexagon
       
    float sx = mod(Coordinates[0],3);
    float sy = mod(Coordinates[1]+0.75,A4); 

    // map everthing to a single quadrant
    if ( sx > 1.5 ) sx = 3 - sx;
    if ( sy > A2 ) sy = A4 - sy;
    
    // the distance were interested in is the distance to 
    // the *closest* center point 
    float d1 = distance(vector(sx,sy,0),vector(1.5,A2,0));
    float d2 = distance(vector(sx,sy,0),vector(0,A,0));
    float d6 = distance(vector(sx,sy,0),vector(1.5,0,0));
        
    Distance = min(min(d1,d2), d6);
 
}
The code is a generic shader, i.e. its output color does not take any lighting calculations into account and a more familiar way to refer to such a shader would be a custom texture or pattern. Obviously you can plug its calculated color into a diffuse shader for example but you could also combine it with other textures.
The shader has 3 different colors as input parameters and a coordinate. Its outputs are not only a color, but also an integer color index and the distance to the center of the hexagonal cell. The latter can be used for all sorts of displacement tricks while an index is usefull if you want to change not just the color of a cell but use a completely different texture or shader for each cell.
The noodle for the colorful cube looks like this (click to get a better view):
The noodle for the chickenwire like material looks like this:

Future steps

In the next article I will probably focus on implementing a scales pattern that can either be used for fish scales or roof tiles (shingles).

A brand new blog about Blender

Hi

This is the first post in this new blog. The intention is that it is focused on the extension and customization possibilities of Blender. Now that the Open Shading Language is available for Blender (at least in the daily builds), extending Blender takes on a whole new dimension and in the coming months I hope to provide you with some decent general purpose shaders written in OSL.