Add-ons and more

Gears 2.0 (work in progress), a Blender addon


Update: version 0.0.2 now supports out of line gears and is available from GitHub

Update: version 0.0.3 now supports worm gears and helical gears and is available from GitHub. Note that when you create a worm gear (by choosing a low number of teeth and a large helical angle, e.g. 4 and 360) you have to manually fiddle to get a fitting driven gear, automatic calculation is on my list but with 20 minutes a day (see aside) there's only so much you can do :-)
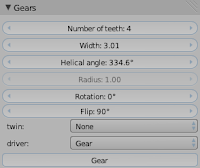

Note the two new parameters: helical angle, which is the amount of twist around the axis, and flip, which is the rotation around the axis of the gear train. The latter s needed because a driven gear is at 90 degrees relative to a worm gear.


A long time ago I wrote an addon for Blender 2.49 to create gears or cogwheels. It works quite well and it even is included as part of Blenders bundled scripts. Over the years it was maintained by other developers so it still works for Blender 2.68.

Recently Brendon Murphy (meta-androcto) asked me to look into the Gears script to resolve some bugs and while working on another plugin (the floorboard generator) I started thinking about completely redesigning the script. The most important issues prompting this redesign were:
Bmesh
When the script was written, Bmesh support in Blender was not even a glimmer of an idea so the code that creates the actual geometry isn't exactly elegant. Redesigning for Bmesh not only makes for cleaner code but is also a personal incentive to learn more about this Api, which isn't always completely documented (return values from operators are often dictionaries with all kind of geometry information yet the different values they contain are often not described in full) but which is both powerful (supporting complex operations like duplication and extrusion) and fast (implemented in C/C++, Python is just a thin wrapper).
Parameterization
When I was working on the floorboard generator Marcatore showed me a design by DragonLee to make options persistent. The original gears addon suffers from the same affliction as many other addons in that once the object is created you cannot easily tweak it. You can of course manually alter the mesh but the option sliders are gone from the toolbar as soon as the mesh is manipulated in any way. What we really want is the possibility to tweak the options even after saving and reloading the .blend and this exactly what DragonLee's method makes possible, paving the way for truly parametric objects.
Animation suport
Configuring a rig or drivers to let one cogwheel drive a bunch of other cogwheels is not that simple and rather time consuming. So the new design should feature drivers and keyframes that allow for instant animation, which then of course may be adapted to your specific needs.
User friendliness
Many addons are not written with user friendliness in mind and I am guilty of this sin as well. There are basically two solutions to this problem (and they can be used in parallel): One, use your own addon extensively, asking yourself with each mouseclick if it is necessary and with each option you introduce if its description is clear and relevant, and two, interact with the community, for example on Blenderartists. Ask what features they miss and ask explicitely how usability might be improved. Do this early on, not when your script is almost finished, although it should already be quite usable when you introduce it, otherwise no one will try it out.
With those considerations in mind I present you:

Gears 2.0, a work in progress

The script is discussed on this thread on Blenderartists, feel free to comment there. It also has its own entry in Blenders upload tracker.
The code is available from GitHub, install it in the usual way from

File->User preferences->Addons->Install from file and don't forget to check the checkbox to actually activate it.

Workflow

The workflow in general is very simple:
  • Add the first gear that will drive the rest of the mesh with Add->Mesh->Add Gear
  • Locate the Gears panel in the modifiers tab of the properties
  • Add as many gears as you need by clicking Gear (the button at the bottom of the panel)
  • Select each gear in turn and alter its properties as needed
At this point you will have an animated gear train. You can step through the frames to see it move. At the location of the first gear is a spherical empty (called GearHeadEmpty) which can be moved and rotated to position the whole gear assembly in any way you like.
To recreate the gears in the opening image/video go through the following steps:
Add the first gear
Click Add->Mesh->Add Gear
Add four additional gears
Click Gear four times in the Gears panel in Modifiers tab of the Properties
Give the first gear 20 teeth
Select the first gear and adjust the Number of teeth to 20
Give the second gear 6 teeth
Select the second gear and adjust the number of teeth like you did for the first gear
Give the third gear 20 teeth
Just like the first and second gears
Give the fourth gear 6 teeth
Should be familiar by now
Give the fifth gear 20 teeth
You should be able to do this with your eyes closed by now :-)
Twin the second gear to the first
Select the second gear and choose Up from the Twin dropdown. The gear will move to the location of first gear, slightly shifted along the z-axis and its animated rotation will be identical to that of the first gear, all as if both gears are connected to the same gear axis.
Twin the fourth gear to the third
Select the fourth gear and choose Up from the Twin dropdown like you did for the second gear.
Done!
Step through the frames or press ctrl-A to see the gear assembly move.

Road map (provisional)

Whatever will be developed depends of course on the feedback I get but my personal list features the following items (in no particular order):
  • rotate gear out of line, to allow a more varied placement of the gears
  • parameterization of tooth (size, margin, angle)
  • parameterized depth, taper and twist (to make conical and helical gears)
  • spokes + axes
  • uv-map
  • material slots w. simple cycles material.[gear, spoke, axis]
  • worm gear?

Generate floor boards quick and easy, part VI

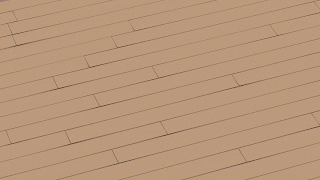
This version (0.0.8) of the floor board generator adds options to add twists and hollow curvature to the individual planks. This is useful when creating floors in older houses and its more subtle simply rotation planks. All the options are now visually grouped as well to aid the user in locating related options.


An example (with a flat material to emphasize the subtle curvature) is shown below (click to enlarge):

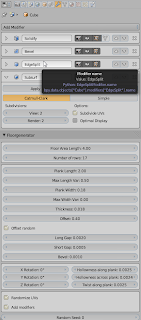
The option values used to create the image are shown in the next image. Note that for illustrative purposes we made the gaps between the planks quite large:

Parameterization

The biggest change in this version was already visible in the image above: parameters no longer appear in the toolbar but in the FloorBoards section of the modifier options. This is not only a visual change but it actually means that even after savinf the .blend file all relevant parameters are retained along with the abject and can be tweaked at any time. (Thanks floric for the code adaptation and DragonLEE for the original idea)

Generate floor boards quick and easy, part V

This version (0.0.7) of the floor board generator adds options to add small random rotations to the individual planks. This is useful when creating floors in older houses. All the options are now visually grouped as well to aid the user in locating related options.

An example (with exaggerated values for the rotations) is shown below (click to enlarge):

The option values used to create the image are shown in the next image. Note that for illustrative purposes we made the gaps between the planks and the random rotation values quite large:

Generate floor boards quick and easy, part IV

In a previous post I added some extra functionality to the floor board generator and based on user feedback and code contributions there are now some more options:

  • the offset can now be random for each individual row of planks (thanks Alain for your contribution)
  • adding modifiers is now optional (but on by default)
  • adding random offsets to the uv-map for each plank is now optional (but on by default)

Code availability

This new version (0.0.6) is available for download from GitHuband is tracked in the Blender extensions tracker as well.

Random Vertex Colors, a simple addon

In a previous article I presented an addon to generate a floor board with individual planks. Each individual plank was adorned with a random vertex color that can be used to create materials with random color variations for each face.

When working with the Ivy Generator recently I wanted this same feature and indeed my own space tree addon could benefit from this as well, because just like IvyGen it generates a single mesh object with a face. for each leaf. So I decided to separate this functionality from the floor board generator so it can be used in different situations.

Once the addon is installed it can be used on any mesh object when in vertex paint mode as shown below:

It will replace the vertex colors of the active vertex color layer with colors that are random but equal for each face. In Cycles vertex colors can be accessed with an attribute node, an example node setup can be found in the article on the floor board generator referred to at the start of this article.

Code availability

All functionality of this add-on plus a lot more is now available as a convenient all-in-one add-on on BlenderMarket. It comes with an extensive PDF manual and your purchase will encourage me to develop new Blender add-ons.

The simple code shown in this article is available for download at GitHub and is uploaded to the upload section of Blender extensions tracker so if you find bugs you may post them there as well.

[2016 Feb 7] The version currently in GitHub is much faster for large meshes because it uses Numpy. Check this article to see why.

Voronoi playtime, some Cycles OSL secrets

This article now has a follow up that shows how to implement different distance metrics.
Members over at BlenderArtists wondered what it would take to get the diversity of voronoi textures back in Cycles which are present in Blender Internal. Well, the functionality is available but hidden in an OSL include file, so it takes a very simple OSL script node to get at it.
The example below is a Voronoi Crackle textures (basically the distance to the second closest point minus the distance to the closest point):

The node setup for this image is shown below.

Code

The code is quite simple. It utilizes the node_texture.h include distributed with Blender. Its outputs are the distances to the four closests points.
#include "node_texture.h"

shader Crackle(
  point p = P,
  output float Fac1 = 0,
  output float Fac2 = 0,
  output float Fac3 = 0,
  output float Fac4 = 0
){
  float da[4];
  point pa[4];

  voronoi(p, "Distance Squared", 0, da, pa);
  
  Fac1 = da[0];  
  Fac2 = da[1];  
  Fac3 = da[2];  
  Fac4 = da[3];  
}
Mind you, there is a lot more in the include (it is in the scripts\addons\cycles\shader directory of you Blender distribution), it even sports a voronoi_Cr function which does more or less the same as the node setup below, but this node is a bit more versatile for your experimentation :-) The only drawback is that we cannot define anything in the make up of the node ohter than its input and output sockers, so it is not possibly to define a nice drop down with for example distance metrics in OSL. (We could use an integer socket to switch, but that feels clunky).

Example node setup

The image at the start of this post was created with the following node setup:


Generate floor boards quick and easy, part III, vertex colors

A member at BlenderArtists really wanted to apply a random material to each individual plank. Now Cycles can generate a unique random number for each object but not for each face within an object so another trick was needed. I therefo , added a vertex color layer with a unique color for each plank. Vertex color layers may be accessed from Cycles with an attribute node as shown in the node setup below:

In the example we use the color directly but of course it can be treated as a random value to control some specific material property ad well, that is left as an exercise for the reader.

Code availability

The code is available on GitHub but as I hope to promote it to the Contrib repository one time, it's also in the Blender upload tracker.

Irregular stone patterns in OSL, a first attempt

On the BlenderArtists forum a member was analyzing irregular stone walls and posed the interesting question: does this resemble a tree pattern and can it be done in OSL? Quite a lot of thinking and tinkering is needed for a full solution put in this post we explore some of the basic requirements.

Irregular stone patterns


A sample pattern with primary colors, Mondrian eat your heart out :-)
The sample image shows that we have generated a pattern consisting of rows with different heights, each consiting of stones of varying width. Additionally, some stones within a row are further split horizontally. The code to generate the pattern is shown below:
shader stones(
  point p = P,
  vector Scale = 1,
  float w = 0.02,
  float s = 2,
    
  output float Fac = 0
){
  point Pos = p * Scale;
  
  float bot = floor(Pos[1]-1)+cellnoise(Pos[1]-1);
  float lev = floor(Pos[1])+cellnoise(Pos[1]);
  float top = floor(Pos[1]+1)+cellnoise(Pos[1]+1);

  if( Pos[1] < lev ){
    Pos[0] += s*cellnoise(Pos[1]);
  }else{
    Pos[0] += s*cellnoise(Pos[1]+1);
  }
  float left = floor(Pos[0]-1)+cellnoise(Pos[0]-1);
  float mid = floor(Pos[0])+cellnoise(Pos[0]);
  float right = floor(Pos[0]+1)+cellnoise(Pos[0]+1);
  if( 
    ((Pos[0] > left+w) && ( Pos[0] < mid - w )) 
    || 
    ((Pos[0] > mid+w ) && ( Pos[0] < right - w))
  ){
    if( 
      ((Pos[1] > bot+w) && ( Pos[1] < lev - w )) 
      || 
      ((Pos[1] > lev+w ) && ( Pos[1] < top - w))
    ){
      int stoneindex=0;
      float seeda = left;
      float seedb = bot;
      float bounda = mid;
      float boundb = lev;
      
      if( Pos[0] > mid ){ stoneindex += 2; seeda = mid; bounda = right; }
      if( Pos[1] > lev ){ stoneindex += 1; seedb = lev; boundb = top; }
      int pattern = (int)floor(cellnoise(seeda,seedb)*4);
      if( pattern == 0 ){
            // horizontally halved
            float nlev = (seedb + boundb)/2;
            if( (Pos[1] > nlev - w) &&  (Pos[1] < nlev + w) ){
              Fac = 0;
            } else {
              Fac = cellnoise(vector(seeda,seedb,Pos[1]>nlev));
            }
      } else {
        Fac = cellnoise(vector(seeda,seedb,-1));
      }
    }
  }
}
(The code is also available on GitHub.)

Sample node setup

The example image at the top of this article was made with the following node setup (click to enlarge)
:

Further work

Obviously we need more sub patterns for the individual stones and add some distortion to the underlying coordinates to make really random stones. It would probably also be a good idea to vary the spacing between the stones and use the output value to drive displacement and bump maps and the code could certainly do with a bit of cleanup but I thinks this approach is at least shows promiss.

Generate floor boards quick and easy, part II

In a previous article I presented a simple script to generate floor boards with real geometry. Since then I enhanced this with an option to generate uv coordinates as well, with a random offset for each individual plank. This option not only relieves the user of the need to create a uv map but the random offset will break the unwanted illusion that all planks are perfectly sawn from a single endless pices of wood.

The image in the example on the left (click to enlarge) was generated with the wood shader presented earlier but similar effects can be obtained by applying a tiled image (which of course should not depict planks already), for example PlywoodNew0050 from CGTextures would work nicely I think.

The updated script (version 0.0.3) is available from GitHub and is tracked in the Blender Bug Tracker as well. Version 0.0.3 also has its hard limits on plank length etc. removed. The are replaced by soft limits so if you want you can make planks shorter than 50cm or narrower than 10cm by explicitly typing in a value.

A new tree addon part VII: tweaking leaf UVs

Now that the addon is in Blender's Contrib repository I thought it was time to start acting on some of the feedback from the BlenderArtists thread.

This release contains two minor improvements:

  • rotated UV-maps for the leaves and
  • an option to set the offset of the leaves from the twigs
Previously the UV-maps that were generated for the leaves were rotated. Because most alpha mapped leaf image textures feature leaves with the tip at the top and the stem at the bottom this rotated arrangement was often counter intuitive.

Depending on the image that you use as a leaf texture it might be useful to be able to control the point where the leaves are joined to the twig. This offset is now provided as an option slider in the leaves section. Note that even if this offset is zero the leaf plane might still be intersected by a twig. This happens when the branches are skinned with Blender's skin modifier (instead of the native skinning method).Before this skin modifier the addon adds a subsurface modifier which has the effect of cutting corners. Choosing a smaller internode distance and removing this subsurface modifier will prevent this unwanted intersection but in most cases (I.e. with enough leaves) this probably won't be noticeable anyway.

Book review: Blender 2.6 Cycles: Materials and textures cookbook

Last week I had the opportunity to read the Cycles materials and textures cookbook and it proved to be a worthwhile read.

The author, Enrico Valenza, is an experienced and professional Blender user so a book by him is certainly worth checking out. The book presents some thirty shaders in a cookbook style and offers many insights in the Cycles rendering system not limited to specific materials. Although a cookbook implies that you can use the recipes as they are presented, the techniques that are offered in the book will get you a lot further than that and will help you develop skills necessary to develop your own materials because of the very detailed way their implementation is described.

pros

thorough,
each material is described in step-by-step detail and pretty much every avaible Cycles node is featured somewhere and both node groups and frames are covered as well,
comprehensive,
both materials based on textures and materials based on procedural noise are covered and the all important concept of layering increasingly fine detail to get realistic textures is featured quite some times,
interesting
some materials feature mainly as a means to illustrate a concept but many materials are quite good and some are even excellent, my favorites are the sponge texture, the leather texture and the ancient bronze texture.

cons

  • the introductory chapter on how to set up Cycles and where to find stuff isn't all that clear. This isn't necessarily the author's fault because sometimes the Blender interface can be overwhelming. Maybe this is one of those situations where a video tutorial is useful,
  • the resolution of the illustrations is way to low. If you try to zoom in the lettering of the node labels isn't readable. And yes, high resolution versions of those illustrations are available for download but that detracts from the reading experience a lot.

Conclusion

Nice and thorough book to get you started on creating materials for Cycles, the e-book versions are certainly worth your money in my opinion (personally i think that twice the price for a print version is over the top but of course there will always be people who prefer the genuine touch of paper :-)