Add-ons and more

Blender addon: visible vertices part III: bug fixes

A couple of weeks ago I presented a small addon that created a vertex group with weights that depend on the visibility of the vertex from the camera. This can be quite useful if you want to restrict particles to areas where they are actually visible, which will reduce render time and memory consumption and in a folow-up article I showed some new features. The addon was wel received but did contain a annoying bug which is fixed in this new version: vertices that were far enough behind the camera received weight as well; this is now fixed. I also disabled numerous print statements accidentally left in for debugging purposes.

Availability and usage

All functionality of this add-on plus a lot more is now available as a convenient all-in-one add-on on BlenderMarket. It comes with an extensive PDF manual and your purchase will encourage me to develop new Blender add-ons.

Version 0.0.3 of the simple add-on shown in this article is available from GitHub (right click the link to download the script somewhere then install it from Blender with File -> User Preferences -> Addons -> Install from file. Don't forget to enable the check box and don;t forget to remove any previous version from you addon directory).

Once installed it's available in weight paint mode from the Weights menu.

The addon might also be discussed in this BlenderArtists thread.

Blender Addon: Weight paint vertices visible from the active camera, part II: distance weights and more

A couple of weeks ago I presented a small addon that created a vertex group with weights that depend on the visibility of the vertex from the camera. This can be quite useful if you want to restrict particles to areas where they are actually visible, which will reduce render time and memory consumption.

The addon did take into other objects in the scene that could block the view but there was room for improvement. The first new feature in this version is that the weight of the visible vertices diminishes with the distance from the camera. For a field of grass particles you often can do with less particles at a greater distance without destroying the apparent density so this helps in cutting down the number of particles even further.

The second addition is the option to add a margin around the camera frame. Some extra particles just outside the camera view might be needed to prevent a sparse edge and to allow shadows from outside the view.

The final extra is the addition of a vertex weight edit modifier. Probably one of the lesser known modifiers, this nifty tool allows us to tweak vertex weights after the are calculated. The addon itself for example decreases the weight linearly with distance but if you want it to fall off in a different way this can be done quite easily by tweaking the curve in the modifier.

All these new options are on by default and the addon even makes sure the vertex weight modifier is visible in the properties panel just to draw some attention to it.

Example

The image below shows the generated weights falling of with the distance to the camera and with some extra margin selected:

Availability and usage

All functionality of this add-on plus a lot more is now available as a convenient all-in-one add-on on BlenderMarket. It comes with an extensive PDF manual and your purchase will encourage me to develop new Blender add-ons.

Version 0.0.2 of the simple add-on shown in this article is available from GitHub (right click the link to download the script somewhere then install it from Blender with File -> User Preferences -> Addons -> Install from file. Don't forget to enable the check box).

Once installed it's available in weight paint mode from the Weights menu.

The addon might also be discussed in this BlenderArtists thread.

Settling of particles in suspension with Blender and OSL

Playing with volumetrics I wanted to approximate the effect of the settling of suspended particles from a fluid, like what happens when you leave a glass of orange juice standing for too long. The idea is that there is some region near the bottom of the glass that has a dense mass of settled particles and that in the beginning the diminishing density towards to surface is not all that visible but get clearer with time.
Of course this could be implemented with math nodes but I find it far simpler to write it all down in OSL and condense the logic in a single script node. The result shown below is admittedly not the animation that will get nominated for the next Academy Award but does show nicely the slow settling I had in mind, including the effect that near the end the fluid seems to clear up quicker:

OSL code and node setup

The node is simple enough:
shader edgedecay(
    point Pos    = P,
    float Edge   = 0.1,
    float Power  = 1,
    float Density= 10,
    float Length = 1 - Edge,
    
    output float Fac=Density
){
    float h = Pos[2];
  
    if(h>Edge){
        float d = (h - Edge)/Length;
        if(Power > 0 && d < 1){
            Fac = Density * ( 1 - pow(d,Power));
        }else{
            Fac = 0;
        }
    }
}
The node setup for the videoclip is:

The Density input was animated from 2.7 to 3.5 in 100 frames, while at the same time the Power input was animated from 1.0 to 0.0.
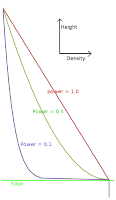
The following graph shows the plot of the density profile with relevant parameters:

If you would like to know more about programming OSL you might be interested in my book "Open Shading Language for Blender". More on the availability of this book and a sample can be found on this page.

OSL support in mainstream renderers (V-Ray and Renderman)

Things are getting interesting now that more major players start supporting OSL. This week Pixar announced the support for OSL in Renderman and a few months ago Chaosgroup released a version of V-Ray with OSL integration.

Not all integrations are equal, for example the one in Renderman doesn't appear to support closures (bsdf's), but nevertheless, now there is a huge potential to share programmatical patterns and textures between V-Ray, Renderman and Blender. I am quite exited and can't wait to see how this will foster the reuse of shaders across platforms. To illustrate the portability: some of the shaders provided as examples on the V-Ray page work on Blender without a single change, while others need some tweaks, mainly because each renderer provides its own set of closures (for eaxmple, Blender does not have the phong() closure) and more importantly, the output model is not identical: the V-Ray shaders don't provide closure outputs, but simply assign to the Ci variable, something that on Blender has no effect.

If you would like to know more about programming OSL you might be interested in my book "Open Shading Language for Blender". More on the availability of this book and a sample can be found on this page.

Blender Addon: Weight paint vertices visible from the active camera

When working with particles it is often a waste of resources to distribute the particles outside the area visible from the camera. Fortunately the particle distribution can be controlled by a vertex group but weight painting the visible area by hand is a bit cumbersome. I therefore created a simple script that offers the option to paint the vertices of a mesh in the active vertex group with a weight of one if they are visible from the camera and zero otherwise. With a toggle switch you can select whether objects in the scene should be taken into account as well.

Availability and usage

All functionality of this add-on plus a lot more is now available as a convenient all-in-one add-on on BlenderMarket. It comes with an extensive PDF manual and your purchase will encourage me to develop new Blender add-ons.

The simple add-on presented in this article is available from GitHub (right click the link to download the script somewhere then install it from Blender with File -> User Preferences -> Addons -> Install from file. Don't forget to enable the check box).

Once installed it's available in weight paint mode from the Weights menu as shown below:

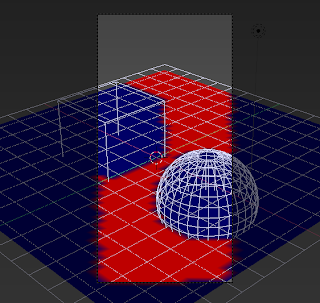
Simply select the mesh you want to paint, switch to weight paint mode and click Weights -> Visible Vertices. It will adjust the weights of the active vertex group and if the mesh hasn't got one, a new vertex group will be added. If you toggle the Full Scene option (in the VisibleVertices tab of the toolbar, you might need to press control-T to show it) objects in the scene might block the view as well as shown in the image below, where a cube and a sphere are shown in wireframe mode to reveal that blocked portions of the plane have been assigned a weight of zero.


The add-on was presented in this BlenderArtists thread.