Add-ons and more

Height to vertex weights, a Blender addon

In a previous article I presented a small script that could create a vertex group or vertex color layer with values representing the slope of faces in a mesh. The script in this article is its companion: it creates a vertex group with values representing the height (sorry no vertex color equivalent yet). I decided to make it a separate addon to keep code maintenance a bit simpler.

version 0.0.2 is now available and gives you the same possibilities as vertex colors instead of vertex weights. If you have installed the script you can find this new functionality under Paint->Height.

Terrain modelling

The script was created with terrain modelling in mind. You might for example want to distribute plants based on the height of a landscape mesh as shown in the (rather crude I admit) image below:
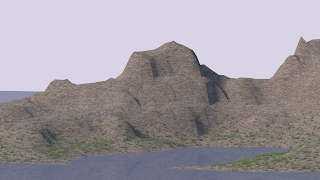
The image was created with a mesh from the ANT landscape generator to which a vertex group was added with the height addon (in weight paint mode, in the 3dview with Weights->Height). The result was this weight map:
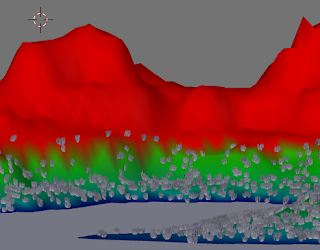
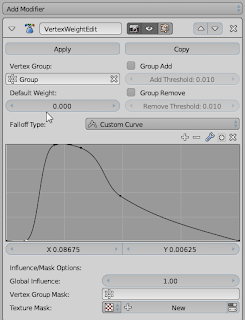
Because i wanted the grass particles to be more dense at lower altitudes, I tweaked the weights in the resulting vertex group with a vertex weight edit modifier with the following settings:
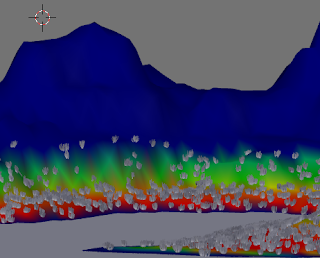
The resulting map (shown below) was then used a density map for my particle system:
Options

The scripts replaces the weights in the active vertex group to weights that represent the height or creates a new vertex group is necessary. After installation it is available in the 3dview in weight paint mode under Weights->Height It maps the chosen coordinate (x, y or z-axis) to a weight, which will be 1.0 for the largest value encountered and 0.0 for the smallest. These coordinate values are interpreted in either object (local) space or world (global) space. If the the Absolute checkbox is checked negative coordinates will be treated as positive. The mapping from [minimum,maximum] coordinate to [0,1] weight is normally linear, but may be influenced with the Power property. After mapping any values less dan Low will be set to 0, any values larger dan High will be set to 1

Code availability

All functionality of this add-on plus a lot more is now available as a convenient all-in-one add-on on BlenderMarket. It comes with an extensive PDF manual and your purchase will encourage me to develop new Blender add-ons.

The simple script shown in this article is available from GitHub and has an entry in Blenders upload tracker. There is also a BlenderArtists thread for discussing it.
Slope to vertex weights, a Blender addon part II

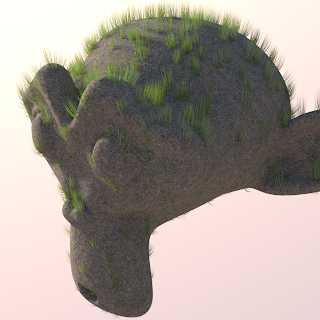
The addon's functionality was enhanced with a mirror option, to treat 'negative slopes', like those on the underside of a sphere in the same manner as positive slopes. This makes it for example possible to grow stuff on flat parts on the underside of an object while still not growing anything on the steep side as shown in the image of Suzanne (Rock material by Rasmus Seerup). Note that the default Suzanne has a ninety degree rotated mesh, so I had to rotate her in edit mode to get the slope information I needed)

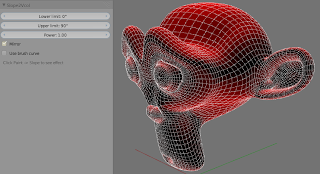
The vertex paint variant was enhanced with the option to map the calculated slope through the brush curve. This allows you the ultimate control of the weights assigned to the slope values. (Note that have to click Paint -> Slope everytime you alter the brush curve, I haven't found a way to give immediate feedback. Also the weight paint variant of this addon (which produces vertex weights instead of vertex colors and is available in weight paint mode from Weights -> Slope) does not offer this functionality itself because it is already possible to add a Bevel Weight Edit Modifier to modify vertex weights).

Code availability

All functionality of this add-on plus a lot more is now available as a convenient all-in-one add-on on BlenderMarket. It comes with an extensive PDF manual and your purchase will encourage me to develop new Blender add-ons.

The simple code shown in this article is available from GitHub snd discussed on this BlenderArtists thread. It is also followed in the Blender upload tracker. The brush curve functionality is only available for builds >= 60054 so you will have to wait for a new Blender release or build your own/download the daily build if you want to use it. The script checks for the release number so it won't crash if you have an older release.

Gears 2.0 (work in progress), a Blender addon, part IV

As you can see version 0.0.4 adds an option for an internal gear. It is a very slight enhancement, just 4 or 5 lines but it makes it possible to create the setup shown in the clip in a few seconds.

Planetary gear workflow

  • Add the first gear from the add mesh menu
  • Add the second gear from the gears panel in the modifier tab by clicking the 'Gear' button,
  • Select the first gear again and add another planet gear; use the rotation option to position it relative to the central gear,
  • Repeat the previous step for any additional planet gear,
  • Select one of the planet gear and add the outer gear. Select the 'Internal' option from the type drop down,
  • Adjust the number of teeth for any of the gears to taste,
  • Set some rotation keyframes for the gearhead empty to make the whole setup rotate a bit,
  • Done ;-)

Slope to vertex weights, a Blender addon

As usual I enjoyed Andrew Price's tutorial on creating a cliff side quite a bit. Andrew is gifted when it comes to creating interesting Blender tutorials. However, he's first and foremost an artist. That is not meant to sound negative in any way but I observed that his solution to distributing grass along the cliff face's less steep parts was a laborious affair. Each suitable spot needed to be painted by hand.

Now this gives you ultimate control over the placement of grass tufts but wouldn't it be easier to just generate weights for a vertex group with a single clip? Of course it would and the end result can always be tweaked in weight paint mode if you would like to do so. So I wrote a small script.


The grass was done with a simple particle system that has its density set to a vertex group generated with the script.

It very much resembles my random vertex colors script so most of the work was copy and paste except for the few lines in the execute function.

The workflow is simple: after you have installed the script in the usual way, select your object and make sure you are in object mode. Then in the 3d view select Slope to vertex group from the object menu and your done.

The result is that the weights of the active vertex group have been replaced with a value representing the slope (or to be more precise the angle between the vertex normal and the object z-axis). A weight of one will be equal to a flat portion, while 0.5 will equal to a perfectly vertical part. Zero is a flat portion that is upside down. (I might change this behavior and add some options to influence the mapping range)

Code availability and discussion

All functionality of this add-on plus a lot more is now available as a convenient all-in-one add-on on BlenderMarket. It comes with an extensive PDF manual and your purchase will encourage me to develop new Blender add-ons.

The simple code shown in this article is available on GitHub and has it's own entry in Blenders upload tracker. Any comments are welcome, you might prefer this Blenderartists thread instead of this blog.