I generally present stuff in a back-to-front manner: first an article with some (well commented) code and images of the results, then one or more articles discussing the concepts. The idea is that this encourages you to experiment and have a look at the code yourself before being introduced to theory. How well this works out we will see :-)
So far the series consists of the several articles labeled ray tracing concepts
The effect we want to achieve is illustrated in the two images below where the green sphere on the right had some specular reflectance. Because of this it shows highlights for the two points lamps that are present in the scene.
The icosphere shows faceting because we did not yet anything to implement smooth shading (i.e. interpolating the normals across a face) but with added some smooth subdivisions to show off the high lights a bit better.
In the image below we see that we also look at the hardness of the specular reflections in our shader model, with a high value of 400 giving much tighter highlights than the default hardness of 50.
In both images the red cube has no specular intensity and the blue one has a specular intensity of .15 and a hardness of 50.
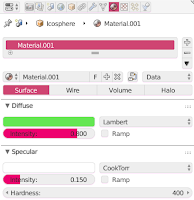
Specular color, specular intensity and hardness are properties of a material so we have also exposed the relevant panel to our custom renderer so that the user can set these values.

Code
The code changes needed in the inner shading loop of our ray tracer are limited:if hit:
diffuse_color = Vector((0.8, 0.8, 0.8))
specular_color = Vector((0.2, 0.2, 0.2))
mat_slots = ob.material_slots
hardness = 0
if len(mat_slots):
diffuse_color = mat_slots[0].material.diffuse_color \
* mat_slots[0].material.diffuse_intensity
specular_color = mat_slots[0].material.specular_color \
* mat_slots[0].material.specular_intensity
hardness = mat_slots[0].material.specular_hardness
... identical code left out ...
if not lhit:
illumination = light * normal.dot(light_dir)/light_dist
color += np.array(diffuse_color) * illumination
if hardness > 0: # phong reflection model
half = (light_dir - dir).normalized()
reflection = light * half.dot(normal) ** hardness
color += np.array(specular_color) * reflection
We set reasonable defaults (line 2 - 5), override those defaults if we have a material on this object (line 6 - 11) and then, if we are not in the shadow, calculate the diffuse component of the lighting as before (line 16 - 17) and the finally add a specular component (line 18 - 21)For the specular component we use the Phong model (or actually the Blinn-Phong model). This means we look at the angle between the normal (shown in light blue in the image below) and the half way vector (in dark blue). The smaller the angle the tighter the highlight. The tightness is controlled by the hardness: we raise the cosine of the angle (which is what the dot product is that we compute in line 20) to the power of this hardness. Note that the half way vector is the normalized vector that points exactly in between the direction of the light and the camera as seen from the point being shaded. That is why we have a minus sign rather than a plus sign in line 19 because dir in our code points from the camera towards the point being shaded.


No comments:
Post a Comment