3D printing an H0 scale stone bridge
On my layout I wanted to have something different than the many stock models availabel from the big brands so I decided to design and print them myself. The actual printing will be done by Shapeways and currently I am working on finalizing the design of the model. The rough version is shown below:
It is already good to print (which I verified first with the 3D printing tools and then by uploading it to Shapeways) but it needs some tweaking, mainly in the form of randomizing the stones. Maybe I'll add some kind of ornament to the cap stone.
Chaos mosaic with OSL
(I used a 700x700 tileable texture from CGtextures.com (Gravel0170_3_S.jpg) repeated four times in each direction on the upper right plane, and the same image with the chaosmosaic shader on the lower left plane)
Shader code
The shader code to implement this is very short:
shader chaosmosaic(
  point Pos=P,
  string Image="",
  int M=10,

  output color Color=0
){
  float x,y;

  x=mod(Pos[0],1);
  y=mod(Pos[1],1);

  float xi=floor(x*M);
  float yi=floor(y*M);

  // mapping here
  float xp=noise("cell",Pos,xi*M+yi);
  float yp=noise("cell",Pos,xi*M+yi+M*M);

  float xoffset = mod(mod(x,1.0/M)+xp,1);
  float yoffset = mod(mod(y,1.0/M)+yp,1);
  Color = texture(Image,xoffset,yoffset);
}
In the code above M is the number of squares in each direction in our uv map. We use it to calculate two indices (xi, and yi) that are subsequently used pick a random position in the texture (xp,yp). The pixel from the texture is then selected according to the relative offset in the small square inside the uv map (xoffset, yoffset). The original algorithm also uses a blending function between adjacent tiles form the textures but that will blur the image. In this case we didn't implement that because from far enough away the small tile edges aren't noticable but the large scale repetion has gone away so with very little code we already have a better result. Example node setup
The node setup used for the example image (the plane on the lower left) looks like this:
reference
- http://en.wikipedia.org/wiki/Texture_synthesis#Chaos_mosaic
- http://research.microsoft.com/apps/pubs/?id=69770 (the research paper)
[Non Blender] Python 3 Web Development Beginner's Guide for free
Free e-books at Packt
I was a bit late in noticing it but so far they have given away some pretty interesting titles so it might be a good idea to check it out for more to come...
Basket arch with given width and height
In a previous article I showed a simple addon to create a basket arch with a given width. This update adds the possibility to set the height as well. A height of 0 will give you the classic basket arch and it will silently ignore width/height ratios > 4 or < 2 (in which case it will revert to a classic arch).
For width/height ratios close to 1.0 the fit isn't perfect and although I followed the instructions on ThisIsCarpentry.com (pdf) closely the curves for the classic arch and the one with known height are not exactly the same although to be honest I not 100% sure what to expect. It might also be due to numerical inaccuracies.
In the end you might be better of scaling the arch in the z-direction.
The previous article contains source code link and installation instructions.
open shading language for blender: promotion
This promotion is valid until 5 december, with promotion code UE42Z.
Enjoy!
Addon: Creating a basket arch in Blender: better symmetry
You can install it in the usual way:
File->User preferences->Addons->Intall from file. Don't forget to check the 'enable addon' box. It will the be available from the Add Mesh menu in the 3D view.If you already installed the first version do not forget to remove the old version firs:
File->User preferences->Addons->Add Mesh->Basket arch->Remove
www.swineworld.org now points to blenderthings.blogspot.com
In a couple of days any visitors to blenderthings.blogspot.com may find themselves suddenly redirected to www.swineworld.org, so don't worry if you see something unexpected. The blog itself will of course not be affected and I will continue to publish articles there quite frequently.
Addon: Creating a basket arch in Blender
Recently I was thinking about a visualization of some rooms in our house. These rooms were once separate but the wall has been broken through and the arch between them has a very specific form: a basket arch, aka three centered arch. This is a form widely used not only indoor but also for example for many 17th century bridges and is not entirely trivial to construct as it involves matching three circle segments at their tangents. So I constructed a small addon to create basket arches ;-)
Availability and possible improvements
The addon is available on GitHub. You can install it in the usual way: File->User preferences->Addons->Intall from file. Don't forget to check the 'enable addon' box. It will the be available from the Add Mesh menu in the 3D view.
The addon constructs what is called a classical three centered arch, that is you can only choose the width while the height has then a fixed proportion. It might be a good idea to add the variant where you can also specify the height, which will give a squeezed arch that is has not quite the same shape as a classical arch that is scaled in the z-direction.
Currently the vertices in the arch a distributed with more or less even spacing along the circle. Because we use the angle along a circle segment the last vertex may or may not touch the ground. This is however hardly visible and since I intended this addon for visualization rather than CAD I thought i good enough. I might fix it though in the near future.
Full book review: Blender 3D Basics Beginner's Guide, second edition
_cov.jpg)
Blender 3D Basics Beginner's Guide, second edition
The first impressions on reading the first edition of this book were that it was well written and the second edition doesn't change that. The writer clearly has thought about how to present the reader with projects that provide a smooth learning curve. No details are left out and animation, not just modeling and rendering, is a focal point from page one.
While reading the book you clearly get the feel you are getting somewhere. Many easy to follow steps guide you through subjects like camera work, animating, rendering a final compositing and the book even touches on that all important point of animation: telling a story. At the end the reader will be able to create a small animated movie (even in anaglyphic 3d!).
It helps of course that for almost every small step sample files are available for download and the pdf version of the ebook is in color, a necessity for books about graphics in my opinion (although the .mobi version read just fine on my Kindle)
The second edition doesn't add much in terms of content but it is updated for Blender 2.7, which is nice. It still doesn't cover character animation, (which is an advanced subject, but something about armatures would have been nice, even for non-character animation), while texturing, especially UV mapping, is still hardly touched upon. Cycles, the Blender's new render engine, gets a little bit more coverage now but not as much as it deserves. I don't think this is a major issue though: thousands of fine animations have been made with Blender's internal renderer and thousands will be.
Conclusion: This is an excellent book for Blender novices. Reading this book gives the aspiring Blender animator the biggest chance of actually finishing something instead of leaving the reader with some boring technical experiments.
Selecting from property lists in Blender addons
prop_search(). What this poorly documented function does is putting a widget in the layout of your addon that lets the user select an item from a property list that is part of an object the name of which subsequently assigned to a property on another object.
That may sound a bit cryptic at first but say you want to let the user choose a vertex group on the active object and store the name of this chosen vertex group in a string property. Then all you have to do is to define that property in your operator and
call prop_search() in the draw() function:
vertexgroup = StringProperty(name="Vertex group")

def draw(self, context):
    layout = self.layout
    # get the mesh data of the active object
    ob = context.active_object.data
    # display a vertex choice widget that assign to our string property
    layout.prop_search(self, "vertexgroup", ob, "vertex_groups", text="Vertex Group")
It automatically assigns a proper icon as well:
This works for basically anything that is a
bpy.types.bpy_prop_collection, like objects in a scene or vertex groups in mesh data. There's also a prop_enum() that lets you select an item from a enumerated property. book review: Blender 3d basics beginners guide - second edition
A long time ago I reviewed the first edition and my impression then was quite positive. Character animation however was not covered and uv mapping and cycles were underrepresented so I am curious whether these subjects are better covered in this new edition.
Stay tuned for a full review.
DryStone: create irregular stone walls, uvs and random vertex colors
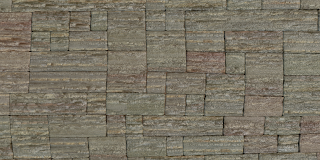
(The texture used in the image was RockSediment0105_1_L.jpg from CGTextures)
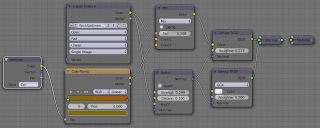
The node setup used for the image looks like this:
Availability
The updated addon is available from GitHub.WeightLifter - Vertex Group Tool, bugfix release
Of course, no serious piece of software is completely without bugs so I updated the addon a few hours ago. Version 20141018 contains a few small bugfixes and removes a limitation that could lead to crashes when assigning random weights to groups of connected vertices on large meshes (Thank you Wybren for reporting this).
DryStone: create irregular stone walls
It's been a while but I haven't been completely idle during the holiday season: In this post I am happy to present a small Blender addon that creates walls of irregular stacked stones.
Inspired by the walls of the castles at Conwy and Beaumaris this addon aims to produce irregular walls, resembling the ones shown below.
For quite some time Blender users have known the excellent masonry addon but I wanted irregular walls (and a proving ground for serious bmesh programming).
The addon offers a number of controls to tweak the appearance that should be quite self explanatory. It's available from GitHub and discussed in this BlenderNation thread. Download it and select File->User Preferences->Addons->Install from file to install it and it will then be available in the Add->Add mesh menu in the 3D view.
The mesh that is created consists of separate n-gons and the depth is provided by a solidify modifier topped by a bevel modifier. Currently you will have to do the uv-unwrapping yourself. The image at the start was created with a procedural stone texture.
Interested in a professional add-on to capture all kinds of mesh characteristics into vertex groups or vertex colors? Then have a look at my WeightLifter addon on BlenderMarket. (In the first image it was used to quickly assign a random vertex color to each block to vary the coloring and bump mapping for each separate block).
Floor board generator, using a floor plan
I have started on the support for a floor plan, i.e. restricting the generated planks to some outline. This feature is very much a work in progress but it is already useable:
It works by adding and applying a boolean modifier to the generated floorboards.
The current [updated] workflow is like this:
- select your floor plan, make sure it is flat, has a number of faces selected and the face normals pointing up:
- position the 3D cursor just outside the bottom left corner of the floor plan
- choose Add -> Mesh -> Add floor board mesh
- adjust the number of planks and their length (in the modifier tab!)
- select 'use floorplan' and select your floor plan mesh
For those who find a video easier to understand, here's a short screencast of the workflow:
Code availability
You can download version 0.0.15 form GitHub to try out this new functionality. If you already installed a previous version don't forget to remove the old version before installing the new one. (You can remove an old version by deleting the file planks.py from your Blender addons directory (on Windows typically in C:\Users\<your user name>\AppData\Roaming\Blender Foundation\Blender\2.71\scripts\addons )
Known issues
The sides of the planks are currently not properly uv mapped, something that may show when large gaps are used.Previous articles on the floor board addon
The development and use of this addon is documented in several earlier articles:Part I initial version
Part II random uv-coordinates
Part III random vertex colors
Part IV additional options
Part V randomization
Part VI small enhancements
It is also extensively discussed in this BlenderArtists thread.
EnumProperty callback problems - a better workaround
import bpy
from bpy.props import EnumProperty

available_objects = []

def availableObjects(self, context):
 available_objects.clear()
 for ob in bpy.data.objects:
  name = ob.name
  available_objects.append((name, name, name))
 return available_objects

class TestCase(bpy.types.Operator):

 bl_idname = "object.testcase"
 bl_label = "TestCase"
 bl_options = {'REGISTER', 'UNDO'}

 objects = EnumProperty(name="Objects", items = availableObjects)
if we hover the mouse over the second or third option we see that the description shows garbage, i.e. the description part of another item! 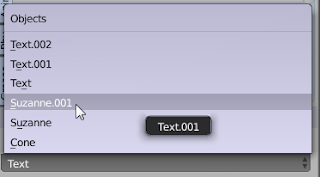
The really annoying part is that even if we make a full copy of the object's name (with
ob.name[:]) the problem isn't solved. So probably the internal callback code trashes memory even outside its own allocated memory. def availableObjects(self, context): available_objects.clear() for ob in bpy.data.objects: name = ob.name[:] # a copy, not just a reference available_objects.append((name, name, name)) return available_objectsA way around this is to let the callback just return a list that is filled with values outside the callback code, for example in the code thst is executed when the user clicks on the menu item that selects the addon:
available_objects = []

def availableObjectsInit(self, context):
 available_objects.clear()
 for ob in bpy.data.objects:
  name = ob.name[:] # a copy, not just a reference
  available_objects.append((name, name, name))
 return available_objects

class TestCase(bpy.types.Operator):

        ... stuff omitted ...

 objects = EnumProperty(name="Objects",
                    items = lambda self,context: available_objects)


def menu_func(self, context):
 availableObjectsInit(self, context)
 self.layout.operator(TestCase.bl_idname,
                             text="TestCase",icon='PLUGIN')

def register():
 bpy.utils.register_module(__name__)
 bpy.types.VIEW3D_MT_object.append(menu_func)
This is usable even if the addon changes the number of objects. The only downside is that the code isn't reentrant because in its present form does not guard thread access to the global variable but as far as I know the Blender UI runs as part of a single Python interpreter so there's only one thread, which renders this point moot. The other issue is that it looks ugly, but as long as it works that's a minor issue :-) Note: you might wonder why we need the lambda here but that's because if we would point to just the list here, the list would be empty at the point where the EnumProperty was defined and apparently it makes a copy of that list so it would stay empty.WeightLifter - My first BlenderMarket addon
The addon combines a lot functionality in a single comprehensive addon. There's a tutorial online as well, demoing the most eyecatching features and I hope it will be useful to not just ArchViz people!
Update: there is now an update available that fixes a crash that could happen when assiging random weights to groups of connected vertices in large meshes.
A hexagon shader in OSL, second edition
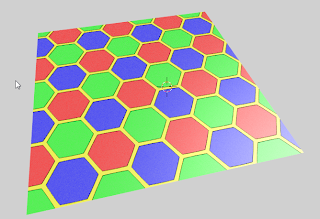
The noodle used to create the image is shown below (click to enlarge):

The color code has stayed the same except for the calculation of the distance to the edge. This might be a bit inefficient, but at least it's easy to read.
The additions are shown below, the full code is available on GitHub.
    // distance to nearest edge

    float x = mod(Coordinates[0]/3,1.0);
    float y = mod(Coordinates[1]/3,A2);

    #define N 18
    vector hc[N] = {
        vector(  0, -A2/3     ,0),
        vector(  0,     0     ,0),
        vector(  0,  A2/3     ,0),
        vector(  0,2*A2/3     ,0),
        vector(  0,  A2       ,0),
        vector(  0,4*A2/3     ,0),

        vector(0.5, -A2/3+A2/6,0),
        vector(0.5,     0+A2/6,0),
        vector(0.5,  A2/3+A2/6,0),
        vector(0.5,2*A2/3+A2/6,0),
        vector(0.5,  A2  +A2/6,0),
        vector(0.5,4*A2/3+A2/6,0),

        vector(1.0, -A2/3     ,0),
        vector(1.0,     0     ,0),
        vector(1.0,  A2/3     ,0),
        vector(1.0,2*A2/3     ,0),
        vector(1.0,  A2       ,0),
        vector(1.0,4*A2/3     ,0)
    };

    float d[N], t;

    for(int i=0; i < N; i++){
        float dx = x - hc[i][0];
        float dy = y - hc[i][1];
        d[i] = hypot(dx, dy);
    }

    for(int j= N-1; j >= 0; j--){
        for(int i= 0; i < j; i++){
            if(d[i] > d[i+1]){
                SWAP(t, d[i], d[i+1]);
            }
        }
    }

    Center  = d[0];
    Edge    = d[1] - d[0];
    InEdge  = Edge < Width;
The approach we have taken is very simple: the hc enumerates all nearby hexagon centers. We then calculate all the distances to these points and sort them shortest to longest (yes with a bubble sort: with 18 elements it might just be faster to do it with a more efficient sorting algorithm at the cost of much more complex code so I don't bother). The
Edge is not realy the distance to the closest edge but the difference between the closest center and the next closest. Near the edge these values are more and more the same so Edge will approach zero. For convience we provide a comparison with some threshold also. Inheritance and mixin classes vs. Blender operators
recently I was working on an addon that would offer functionality both in weight paint mode and in vertex paint mode. There were slight differences in functionality of course so I needed two operators but I wanted to keep most of the shared code in a single mixin class.
Sharing member functions was easy enough using a mixin class but for some reason for properties this didn't work. Any property I put in the mixin class was not accessible from the derived classes. What was happening here?
However, if I didn't derive the mixin class from
class mixin(bpy.types.Operator):
  foo = FloatProperty()
  def oink(self): pass

class operator1(mixin):
  def execute(self, context):
    self.oink()  # ok
    bar = self.foo  # error :-(
bpy.types.Operator all was well ... So what is happening here? Sure in the first scenario both the mixin and the derived class inherit from bpy.types.Operator but that shouldn't be a problem is it? after all, Python's inheritance model supports the diamond pattern.
class mixin:
  foo = FloatProperty()
  def oink(self): pass

class operator1(bpy.types.Operator, mixin):
  def execute(self, context):
    self.oink()  # ok
    bar = self.foo  # ok too :-)
The answer to this riddle is hidden in Blender's source code, quote:
So upon creating an instance of a class that is derived from bpy.types.Operator only the class itself and any base classes that are not derived from Blender types are searched for properties. This will reduce needless traversal of base classes that do not define properties themselves and avoid duplicate searches in cases where there is a diamond pattern but it sure is confusing.
/* the rules for using these base classes are not clear,
 * 'object' is of course not worth looking into and
 * existing subclasses of RNA would cause a lot more dictionary
 * looping then is needed (SomeOperator would scan Operator.__dict__)
 * which is harmless but not at all useful.
 *
 * So only scan base classes which are not subclasses if blender types.
 * This best fits having 'mix-in' classes for operators and render engines.
 */
It does make sense though: instantiation of operators should be as cheap as possible because instantion happens each time a screen area with the operator controls is redrawn! And this can add up: merely moving your mouse can result in tens of instantiations.
So the moral of this story? Sure it's awkward, especially while it's not well documented, but it is an understandable design choice. There is one serious drawback though; if you have the mixin and your operators in the same file you cannot use register_module() because that function tries to register all classes even the mixin class and that will fail.
conclusion
When using inheritance with bpy.types.Operator derived classes and you want to define properties in a mixin class make sure that:
- the mixin class does not derive from
bpy.types.Operator, - the final classes do derive from
bpy.types.Operator(and from the mixin of course), - you don't use
register_module()but useregister_class() for each operator separately (but do not register the mixin)
Blender addon: Assign random vertex colors to connected vertices
Prompted by a request in this BlenderArtists thread I created a small add-on that assigns random vertex colors to regions with connected vertices. 
The image shows a single object consisting of several cubes. within each cube all vertices are connected and therefore get the same (but random) color.
Code availability
All functionality of this add-on plus a lot more is now available as a convenient all-in-one add-on on BlenderMarket. It comes with an extensive PDF manual and your purchase will encourage me to develop new Blender add-ons.
The code for the functionality shown in this article is available on GitHub. use File -> User preferences ... -> Addons -> Install from file to install it and don't forget to enable the check box. It will then be available in the Paint menu in Vertex Paint mode.
For discussion you might want to check here
Blender addon: visible vertices part III: bug fixes
A couple of weeks ago I presented a small addon that created a vertex group with weights that depend on the visibility of the vertex from the camera. This can be quite useful if you want to restrict particles to areas where they are actually visible, which will reduce render time and memory consumption and in a folow-up article I showed some new features. The addon was wel received but did contain a annoying bug which is fixed in this new version: vertices that were far enough behind the camera received weight as well; this is now fixed. I also disabled numerous print statements accidentally left in for debugging purposes.
Availability and usage
All functionality of this add-on plus a lot more is now available as a convenient all-in-one add-on on BlenderMarket. It comes with an extensive PDF manual and your purchase will encourage me to develop new Blender add-ons.
Version 0.0.3 of the simple add-on shown in this article is available from GitHub (right click the link to download the script somewhere then install it from Blender with File -> User Preferences -> Addons -> Install from file. Don't forget to enable the check box and don;t forget to remove any previous version from you addon directory).
Once installed it's available in weight paint mode from the Weights menu.
The addon might also be discussed in this BlenderArtists thread.
Blender Addon: Weight paint vertices visible from the active camera, part II: distance weights and more
A couple of weeks ago I presented a small addon that created a vertex group with weights that depend on the visibility of the vertex from the camera. This can be quite useful if you want to restrict particles to areas where they are actually visible, which will reduce render time and memory consumption.
The addon did take into other objects in the scene that could block the view but there was room for improvement. The first new feature in this version is that the weight of the visible vertices diminishes with the distance from the camera. For a field of grass particles you often can do with less particles at a greater distance without destroying the apparent density so this helps in cutting down the number of particles even further.
The second addition is the option to add a margin around the camera frame. Some extra particles just outside the camera view might be needed to prevent a sparse edge and to allow shadows from outside the view.
The final extra is the addition of a vertex weight edit modifier. Probably one of the lesser known modifiers, this nifty tool allows us to tweak vertex weights after the are calculated. The addon itself for example decreases the weight linearly with distance but if you want it to fall off in a different way this can be done quite easily by tweaking the curve in the modifier.
All these new options are on by default and the addon even makes sure the vertex weight modifier is visible in the properties panel just to draw some attention to it.
Example
The image below shows the generated weights falling of with the distance to the camera and with some extra margin selected:
Availability and usage
All functionality of this add-on plus a lot more is now available as a convenient all-in-one add-on on BlenderMarket. It comes with an extensive PDF manual and your purchase will encourage me to develop new Blender add-ons.
Version 0.0.2 of the simple add-on shown in this article is available from GitHub (right click the link to download the script somewhere then install it from Blender with File -> User Preferences -> Addons -> Install from file. Don't forget to enable the check box).
Once installed it's available in weight paint mode from the Weights menu.
The addon might also be discussed in this BlenderArtists thread.
Settling of particles in suspension with Blender and OSL
Of course this could be implemented with math nodes but I find it far simpler to write it all down in OSL and condense the logic in a single script node. The result shown below is admittedly not the animation that will get nominated for the next Academy Award but does show nicely the slow settling I had in mind, including the effect that near the end the fluid seems to clear up quicker:
OSL code and node setup
The node is simple enough:
shader edgedecay(
    point Pos    = P,
    float Edge   = 0.1,
    float Power  = 1,
    float Density= 10,
    float Length = 1 - Edge,

    output float Fac=Density
){
    float h = Pos[2];

    if(h>Edge){
        float d = (h - Edge)/Length;
        if(Power > 0 && d < 1){
            Fac = Density * ( 1 - pow(d,Power));
        }else{
            Fac = 0;
        }
    }
}
The node setup for the videoclip is: 
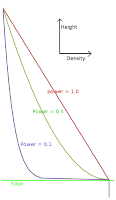
The Density input was animated from 2.7 to 3.5 in 100 frames, while at the same time the Power input was animated from 1.0 to 0.0.
The following graph shows the plot of the density profile with relevant parameters:
OSL support in mainstream renderers (V-Ray and Renderman)
Things are getting interesting now that more major players start supporting OSL. This week Pixar announced the support for OSL in Renderman and a few months ago Chaosgroup released a version of V-Ray with OSL integration.
Not all integrations are equal, for example the one in Renderman doesn't appear to support closures (bsdf's), but nevertheless, now there is a huge potential to share programmatical patterns and textures between V-Ray, Renderman and Blender. I am quite exited and can't wait to see how this will foster the reuse of shaders across platforms. To illustrate the portability: some of the shaders provided as examples on the V-Ray page work on Blender without a single change, while others need some tweaks, mainly because each renderer provides its own set of closures (for eaxmple, Blender does not have the phong() closure) and more importantly, the output model is not identical: the V-Ray shaders don't provide closure outputs, but simply assign to the Ci variable, something that on Blender has no effect.
If you would like to know more about programming OSL you might be interested in my book "Open Shading Language for Blender". More on the availability of this book and a sample can be found on this page.
Blender Addon: Weight paint vertices visible from the active camera
When working with particles it is often a waste of resources to distribute the particles outside the area visible from the camera. Fortunately the particle distribution can be controlled by a vertex group but weight painting the visible area by hand is a bit cumbersome. I therefore created a simple script that offers the option to paint the vertices of a mesh in the active vertex group with a weight of one if they are visible from the camera and zero otherwise. With a toggle switch you can select whether objects in the scene should be taken into account as well.
Availability and usage
All functionality of this add-on plus a lot more is now available as a convenient all-in-one add-on on BlenderMarket. It comes with an extensive PDF manual and your purchase will encourage me to develop new Blender add-ons.
The simple add-on presented in this article is available from GitHub (right click the link to download the script somewhere then install it from Blender with File -> User Preferences -> Addons -> Install from file. Don't forget to enable the check box).
Once installed it's available in weight paint mode from the Weights menu as shown below: 
Simply select the mesh you want to paint, switch to weight paint mode and click Weights -> Visible Vertices. It will adjust the weights of the active vertex group and if the mesh hasn't got one, a new vertex group will be added. If you toggle the Full Scene option (in the VisibleVertices tab of the toolbar, you might need to press control-T to show it) objects in the scene might block the view as well as shown in the image below, where a cube and a sphere are shown in wireframe mode to reveal that blocked portions of the plane have been assigned a weight of zero.
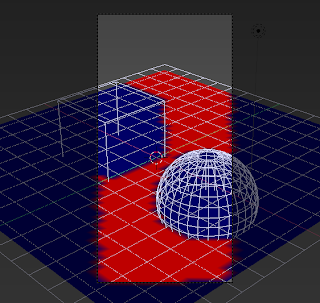
The add-on was presented in this BlenderArtists thread.
Spacetree demo
Credits: apart from many assets from the Architecture Academy, Blendswap proved useful too:
- rose by dansafee (the blooms but the rose bush itself was made wih IvyGen and the rose leaves are based on a scan of a roseleaf I made myself)
- wine glasses by danilius (modified to hold some wine)
- small candle by elkid (inside the blue jar)
Floor board generator, bug fix
The current version (0.0.13) fixes this and is commited to GitHub.
You can download it here (right click the link and save it to the addons directory of your Blender installation).
A new tree addon, Part VII: an all C implementation
As indicated in this BlenderArtists post I have started developing a version of the space tree addon with most of the core calculations performed by C code.
Currently most functionality is available except for apical control and pruning but a 4x speed up (approximately, your mileage may vary) is worth it. This version is at the moment only available for 64bit Windows platforms (because it was difficult enough already to get that running with Visual Studio 2012) and unlike the previous C enhancements there will be no fallback on pure Python.
Code availability
This version is developed in its own branch, 'all_c' and the installation follows the exact same pattern as for other addons (don't forget to remove any older version). The zipfile is located here. As of May 2, 2014, this is linked against the 3.4 Python library as shipped with the Blender dailt build. If you use a slightly older version of Blender you might want to use the previous commit that was linked against 3.3.
The (almost) pure Python version stays available in the master branch, the zip file for this version is located here.
Future developments
I am thinking about making a Linux version available but that's not high on my priorities. If someone is willing to compile the module however I can include it with the addon. I think it is entirely possible to have a csca.pyd and a csca.so side-by-side. Having different .so files for Linux and OSX is something else, that would require tweaking the Python imports based on the OS type.
The current speed improvements only apply to the generation of the tree skeleton. I think the same improvement should be possible for native skinning algorithm. Also, there is yet no optimization of the C code and no multithreading, so we might improve the speed even more.
Another area of interest that I am currently spending time on is creating good leaf textures. Even with a decent flatbed scanner this is not trivial, yet now that spring is in full gear in my hemisphere I have started on cherry, apple and oak leaves.
References
The space tree addon itself is introduced in a few articles on this blog and is available on GitHub. Relevant links are listed below:A new tree addon, part VI: continuing development
The latest version (0.2.14) includes a module written in C that implements some of the most time consuming functions. The result is a 20 - 30 % speedup for the generation of the branch skeleton. For now this is only available for 64 bit windows but on a different platform the addon will fall back on pure python implementations of these functions so cross platform portability is still guaranteed.
This is a quite noticable speedup: on my machine the generation of a tree consisting of 3000 branch segments went from 3.7s to 2.7s.
Implementation notes
The C extension module was compiled with Visual Studio 2013 and seems to work fine both with the official 2.70 distribution (compiled with MSVC 2008) and with the daily builds (compiled with MSVC 2013) but will only work with 64 versions of Blender. The Visual Studion solution is part of the spacetree repository so if people are interested in porting the module to other platforms they can have a go. Detailed notes on how to compile a native Python extension with Visual Studio 2013 were published in a separate article.
Undocumented stuff
This version of the addon also contains a first try at the implementation of branch shedding.
References
The space tree addon itself is introduced in a few articles on this blog and is available on GitHub. Relevant links are listed below:Native Python extensions for Blender with Visual Studio 2013
Researching how to create a python module in C with Microsoft Visual Studio 2013 which could be used in Blender caused me quite a few headaches so in order to spare other people the same I wrote this article that illustrates the process in a step-by-step manner. The resulting solution is available on GitHub as well.
Prerequisites
When writing native extensions for Python it is said that it is vitally important to use exactly the same compiler that was used to compiler Blender itself (or rather its embedded Python). This is especially important on Windows where even different versions of Visual Studio may break compatibility. However, I have found that Visual Studio 2013 can be used to compile an extension that is usable both for Blender version compiled with msvc2008 and msvc2013.
Currently the daily builds for Blender are built with Visual Studio 2013. This can be verified by opening Blender and generating the system information from Help -> System Info. In the generated text file (available in the text editor) the line with the Python version should read something like: ...... 1800 64 bit .... The 1800 part is the interesting bit as it identifues the version of Visual Studio, where 1800 means MSVC 2013.
The official Blendet 2.70 release for windows is still built with MSVC 2008 (the version string in the system info will show 1500) but I have found no compatibility issues, but of course your mileage may vary. It is however extremely important to match the platform: a 64 bit extension will only work for 64 bit Blender!
Writing an extension module in C
Starting point when writing an extension is this page. It's a fairly complete but lengthy introduction and its content is platform independent. To actually compile C code into a dynamic library that can be used on Windows additional information is needed. Unfortunately some information on this page is wrong or incomplete (/export:initexample is not needed, the dll needs a .pyd extension) and as there are quite a few confusing steps it might be easier to have all the steps explicitely listed for our Blender scenario.In the following walkthrough I'll assume that Blender is installed in C:\Blender and that we'll be using MVSC 2013 express edition for Desktop. I also assume you have checked out the Python library that Blender is built with, to C:\BlenderLibraries. We need the source for these libraries for the Python.h include files. (you can checkout these libraries with any subversion client from svn.blender.org, see here for instructions. Make sure you get the 64 bit versions if you are compiling for a 64 bit platform and notice that the folder is called win64_vc12 even though we'll be using msvc 2013)
Ten easy steps
The following steps are needed to create a simple extension. each step is explained in detail below.
- Create a new DLL project
- Add a new x64 platform if necessary
- Configure the extension to use
- Configure the include directory
- Configure the library directory
- Add the library dependencies
- Add your source code
- Build the project
- Copy the library to the Blender installation
- Test it from Blender
Create a new DLL project
- file->new project
- templates->Visual C++->Win32->Win32 Project
- name: BlenderTest (can be placed anywhere, leave all default settings)
DLL and Empty project. Add a new x64 platform if necessary
i=If you are working on/for a 64-bit platform you'll need to add a x64 platform to your solution.
- click on the configuration manager [below the menu bar in the task bar]
- add a new active platform [click on the part that probably displays Win32]
- select x64 and leave all the default settings
Configure the extension to use
Although a native extension is just a DLL, Python wants it to have a .pyd extension:
In the properties of the BlenderTest project
for all configurations set
Configuration properties -> General the Target extension to .pyd
Configure the include directory
The compiler needs to be able to find the Python.h include file.
for all configurations
Configuration properties -> C/C++ -> General Add 'C:\BlenderLibraries\win64_vc12\python\include\python3.3' to Additional Include directories
Configure the library directory
The Python libraries need to found as well:
for all configurations
Configuration properties -> Linker -> General Add 'C:\BlenderLibraries\win64_vc12\python\lib' to Additional Library directories
Add the library dependencies
Each configuration is dependent on a different library:
for the Debug configuration
Linker -> Input Add 'python33_d.lib' to Additional Dependencies
for the Release configuration
Linker -> Input Add 'python33.lib' to Additional Dependencies
Add your source code
in the Solution explorer, right click the Source Files folder in the BlenderTest project and slect add -> new item. Choose C++ file and give it BlenderTest.cpp as its name (although you're free to choose anything you want)
Copy the example code (you might want to use this) in the editor
build the solution (a warning about an inconsistent dll linkage of round can be ignored)
Build the project
Select the release configuration and click Build -> Build Solution
The module will be in the subfolder BlenderTest\x64\Release and be called BlenderTest.pyd
Copy the library to the Blender installation
Copy BlenderTest.pyd to somewhere where Blender can find it, for example to the site-packages directory within Blenders installation directory (e.g. C:\Blender\2.70\python\lib\site-packages)
Test it from Blender
open the python console in Blender
import BlenderTest
BlenderTest.foo()
The System console (Window -> toggle system console) should show 'Hello World'
Book review: Blender Cycles Rendering and Lighting
Pros
- cookbook style with many examples
- thorough coverage of all things Cycles
- gentle learning curve
- some really great materials (especially carpaint and food)
- addresses lighting as well
- plenty of relevant external references
Cons
- could do with some detail renders of the individual materials
- doesn't cover volume shaders
The Cycles rendering engine has been available for some time now in Blender but it is still hot because it enables the artist to produce great results. However, its many options can overwhelm a person just starting out, so Bernardo's cookbook is a blessing both for beginners as well as for more accomplished artists.
The book is well written and covers almost everything from basic node setups to very complex ones, including subsurface scattering nodes and script nodes (It doesn't cover writing shaders in the Open Shading Language, for that you might consider my book Open Shading Language for Blender). The illustrations of the node setups are also very clear and although the book's style is a cookbook, the reasoning behind the creation of the materials is often explained as well which really helps to understand why the materials are set up the way the are.
I also like that the is a fair amount of information on lighting because now matter how good your materials are, without proper lighting your render won't shine. The book presents some useful lightning setups and covers both mesh lighting and HDRI lighting quite well.
The criticisms I have are minor indeed: the book doesn't cover the new volume shaders but this is of course not a fault of the author. Cycles evolves at a rapid pace and at the time of writing volume shaders were not yet available.
Also it would have been clearer of some of the many materials presented in this book would have closeup example renders; now there is just a larger overall render of a scene at the beginning of each chapter which doesn't show the smaller details very well. Of course the sample scenes are available to the reader so you can render them yourself but it would have made for an easier read.
All in all I really enjoyed reading this book and in my opinion it is one of the better ones on Blender published so far.
Conclusion
A well written book that delivers what it promises. Well worth its money.A critical remark to all publishers
I read the pdf version of the book and potential buyers really should consider that too because the printed version is in black-and-white.When will publishers realize that this kind of book should be printed in color or nit at all? Monochrome paper prints simply cannot convey the information presented in colorful illustrations very well and books on rendering are all about color!
So either invest in proper color plates as the print version already is quite expensive or just stick to e-book formats.
A new tree addon, part V: bug fixes and user contributions
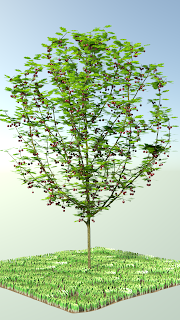
Vitamins are good for you
BlenderArtists member Piet not only contributed a new bark material that adds the impression of snow lying on the branches but also provided a collection of several fruits: Apples, pears, plums, peaches, cherries as well as mistletoe and a birds nest. Thank you Piet! Now all we need is leaf materials to go with these fruits. I'll try to source some Creative Commons leaf textures but now that spring is getting underway (at least here in the Netherlands) I might create some of my own.Bug fixes
This release also features some bug fixes: If you were using groups of objects to shape a crown and an object within this group wasn't a mesh object, the addon would throw an exception. Likewise, if you had an object selected before creating a tree, an exception was thrown if this object didn't have an edit mode (like the camera or an empty).Observations
- The bundled library is getting quite big, I am thinking about zipping it and uncompressing it on the fly.
- The fruit objects (and the leaves as well) are not positioned perfectly (Most of the time they do not quite connect to a branch). I'll have to check if there origins are set correctly or if we need something else (fruit tree for example grow their fruits generally on small protrusion called spurs)
- It might be sensible to add more than one object group from the library (for example acorns and mistletoe)
References
The space tree addon itself is introduced in a few articles on this blog and is available on GitHub. Relevant links are listed below:A new tree addon, Part IV: volume rendering experiments with OSL
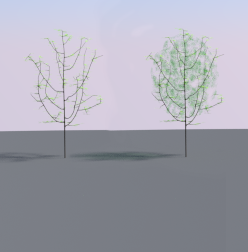
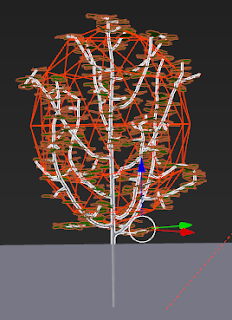
This effect was achieved by inserting a scaled icosphere that covers about 90% of the crown interior (see below) and adding a volume shader to this icosphere that scatters and absorbs light in a non-uniform manner, i.e. the shader mimics a bunch of small scattered disks, which when seen from the distance add to the illusion of leaves. Note that we cannot do without all the leaves because volume scattering adds no specular reflections as real leaves might do.
Shader code and example node setup
The code for this shader consists of the shader proper, which merely checks which randomly scattered point we are closest to and then calls theindisk function with the position of this closest point and a random direction. indisk checks whether we are inside a disk with its axis in some direction and returns 1 if this is indeed so. Note that the include at the start of the code refers to a file that is distriubted with Blender and contains a number of useful functions, including a number of Voronoi/Worley related ones.
#include "node_texture.h"

int indisk(
  point p,
  point c, float r, float h, vector d
){
  vector v = p - c;
  float a = dot(v,d);
  float lh = abs(length(a * d));
  if(lh > h){ return 0;}
  float lv = length(v);
  float lp = sqrt(lv*lv - lh*lh);
  if(lp > r){ return 0;}
  return 1;
}

vector randomdirection(point p){
  float t = M_2PI*noise("cell",p,1);
  float u = 2*noise("cell",p,2)-1;
  float s,c,a;
  sincos(t,s,c);
  a = sqrt(1-u*u);
  float x = a*c;
  float y = a*s;
  float z = u;
  return vector(x,y,z);
}

shader bits(
  point Pos = P,
  float Scale = 1,
  float Size = 1,
  float Height = 0.05,

  output float Fac = 0
){
  point p = Pos * Scale;
  point centers[4];
  float distances[4];
  voronoi(p, "Distance Squared", 0, distances, centers);
  if(indisk(p,centers[0],Size,Height,randomdirection(p))){
    Fac = 1;
  }
}
The node setup to use this shader as seen in the opening image of this article looks like this: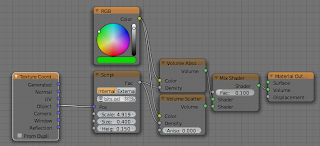
Discussion
Whether using a volume shader this way is really useful remains to be seen: rendering this way is still rather slow. Of course, getting a comparable dense crown with extra particles also slows down rendering: in my tests doubling the number of particles from 1000 to 2000 resulted in a render time that was actually slower than adding the volume shader. In other words, your mileage may vary but it might be worth to experiment.References
The space tree addon itself is introduced in a few articles on this blog and is available on GitHub. Relevant links are listed below:Book review: Blender compositing and post processing
Blender compositing and post processing by Mythravarun Vepakomma.
pros
- complete and concise reference of all compositor nodes
- very clear illustrations explaining each node
cons
- very few pages (about 100, not counting fringe content like index and front matter)
- very few task oriented examples, just a short example of each node
I have mixed feelings about this book. Clearly the author knows his stuff and he sure knows how to make clear illustrations that explain each individual building block very well. However the book hardly offers any step by step walkthroughs for more complex, real world tasks. And solving complex tasks by stringing together node networks that each solve a particular task is what Blender's compositor excels at.
So the book is a fine reference but would have offered much more value for money if it had shown for example how to composite an actor in front of a green screen onto background footage from start to finish, including solutions for problems like uneven lighting of the green screen, masking hair, matching color, coping with reflected light, etc. and not just the simple demonstration of tbe alpha over node's options.
Conclusion: not a bad reference, produced quite well but I'm left with the feeling it could have been a lot more.
OSL Bevel Shader
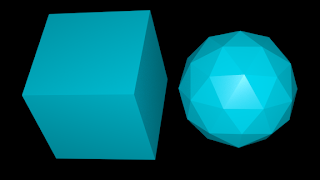
Sample scene, just a cube and an icosphere with sharp edges and some glossy material.

The effect of the bevel shader with
Perturb = 0.1. Subtle but clearly noticable.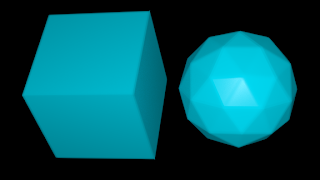
Setting
Perturb = 1.0 is far less subtle but shows how much roundedness is possible. All images were produced with Divisions = 3, i.e. 27 sample rays (see below). Code & theory
To simulate rounded edges choose a point a little below the surface and from this point we cast a set of rays that are all a little bit perturbed from the normal. The we determin the normal at these new intersections and average all normals found. This way when we are close to an edge the normals at the intersection with an adjacent face will be blended in. The illustration below shows what I mean: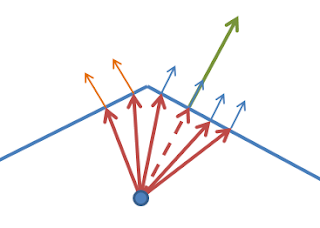
At the shaded point we have a green surface normal. We descend below the surface along this normal (dashed red line) to the blue point. From this point we shoot rays (red) that are slightly perterbed from the normal. Some will hit the same face (and have the same normal as the shaded point (small blue arrows) some will hit the adjacent face with adifferent normal (small orange arraws). The calculated normal is the average of the normals at the hit points.
Note that this algorithm only works well for convex edges, because with concave edges random faces could be hit instead of the adjacent face if the angle between the faces is too sharp.
The code implementing this algorithm is pretty short:
#define BIG 1e6

shader edge(
  float Delta = 0.01,
  float Perturb = 0.001,
  int Divisions = 2,
  output float Fac = 0,
  output normal Normal = N
){
  vector origin = P-Delta*N;
  float count = 1;
  for(int x=0; x < Divisions; x++){
    for(int y=0; y < Divisions; y++){
      for(int z=0; z < Divisions; z++){
        vector d = noise("perlin",vector(x+0.1,y+0.1,z+0.1));
        vector np = N + Perturb * d;
        if(trace(origin, np)){
            float hdb = 0;
            normal nb = 0;
            getmessage("trace","hitdist",hdb);
            // versions before 2.69.11 4-Mar-2014 crash on next statement
            getmessage("trace","N",nb);
            Normal -= nb;
            count += 1.0;
        }
      }
    }
  }
  Normal = normalize(Normal/count);
  Fac = count/(1+Divisions * Divisions * Divisions);
}
We choose an origin point a bit below the surface by descending along the normal [line 10], generate perturbed normals [line 15-16], trace these normals [line 16] and if we have a hit we retrieve the normal at the hit point [line 22]. Because we are below the surface/ inside the mesh this normal will point inward so we subtract it from our sum of normals (Normal). Finally we divide the sum of normals by the number of hits [line 30]. Note that we also get the hit distance [line 20] but don't use that value. We could check this againt some limit to reduce artifacts on concave meshes for instance.The generation of perturbed normals is rather awful: just perturbing it by Perlin noise does not give a very uniform distribution of directions, some Halton or Sobel sequence would probably be better but this will do for now. Also not we add a small value too our noise sampling points to avoid the zeo knots in the Perlin noise.
Also note that I got crashes with Blender's daily build version before March 4 (win-64 version) when using the
getmessage() function. This appears to be fixed in the latest builds but be aware.Example node setup
Note that the node does not take a position or normal as input, it gets those from the globalP and N respectively but of course if necessary this can be changed quite easily. The setup shown below is the exact setup used for the example images at the start of the page.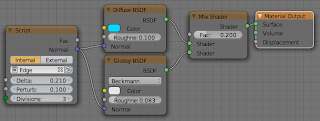
A new tree addon, Part III: development continues
The latest version (0.2.10) adds a particle system with acorns to the library (not because it is briliantly modelled but to show an example usage) and adds a shadow density option if you use a shadow group (because no shadow is absolute). I also added an option to change the size of the faces of the emitter mesh. That way leaves and other objects can be made to sit closer to the branches.
Version (0.2.9) of the spacetree addon features cleaner code, the posibility to add two particle systems and an update to the bundled library: it now features a particle system of chestnut leaves as well as an additional bark material. I have also reordered the options in the UI to a somewhat more logical groouping and I am working on an update to the user manual (old version is still available, concepts discussed there are still valid)
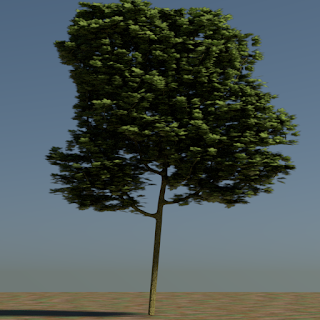
Sample image of a tree with the chestnut leaf particle system. The crown was shaped with a crown group consisting of just a couple of icospheres.
References
- Part I (contains updated road map)
- Part II
- Download and installation instructions (on GitHub)
- Blender Artists thread
Future work
Several suggestions have been done to improve the addon (and a few items from the roadmap are still open) but these are the most interesting ones in my opinion, although I am the first to admit that most serve more an academical interest than an artistical one:
- Apical control
- The suppression of side shoots lower down the branch by the growing tip. Is in place but functions unsatisfactorily. Should give straighter branches.
- Branch angle control
- The angle of a side branch is usually more or less fixed for a given species of tree. Having this could add to the believability of the generated tree.
- Branch sheding
- Some trees (e.g. conifers) drop old branches that don't receive enough light, resulting in bare lower trunks.
- Shadow group density
- Currently the shadow group will receive no endpoint markers at all. This should be modulated by some density factor to emulate half shadow (done, see version 0.2.10)
- Tree roots
- Fairly easy to add I think as it is mainly a not so comples upside down tree (at least as an approximation :-). The trick is to match the diameter of the trunk to the top of the root system.
If you really like my addon you might consider having a look at my Amazon wish list :-)
A new Tree addon, adding functionality
Compoared to the previously documented features this new version (0.2.5) adds a preliminary version of apical control and a 'Leaves' vertex group.
Code availability
Downloaf the installable .zip file from GitHub and read the installation instructions carefully, especially if you have installed an earlier version.
Apical control
Apical control (or apical dominance) is the phenomenon where buds on the end of a branch supppres the developments of bufs lower doen the branch. Often this will lead to trees with straighter branches and less side shoots. This versions contains a preliminary version but because I'm not quite satisfied with it yet I won't elaborate on it.
Vertex weights
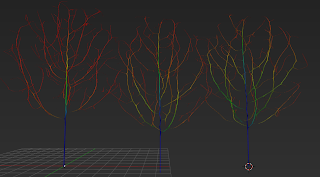
The generated tree now has a vertex group called Leaves. It has more weight near the end of the branches and the clustering can be controlled with the leaf clustering option. (As shown in the image below for a value of 1.0, 4.0 and 8.0 respectively). In the future we will add a ;eaves particle system as an alternative to the mesh leaves and the density of this particle system will be controlled by this vertex group. Of course you can now use this group yourself if you configure a particle system by hand. Note that without a skin the tree mesh consists only of vertices and edges (no faces) so the weights are not visible in weight paint mode although they are there. With a skin (either our custome skin or one generated with Blenders skin modifier there will be faces and the weights will be clearly visible (the skin 'inherits'the weights from the tree skeleton in both scenarios).
