Showing posts with label Python. Show all posts

Installing Python packages with pip in your Blender environment

Say you are developing Blender add-ons and you need some additional packages, perhaps to to some line profiling use the line_profiler package.

You could keep a separate Python installation outside your Blender environment (like I mentioned in this old article ) but then versions needed to be the same and you needed to tweak the import path to be able use those packages.

An easier approach is to install the necessary packages in your actual Blender Python installation, but if you use pip from the command line it will install inside you regular python environment because pip is a python script that installs in whatever Python installation it is part of.

Fortunately it is rather straight forward to bootstrap your Blender Python environment to get its own pip and then use it to install whatever you want.

Examples

In the examples below, /blender refers to your Blender installation directory. This could be something like /home/michel/Downloads/blender-2.93.0-stable+blender-v293-release.84da05a8b806-linux.x86_64-release

First we install the pip module

/blender/2.93/python/bin/python3.9 -m ensurepip
After installing it, we verify whether it works
/blender/2.93/python/bin/python3.9 -m pip --version

pip 20.2.3 from /blender/2.93/python/lib/python3.9/site-packages/pip (python 3.9)
Now we can immediately use it to install packages inside the Blender Python installation, for example the line_profiler package
/blender/2.93/python/bin/python3.9 -m pip install line_profiler

Collecting line_profiler

... [a boatload of dependencies gets downloaded as well] ...
You will most likely get a warning
WARNING: You are using pip version 20.2.3; however, version 21.1.2 is available.
which is ok. You can upgrade the pip module if you like (with /blender/2.93/python/bin/python3.9 -m pip install --upgrade pip) but the version you got with ensurepip works fine, as demonstrated, so there is no immediate need. You can verify that the package is installed
ls /blender/2.93/python/lib/python3.9/site-packages/line_profiler
Now you can use this package in your add-ons without the need to change sys.path
from line_profiler import LineProfiler  
profile = LineProfiler()
 
@profile
def fie():
    ... expensive code happening here ...

And then somewhere else in your code
profile.dump_stats("/tmp/test.prof")
Inspecting the profile can then be done with
/blender/2.93/python/bin/python3.9 -m line_profiler /tmp/test.prof

Notes

You cannot profile Python code that you code inside text blocks in Blender. Or rather you can profile them alright but you can not inspect the stats in any meaningful way because the file name of the code that is logged makes no sense (if your .blend is called MyBlend and you have a text block test.py, the file will be called .../MyBlend.blend/test.py which is a file that does not exist and even if you save your text block this is an issue because MyBlend.blend is not a directory you can save to. I do not have a workaround for this (except for hacking the .prof file) but in practice this is probably not much of an issue.

Do not forget to remove the profiling changes (and the import) if you want to distribute your add-on, because your customer will probably not have the line_profiler package installed.

(refer to the original article for a bit more detail. Note that there is no longer the need to use my tweaked version, if you use pip as described earlier you have all you need)

Blender Add-on Cookbook 2.93 Edition

I am pleased to announce that I just released an updated version of my Blender Add-on Cookbook


This new edition has been updated and tested on Blender 2.92 & 2.93 (beta at the time of writing).

It does not contain any drastically new things, but it has been revised to take into account all the small things that have changed in the Blender Python API since version 2.78, most screenshots have been updated to reflect the 2.9x interface, all links have been verified/updated, and the updated code has been placed in its own Github repository.


The Blender Add-on Cookbook - 2.93 Edition is available on Blender Market.

Upgrading Blender add-ons from 2.79 to 2.80, part 2

In the first part of this series on porting add-ons from 2.79 to 2.80 I promised to keep notes on issues that might pop-up so here is my second batch:


  • scene.objects.active is no longer available. Use context.active_object. This is due to working with collections,
  • no bl_category, so you cannot decide where your Panel will be located in the Toolbar. This is too bad, but maybe I don understand this completely,
  • the bgl module does not support direct mode at all (not even as an option). This hurts really bad. Yes the new , modern OpenGL capabilities are what we all wished for but porting the old stuff to the new is far from trivial,
  • BVHTree.FromObject() expects a Depsgraph not a scene. This is a breaking change. The relevant Depsgraph is available from context.depsgraph,
  • scene.ray_cast() expects a view_layer to determine what is visible in the scene. Again a breaking change related to the previous one. The relevant view_layer is available from context.window.view_layer,
  • Lamps are now called Lights, this affects object.type ('LIGHT') as well as bpy.data.lights,
  • Color() constructor always expects 3 values, but the .color attribute in a vertex color layer is 4 items (RGBA). Like the next item on this list this might have been present in 2.79 already but just comes to light now that I am porting add-ons,
  • The name of a module may not contain -  (i.e. a dash or minus sign) or install will silently fail (might have been the case in 2.79 too)

Upgrading Blender add-ons from 2.79 to 2.80

i have started research into upgrading my (commercial) add-ons from 2.79 to 2.80. in documenting what i encounter, i hope i can spare people some frustrations and learn something about add-ons in general. i didn't start earlier, partly because i had some other stuff to do but mainly because the Python API needed to be finalized and more or less stable: with many add-ons to consider for an upgrade starting when everything is still in flux would run the risk of wasting a lot of time.

Expectations

the Blender developers provided some documentation in the API changes in in a short document. Unfortunately, quite a few of them are breaking changes, i.e. the have to be changed in order to work at all. Many of these changes impact every add-on, like no longer having a register_module() utility function while some others apply mainly to math heavy add-ons, like the use of the @ operator for matrix multiplication. Unfortunately quite a few of my add-ons are math heavy so i will probably need to spend quite some time on this.

Annoyances

the Blender devs decided it was a good idea to force all keyword parameters to actually use those keywords. And indeed this will prevent accidentally using a positional argument as a keyword argument and aid in readability. This is a Good Thing™. However it is bloody annoying that layout.label() is affected by this, which I use a lot which just a single text argument ...
The price for biggest annoyance however goes to the mandatory change that forces class variables that are initialized with a call to some sort of property function like an Operator with for example a size = FloatProperty(name="size") property, to a type annotation like size: FloatProperty(name="size")
A small change it may seem but properties are everywhere so it is a lot of work. And although i read the PEP thoroughly, I fail to see the advantage. I'd rather hoped the devs would concentrate on things that change because of Blender's new structure, like collections and viewport related things, than on this new Python fad ...

Upcoming

I am just starting the research on converting my add-ons but you can expect a couple of articles the next couple of months with hopefully some useful findings.

Blender Add-on Cookbook

I am pleased to announce that my new book Blender Add-on Cookbook is now available on Smashwords and Blender Market
A sample (PDF) is available to give you a small taste of what this book offers.

A Cookbook?

It is a cookbook for Blender add-on developers who want to go one step further and want to add a professional touch to their creations or want to add functionality that isn't so straight forward to implement.

This book offers more than 30 examples of practical issues you may encounter when developing Blender add-ons. It gives you practical solutions with fully documented code samples, offers insight and advice based on years of developing add-ons and is fully illustrated.

Each recipe also comes with links to relevant reference sites and Blender API sections, and each code snippet comes with a small example add-on that can be downloaded from GitHub so you can simply test the given examples.

The book contains a proper index and is available in ePub format. (The Blender Market edition will be available in PDF and Mobi formats as well).

Performance of ray casting in Blender Python

The Python API for ray casts on objects and scenes was changed in a breaking manner in Blender 2.77. And because several of my add-ons depend on it, I not only had to fix them but I decided to have a look at the performance as well.
The central use case for ray casting in these add-ons is to check whether a point lies inside a mesh. This is determined by casting a ray and checking if the number of intersections is even or odd (where we count 0 as even). An even number of crossings means the point lies outside the mesh (true for the red points in the illustration) while an odd number means that the point lies inside the mesh (the green point). And the fun part is that this is true for any direction of the ray!

Code

We can easily convert this to Python using Blenders API: given an object and point to test, we take some direction for our ray (here right along the x-direction) and check if there is an intersection. If so, we we test again but start at the intersection point, taking care to move a tiny bit along the ray cast direction to avoid getting 'stuck' at the intersection point due to numerical imprecision. We count the number of intersections and return True if this number is odd.

 
import bpy
from mathutils import Vector
from mathutils.bvhtree import BVHTree

def q_inside(ob, point_in_object_space):
 direction = Vector((1,0,0))
 epsilon = direction * 1e-6
 count = 0
 result, point_in_object_space, normal, index = ob.ray_cast(point_in_object_space, direction)
 while result:
  count += 1
  result, point_in_object_space, normal, index = ob.ray_cast(point_in_object_space + epsilon, direction)
 return (count % 2) == 1

Intersection with an object

We can now use this function to determine if a point lies within a mesh object:
        q_inside(ob, (0,0,0))
Note that the point to check is in object space so if you want to check if a point in world space lies within the mesh you should convert it first using the inverted wordl matrix of the object.

Intersection with a precalculated BVH tree

To determine if a ray hits any of the possibly millions of polygons that make up a mesh, the ray_cast() method internally constructs something called a BVH tree. This is a rather costly operation but fortunately a BVH tree is cached so when we perform many intersection tests this overhead should pay off. BVH trees however can also be constructed from a mesh object separately and offers exactly the same signature ray_cast() method. This means we can perform the same check to see if a point lies inside a mesh with following code:
    sc = bpy.context.scene

    bvhtree = BVHTree.FromObject(ob, sc)

    q_inside(bvhtree, (0,0,0))

Performance

When doing millions of tests on the same mesh a small amount of overhead averages out so the question is if it is meaningful to create a separate BVH tree. If we look at the time it takes to do a million tests for meshes of different sizes we see that the overhead apparently is not the same but for larger meshes this difference loses significance:

inside irregular mesh (subdivided Suzanne)

facesobjectbvhtreegain%
1280003.5473.2418.6
320003.5261.89246.3
80003.4731.71550.6
20003.3931.63951.7
5003.3911.59752.9

outside irregular mesh with mostly immediate initial hit

The initial data was for a point inside a mesh: such a point will always need at least two ray casts: the first will intersect some polygon, the second will veer off into infinity. If we test a point outside a mesh we sometimes will have only one ray cast and sometimes two. if we look at the latter scenario we see similar behavior:
facesobjectbvhtreegain%
1280003.6083.14812.7
320003.4341.83646.5
80003.3811.63751.6
20003.2771.55852.4
5003.2941.52853.6

outside irregular mesh with mostly no initial hits

A strange thing happens when the point to test is outside the mesh but the ray happens to point away from the mesh so that we will have zero intersections. Now for large meshes the overhead of a separate BVH tree appears larger!
facesobjectbvhtreegain%
1280001.5342.417-57.6
320001.5441.01134.5
80001.520.83245.2
20001.5230.79647.7
5001.5340.78349

Conclusion

i cannot quite explain the behavior of the ray_cast() performance for larger meshes when the point is outside the mesh and the test ray points away, but in arbitrary situations and moderately sized meshes a perfomance gain of 40% for the BVH tree is worthwhile when doing millions of tests.

Updating version ids in Blender addons automatically with Notepad++

Blender addons use a version identifier that consists of three numbers, for example:
bl_info = {
 "name": "Awesome object generator",
 "author": "Me",
 "version": (1, 0, 20150425140302),
 "blender": (2, 74, 0),
 "location": "View3D > Add > Mesh",
 "description": "Adds an awesome object at the 3d cursor",
 "warning": "",
 "wiki_url": "",
 "tracker_url": "",
 "category": "Add Mesh"}
I do virtually all addon development with the help of Notepad++ and I really wanted to have a way to automatically update this version information when I change something. Cvs (and svn) have functionality to update specific strings but I wanted to use this addon version information because having two different tags doesn't sound logical to me. Fortunately with the help of the Python Script plugin for Notepad++ it is quite simple to create a save event listener that does exactly what I want:
from datetime import datetime

# Just in case, we'll clear all the existing callbacks for FILEBEFORESAVE
notepad.clearCallbacks([NOTIFICATION.FILEBEFORESAVE])

def ts(m):
 dt=datetime.now()
 ds=dt.strftime("%Y%m%d%H%M%S")
 return m.group(1)+ds+m.group(3)
 
# Define the function to call just before the file is saved
def addSaveStamp(args):
 currentBufferID = notepad.getCurrentBufferID()
 notepad.activateBufferID(args["bufferID"])
 editor.rereplace(r"(version.*?\(\s*?\d+\s*,\s*\d+\s*,\s*)(\d+)(\s*\))", ts)
 notepad.activateBufferID(currentBufferID)
    
# ... and register the callback 
notepad.callback(addSaveStamp, [NOTIFICATION.FILEBEFORESAVE])
If you place that code in the startup.py file (typically in your roaming profile, for example: C:\Users\Michel\AppData\Roaming\Notepad++\plugins\config\PythonScript\scripts\startup.py ) and make sure the Python Script plugin is activated on startup (by selecting Plugins -> Python script -> Configuration -> Initialization = ATSTARTUP and restarting Notepad++) then any subsequent save will look for a version identifier and will replace the third number with a timestamp.

Parameterized objects in Blender, a Python tutorrial

Writing new Blender operators in Python is quite simple and adding all sorts of parameters to customize that mesh is also not difficult but once a mesh is added to the scene and you have performed other actions it is no longer possible to tweak those settings and alter the mesh. You can of course delete the object and execute the operator anew but with more than one object the operator would remember its last settings which are not necessarily the ones you used to create the object you want to change. It would be much more convenient to have the options available for tweaking directly when you select an object.
The way to achieve this is to store the values for these options not as part of the operator but as part of the object and create an operator that checks for these object-bound properties and acts on their value.
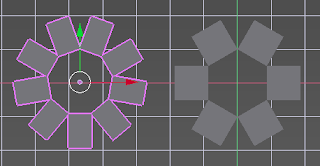
Fortunately it's rather easy to do this in Blender and the code snippet below show how this can be done: it implements a very simple Spokes object, i.e. an object with a configurable number of arms, like in the picture below.

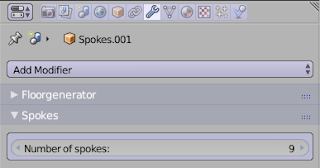
The number of arms is stored as an object property and the code provides both an operator to add a Spokes object and a panel that is installed in the modifier context to change the number of spokes. There is nothing special about placing the panel with the modifiers, you could position it elsewhere, but because these properties are persistent and changing them is non destructive it feels to me a bit like a modifier.
bpy.types.Object.reg = StringProperty()

bpy.types.Object.numberofspokes = IntProperty(name="Number of spokes",
         description="Number of spokes",
         default=6,
         min=2,
         soft_max=50,
         update=updateMesh)

class Spokes(bpy.types.Panel):
 bl_idname = "Spokes"
 bl_label = "Spokes"
 bl_space_type = "PROPERTIES"
 bl_region_type = "WINDOW"
 bl_context = "modifier"
 bl_options = {'DEFAULT_CLOSED'}

 def draw(self, context):
  layout = self.layout
  if bpy.context.mode == 'EDIT_MESH':
   layout.label('Spokes doesn\'t work in the EDIT-Mode.')
  else:
   o = context.object
   if 'reg' in o:
    if o['reg'] == 'Spokes':
     box = layout.box()
     box.prop(o, 'numberofspokes')
    else:
     layout.operator('mesh.spokes_convert')
   else:
    layout.operator('mesh.spokes_convert')

class SpokesAdd(bpy.types.Operator):
 bl_idname = "mesh.spokes_add"
 bl_label = "Spokes"
 bl_options = {'REGISTER', 'UNDO'}

 @classmethod
 def poll(self, context):
  return context.mode == 'OBJECT'

 def execute(self, context):
  bpy.ops.mesh.primitive_cube_add()
  context.active_object.name = "Spokes"
  bpy.ops.mesh.spokes_convert('INVOKE_DEFAULT')
  return {'FINISHED'}

class SpokesConvert(bpy.types.Operator):
 bl_idname = 'mesh.spokes_convert'
 bl_label = 'Convert to Spokes object'
 bl_options = {"UNDO"}

 def invoke(self, context, event):
  o = context.object
  o.reg = 'Spokes'
  o.numberofspokes = 6 # assigning something forces call to updateMesh()
  return {"FINISHED"}
The first lines in the code snippet show the property definitions while line 10 and 33 are where code for the modifier panel and the operators start respectively. Note that the new properties are added to the bpy.types.object. Because Python is such a dynamic language we can add properties to existing class objects.

The nitty gritty

There are a few things to note. When defining a new object property this custom property is available on all Blender objects. It is therefore not sufficient to check whether the numberofspokes property exists to see if we want to show a panel (in the draw() function at line 24). We could check if it contained a valid integer (because other objects that were not created with the Spokes operator would have the property but it wouldn't have been initialized) but it is much easier to create a second object property (a string property called reg in this example) that holds a value that identifies it as a Spokes object. This property could be reused and hold different values for other kinds of parameterized objects. The panel is part of the modifier context and looks like this:


The class that implements the panel doesn't have any code to actually change a Spokes object, all it does is display the numberofspokes property. This property however is defined with a reference to the updateMesh() function (line 8, the actual definition of tbe function is not shown) via its update argument, so every time the numberofspokes option is adjusted this function gets called to update the mesh.
The draw() function also shows a message when we are in edit mode and offers to convert an object to a Spokes object if it isn't already. The reason to have two operators is that we would like to have the option to create a Spokes object from scratch (from the add->mesh menu) and to convert existing objects. For the first option we provide the SpokesAdd operator, which merely creates a cube object and calls the SpokesConvert operator.
All that the SpokesConvert operator does is to assign values the object properties which will trigger a call to the updateMesh() function that will change the mesh data.
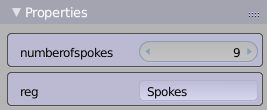
Note that custom properties that we defined are also available in the context panel (the one you get when pressing ctrl-n in the 3d view) but unlike the panel we defined we have no control over how to display these properties. They are however 'live', changing the numberofspokes property here will just as surely alter your object as when you alter it in the modifier panel.

Summary

To create parameterized objects you need to:
  • add properties to the bpy.types.Object class
  • make sure one of these properties can be used to identify an object as being a parameterized object
  • create an operator to add a new object like always but make sure it sets these object properties as well
  • create a way (a panel for example) to let the user alter the new object properties
  • create a function to actually alter the mesh when a property is changed

Code availability

The full code for a working add-on is available on GitHub


Addon: Creating a basket arch in Blender: better symmetry

A slightly improved version of the addon is available on GitHub. It corrects the slight assymetry between the left and right sides (the bottom most vertices were not at the same height)

You can install it in the usual way: File->User preferences->Addons->Intall from file. Don't forget to check the 'enable addon' box. It will the be available from the Add Mesh menu in the 3D view.
If you already installed the first version do not forget to remove the old version firs: File->User preferences->Addons->Add Mesh->Basket arch->Remove

Addon: Creating a basket arch in Blender

Recently I was thinking about a visualization of some rooms in our house. These rooms were once separate but the wall has been broken through and the arch between them has a very specific form: a basket arch, aka three centered arch. This is a form widely used not only indoor but also for example for many 17th century bridges and is not entirely trivial to construct as it involves matching three circle segments at their tangents. So I constructed a small addon to create basket arches ;-)

Availability and possible improvements

The addon is available on GitHub. You can install it in the usual way: File->User preferences->Addons->Intall from file. Don't forget to check the 'enable addon' box. It will the be available from the Add Mesh menu in the 3D view.

The addon constructs what is called a classical three centered arch, that is you can only choose the width while the height has then a fixed proportion. It might be a good idea to add the variant where you can also specify the height, which will give a squeezed arch that is has not quite the same shape as a classical arch that is scaled in the z-direction.

Currently the vertices in the arch a distributed with more or less even spacing along the circle. Because we use the angle along a circle segment the last vertex may or may not touch the ground. This is however hardly visible and since I intended this addon for visualization rather than CAD I thought i good enough. I might fix it though in the near future.

DryStone: create irregular stone walls, uvs and random vertex colors

I commited a small feature update for the Drystone addon. It now generates a (possibly random) uv-map and a vertex color layer with random colors. This makes it quite simple to use a stone texture for the whole wall while enhancing the effect of separately cut stones and slightly irregular coloring.

(The texture used in the image was RockSediment0105_1_L.jpg from CGTextures)
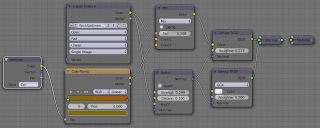
The node setup used for the image looks like this:

Availability

The updated addon is available from GitHub.

DryStone: create irregular stone walls

It's been a while but I haven't been completely idle during the holiday season: In this post I am happy to present a small Blender addon that creates walls of irregular stacked stones.

Inspired by the walls of the castles at Conwy and Beaumaris this addon aims to produce irregular walls, resembling the ones shown below.

For quite some time Blender users have known the excellent masonry addon but I wanted irregular walls (and a proving ground for serious bmesh programming).

The addon offers a number of controls to tweak the appearance that should be quite self explanatory. It's available from GitHub and discussed in this BlenderNation thread. Download it and select File->User Preferences->Addons->Install from file to install it and it will then be available in the Add->Add mesh menu in the 3D view.

The mesh that is created consists of separate n-gons and the depth is provided by a solidify modifier topped by a bevel modifier. Currently you will have to do the uv-unwrapping yourself. The image at the start was created with a procedural stone texture.

Interested in a professional add-on to capture all kinds of mesh characteristics into vertex groups or vertex colors? Then have a look at my WeightLifter addon on BlenderMarket. (In the first image it was used to quickly assign a random vertex color to each block to vary the coloring and bump mapping for each separate block).

Floor board generator, using a floor plan


I have started on the support for a floor plan, i.e. restricting the generated planks to some outline. This feature is very much a work in progress but it is already useable:
It works by adding and applying a boolean modifier to the generated floorboards.

The current [updated] workflow is like this:
  • select your floor plan, make sure it is flat, has a number of faces selected and the face normals pointing up:

  • position the 3D cursor just outside the bottom left corner of the floor plan
  • choose Add -> Mesh -> Add floor board mesh
  • adjust the number of planks and their length (in the modifier tab!)

    • select 'use floorplan' and select your floor plan mesh

      What is left to automate is probably to make sure the floor board is position at the lower left corner of the floor plan because that is easy to forget. You can change the position of the generated floor board but then you have to tweak some attribute (like the number of planks for example) to make it calculate a new floor board, which is ugly.

      For those who find a video easier to understand, here's a short screencast of the workflow:


      Code availability


      You can download version 0.0.15 form GitHub to try out this new functionality. If you already installed a previous version don't forget to remove the old version before installing the new one. (You can remove an old version by deleting the file planks.py from your Blender addons directory (on Windows typically in C:\Users\<your user name>\AppData\Roaming\Blender Foundation\Blender\2.71\scripts\addons )

      Known issues

      The sides of the planks are currently not properly uv mapped, something that may show when large gaps are used.

      Previous articles on the floor board addon

      The development and use of this addon is documented in several earlier articles:

      Part I initial version
      Part II random uv-coordinates
      Part III random vertex colors
      Part IV additional options
      Part V randomization
      Part VI small enhancements

      It is also extensively discussed in this BlenderArtists thread.

      EnumProperty callback problems - a better workaround

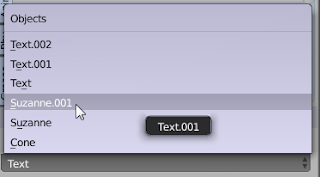
      A frequent use case of EnumProperties in Blender addons is to display a dropdown with a choice of scene objects. Of course which objects are available in a scene is only known when invoking the addon so a fixed list of choices is of no use here. For this scenario a callback option is provided. The callback can be any function that returns a list of choices. Unfortunately there are a number of severe bugs associated with using a callback: if your python code doesn't keep a reference to the items in the list it returns, Blender may crash. This bug is documented and a workaround suggested but this doesn't solve the problem completely. Have a look at the code below:
      import bpy
      from bpy.props import EnumProperty
      
      available_objects = []
      
      def availableObjects(self, context):
       available_objects.clear()
       for ob in bpy.data.objects:
        name = ob.name
        available_objects.append((name, name, name))
       return available_objects
       
      class TestCase(bpy.types.Operator):
       
       bl_idname = "object.testcase"
       bl_label = "TestCase"
       bl_options = {'REGISTER', 'UNDO'}
      
       objects = EnumProperty(name="Objects", items = availableObjects)
      if we hover the mouse over the second or third option we see that the description shows garbage, i.e. the description part of another item!
      The really annoying part is that even if we make a full copy of the object's name (with ob.name[:]) the problem isn't solved. So probably the internal callback code trashes memory even outside its own allocated memory.
      def availableObjects(self, context):
       available_objects.clear()
       for ob in bpy.data.objects:
        name = ob.name[:] # a copy, not just a reference
        available_objects.append((name, name, name))
       return available_objects
      A way around this is to let the callback just return a list that is filled with values outside the callback code, for example in the code thst is executed when the user clicks on the menu item that selects the addon:
      available_objects = []
      
      def availableObjectsInit(self, context):
       available_objects.clear()
       for ob in bpy.data.objects:
        name = ob.name[:] # a copy, not just a reference
        available_objects.append((name, name, name))
       return available_objects
       
      class TestCase(bpy.types.Operator):
      
              ... stuff omitted ... 
      
       objects = EnumProperty(name="Objects",
                          items = lambda self,context: available_objects)
      
        
      def menu_func(self, context):
       availableObjectsInit(self, context)
       self.layout.operator(TestCase.bl_idname, 
                                   text="TestCase",icon='PLUGIN')
      
      def register():
       bpy.utils.register_module(__name__)
       bpy.types.VIEW3D_MT_object.append(menu_func)
      This is usable even if the addon changes the number of objects. The only downside is that the code isn't reentrant because in its present form does not guard thread access to the global variable but as far as I know the Blender UI runs as part of a single Python interpreter so there's only one thread, which renders this point moot. The other issue is that it looks ugly, but as long as it works that's a minor issue :-) Note: you might wonder why we need the lambda here but that's because if we would point to just the list here, the list would be empty at the point where the EnumProperty was defined and apparently it makes a copy of that list so it would stay empty.

      WeightLifter - My first BlenderMarket addon

      I am quite proud to announce my first addon that's available on BlenderMarket!

      The addon combines a lot functionality in a single comprehensive addon. There's a tutorial online as well, demoing the most eyecatching features and I hope it will be useful to not just ArchViz people!

      Update: there is now an update available that fixes a crash that could happen when assiging random weights to groups of connected vertices in large meshes.

      Inheritance and mixin classes vs. Blender operators

      recently I was working on an addon that would offer functionality both in weight paint mode and in vertex paint mode. There were slight differences in functionality of course so I needed two operators but I wanted to keep most of the shared code in a single mixin class.

      Sharing member functions was easy enough using a mixin class but for some reason for properties this didn't work. Any property I put in the mixin class was not accessible from the derived classes. What was happening here?


      class mixin(bpy.types.Operator):
      foo = FloatProperty()
      def oink(self): pass

      class operator1(mixin):
      def execute(self, context):
      self.oink() # ok
      bar = self.foo # error :-(

      However, if I didn't derive the mixin class from bpy.types.Operator all was well ...

      class mixin:
      foo = FloatProperty()
      def oink(self): pass

      class operator1(bpy.types.Operator, mixin):
      def execute(self, context):
      self.oink() # ok
      bar = self.foo # ok too :-)

      So what is happening here? Sure in the first scenario both the mixin and the derived class inherit from bpy.types.Operator but that shouldn't be a problem is it? after all, Python's inheritance model supports the diamond pattern.

      The answer to this riddle is hidden in Blender's source code, quote:


      /* the rules for using these base classes are not clear,
      * 'object' is of course not worth looking into and
      * existing subclasses of RNA would cause a lot more dictionary
      * looping then is needed (SomeOperator would scan Operator.__dict__)
      * which is harmless but not at all useful.
      *
      * So only scan base classes which are not subclasses if blender types.
      * This best fits having 'mix-in' classes for operators and render engines.
      */
      So upon creating an instance of a class that is derived from bpy.types.Operator only the class itself and any base classes that are not derived from Blender types are searched for properties. This will reduce needless traversal of base classes that do not define properties themselves and avoid duplicate searches in cases where there is a diamond pattern but it sure is confusing.

      It does make sense though: instantiation of operators should be as cheap as possible because instantion happens each time a screen area with the operator controls is redrawn! And this can add up: merely moving your mouse can result in tens of instantiations.

      So the moral of this story? Sure it's awkward, especially while it's not well documented, but it is an understandable design choice. There is one serious drawback though; if you have the mixin and your operators in the same file you cannot use register_module() because that function tries to register all classes even the mixin class and that will fail.

      conclusion

      When using inheritance with bpy.types.Operator derived classes and you want to define properties in a mixin class make sure that:

      • the mixin class does not derive from bpy.types.Operator,
      • the final classes do derive from bpy.types.Operator (and from the mixin of course),
      • you don't use register_module() but use register_class()
      • for each operator separately (but do not register the mixin)

      Floor board generator, bug fix

      As mentioned by Greg Zaal in the comments to this post the randomness of the floor boards increased the further you got from the origin. This was due to a faulty calculation og the center of a board.

      The current version (0.0.13) fixes this and is commited to GitHub.

      You can download it here (right click the link and save it to the addons directory of your Blender installation).


      A new tree addon, Part VII: an all C implementation

      As indicated in this BlenderArtists post I have started developing a version of the space tree addon with most of the core calculations performed by C code.

      Currently most functionality is available except for apical control and pruning but a 4x speed up (approximately, your mileage may vary) is worth it. This version is at the moment only available for 64bit Windows platforms (because it was difficult enough already to get that running with Visual Studio 2012) and unlike the previous C enhancements there will be no fallback on pure Python.

      Code availability

      This version is developed in its own branch, 'all_c' and the installation follows the exact same pattern as for other addons (don't forget to remove any older version). The zipfile is located here. As of May 2, 2014, this is linked against the 3.4 Python library as shipped with the Blender dailt build. If you use a slightly older version of Blender you might want to use the previous commit that was linked against 3.3.

      The (almost) pure Python version stays available in the master branch, the zip file for this version is located here.

      Future developments

      I am thinking about making a Linux version available but that's not high on my priorities. If someone is willing to compile the module however I can include it with the addon. I think it is entirely possible to have a csca.pyd and a csca.so side-by-side. Having different .so files for Linux and OSX is something else, that would require tweaking the Python imports based on the OS type.

      The current speed improvements only apply to the generation of the tree skeleton. I think the same improvement should be possible for native skinning algorithm. Also, there is yet no optimization of the C code and no multithreading, so we might improve the speed even more.

      Another area of interest that I am currently spending time on is creating good leaf textures. Even with a decent flatbed scanner this is not trivial, yet now that spring is in full gear in my hemisphere I have started on cherry, apple and oak leaves.

      References

      The space tree addon itself is introduced in a few articles on this blog and is available on GitHub. Relevant links are listed below:

      A new tree addon, part VI: continuing development

      The latest version (0.2.14) includes a module written in C that implements some of the most time consuming functions. The result is a 20 - 30 % speedup for the generation of the branch skeleton. For now this is only available for 64 bit windows but on a different platform the addon will fall back on pure python implementations of these functions so cross platform portability is still guaranteed.

      This is a quite noticable speedup: on my machine the generation of a tree consisting of 3000 branch segments went from 3.7s to 2.7s.

      Implementation notes

      The C extension module was compiled with Visual Studio 2013 and seems to work fine both with the official 2.70 distribution (compiled with MSVC 2008) and with the daily builds (compiled with MSVC 2013) but will only work with 64 versions of Blender. The Visual Studion solution is part of the spacetree repository so if people are interested in porting the module to other platforms they can have a go. Detailed notes on how to compile a native Python extension with Visual Studio 2013 were published in a separate article.

      Undocumented stuff

      This version of the addon also contains a first try at the implementation of branch shedding.

      References

      The space tree addon itself is introduced in a few articles on this blog and is available on GitHub. Relevant links are listed below:

      Native Python extensions for Blender with Visual Studio 2013

      Researching how to create a python module in C with Microsoft Visual Studio 2013 which could be used in Blender caused me quite a few headaches so in order to spare other people the same I wrote this article that illustrates the process in a step-by-step manner. The resulting solution is available on GitHub as well.

      Prerequisites

      When writing native extensions for Python it is said that it is vitally important to use exactly the same compiler that was used to compiler Blender itself (or rather its embedded Python). This is especially important on Windows where even different versions of Visual Studio may break compatibility. However, I have found that Visual Studio 2013 can be used to compile an extension that is usable both for Blender version compiled with msvc2008 and msvc2013.

      Currently the daily builds for Blender are built with Visual Studio 2013. This can be verified by opening Blender and generating the system information from Help -> System Info. In the generated text file (available in the text editor) the line with the Python version should read something like: ...... 1800 64 bit .... The 1800 part is the interesting bit as it identifues the version of Visual Studio, where 1800 means MSVC 2013.

      The official Blendet 2.70 release for windows is still built with MSVC 2008 (the version string in the system info will show 1500) but I have found no compatibility issues, but of course your mileage may vary. It is however extremely important to match the platform: a 64 bit extension will only work for 64 bit Blender!

      Writing an extension module in C

      Starting point when writing an extension is this page. It's a fairly complete but lengthy introduction and its content is platform independent. To actually compile C code into a dynamic library that can be used on Windows additional information is needed. Unfortunately some information on this page is wrong or incomplete (/export:initexample is not needed, the dll needs a .pyd extension) and as there are quite a few confusing steps it might be easier to have all the steps explicitely listed for our Blender scenario.

      In the following walkthrough I'll assume that Blender is installed in C:\Blender and that we'll be using MVSC 2013 express edition for Desktop. I also assume you have checked out the Python library that Blender is built with, to C:\BlenderLibraries. We need the source for these libraries for the Python.h include files. (you can checkout these libraries with any subversion client from svn.blender.org, see here for instructions. Make sure you get the 64 bit versions if you are compiling for a 64 bit platform and notice that the folder is called win64_vc12 even though we'll be using msvc 2013)

      Ten easy steps

      The following steps are needed to create a simple extension. each step is explained in detail below.

      1. Create a new DLL project
      2. Add a new x64 platform if necessary
      3. Configure the extension to use
      4. Configure the include directory
      5. Configure the library directory
      6. Add the library dependencies
      7. Add your source code
      8. Build the project
      9. Copy the library to the Blender installation
      10. Test it from Blender

      Create a new DLL project

      • file->new project
      • templates->Visual C++->Win32->Win32 Project
      • name: BlenderTest (can be placed anywhere, leave all default settings)
      In the application wizard that opens select DLL and Empty project.

      Add a new x64 platform if necessary

      i=If you are working on/for a 64-bit platform you'll need to add a x64 platform to your solution.

      • click on the configuration manager [below the menu bar in the task bar]
      • add a new active platform [click on the part that probably displays Win32]
      • select x64 and leave all the default settings

      Configure the extension to use

      Although a native extension is just a DLL, Python wants it to have a .pyd extension:
      In the properties of the BlenderTest project
      for all configurations set
      Configuration properties -> General the Target extension to .pyd

      Configure the include directory

      The compiler needs to be able to find the Python.h include file.
      for all configurations
      Configuration properties -> C/C++ -> General Add 'C:\BlenderLibraries\win64_vc12\python\include\python3.3' to Additional Include directories

      Configure the library directory

      The Python libraries need to found as well:
      for all configurations
      Configuration properties -> Linker -> General Add 'C:\BlenderLibraries\win64_vc12\python\lib' to Additional Library directories

      Add the library dependencies

      Each configuration is dependent on a different library:
      for the Debug configuration
      Linker -> Input Add 'python33_d.lib' to Additional Dependencies
      for the Release configuration
      Linker -> Input Add 'python33.lib' to Additional Dependencies

      Add your source code

      in the Solution explorer, right click the Source Files folder in the BlenderTest project and slect add -> new item. Choose C++ file and give it BlenderTest.cpp as its name (although you're free to choose anything you want)

      Copy the example code (you might want to use this) in the editor

      build the solution (a warning about an inconsistent dll linkage of round can be ignored)

      Build the project

      Select the release configuration and click Build -> Build Solution

      The module will be in the subfolder BlenderTest\x64\Release and be called BlenderTest.pyd

      Copy the library to the Blender installation

      Copy BlenderTest.pyd to somewhere where Blender can find it, for example to the site-packages directory within Blenders installation directory (e.g. C:\Blender\2.70\python\lib\site-packages)

      Test it from Blender

      open the python console in Blender
      import BlenderTest
      BlenderTest.foo()

      The System console (Window -> toggle system console) should show 'Hello World'