Showing posts with label Filmic. Show all posts

Review: CinemaColour For Blender

Recently I was offered a change to look at CinemaColour For Blender by FishCake.


CinemaColour offers a large collection of professional color management looks (LUTs) to use with Blender's built-in Filmic color management. Check out the artist's website for some great examples. It comes in the form of an add-on that installs over a hundred looks and also offers a convenient way to browse and select the looks that are available. In this short article I'll have a good look at my experiences with the add-on and the looks it offers.

Filmic color management

Since well over a year Blender has incorporated Roy Sobotka's Filmic color management solution and everybody, really everybody, has been very enthusiastic about it ever since. This enthusiasm is well deserved because when using Filmic your renders may almost immediately gain a lot of realism, mainly by mapping the wide range of light intensities in your scene to the limited range of intensities your monitor can handle in a much better way than before. No more blown out highlights or loss in details in the deep shadows!

Looks

Filmic uses lookup tables (LUTs) to convert these intensities and by selecting different look up tables you can create different looks: not only can you choose these looks to present you with more or less contrast in your renders but because these lookups are done independently for all color channels you can use looks that add a color tone to your render. These tones can greatly influence the feel of your scene and because this mapping is done after the result is rendered and composited, it is very easy to experiment with the overall look.

CinemaColour for Blender

Now creating professional looks and making them available for use in Blender is a real craft and that is where CinemaColour comes in. The add-on installs over a hundred different looks and panel in the Scene options where you can easily browse through the list of choices and apply them to your scene. The available looks are grouped in several collections and each look has a name that hints at major blockbuster films that feature a similar look. The available looks range from subtle contrasts to moody color settings and everything in between. Some examples are shown below:
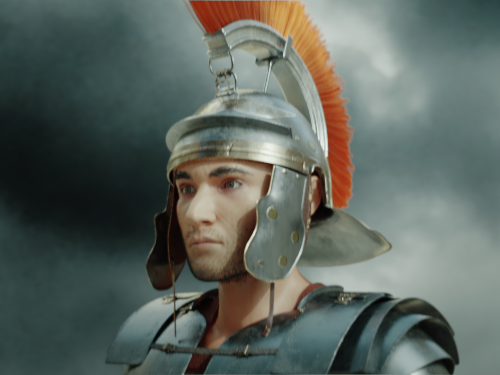
Look: CS ST Y L 3
Look: B2 Gangster
Look: B2 Sniper Alt
Look: B2 The Phantom Alt
Look: B2 Wade Pool
Look: CC Crush
Look: CM Ice
Note that we did not have to render our scene again to generate these looks, so generating these examples after render the scene a single time only took seconds.

Conclusion

A great set of professional looks done by someone who clearly knows their color management. The selection of the provided looks is also intuitive and every artist that is serious about the overall look and feel of their renders should check this out. CinemaColour is available on BlenderMarket.


Converting Blender Filmic LUTs for use in Substance Painter

with the new Filmic Blender color management options getting a lot of attention I wanted to get the exact same looks when creating textures in Substance Painter.
Substance Painter supports LUTs in so called 3d format which are stored in .exr files. So our challenge is twofold: convert the bundled Blender Filmic LUTs to this format and of course to get results in Substance that match Blender as closely as possible.
The results of 3 of the filmic LUTs are compared side by side in the image below:

I made this comparison collage by keeping parameters like exposure (1) and gamma (also 1) the same in both Blender and Substance Painter and then took screenshots. I glued the screenshots together in GIMP. This way I could see all images on the same monitor. This is important because if the applied profiles are the same and both displays are sRGB, two monitors will still differ in their color response and it is fiendishly difficult to calibrate them (unless you have a very expensive monitor with the associated color calibration kit). My own monitors are not even the same brand so it is an easy trap to fall into if you compare images on two different monitors side by side.
Anyway, even this way when you have a close look the images are close in tone but not 100% identical and I am not sure what is causing this. There might be slight differences in camera aperture, focal blur and multiple importance sampling of the environment and of course Cycles' ray model is not the same as Iray's Substance painting mode renderer. Still, I think this is pretty close and useful to compare textures in Substance under different looks before transferring them to Blender.

How the LUTs were generated

I used the Python bindings of the OpenColorIO and OpenImageIO libraries to create a small script (code below). These are in fact the libraries Blender uses to work with color conversions.

The script takes a linear to linear transform that is encoded as an .exr image and creates a new .exr for each 'Look' in Blender's OCIO config file that is defined in the 'Filmic Log' process space.
The docs for the Python bindings for both libraries are not an easy read and the APIs have some small inconsistencies so it took some time to get it working. The code is far from beautiful but i commented the relevant parts. I am open to any critique that can help to improve the transforms.
Note that the code is not plug and play and i have no intention of improving that :-)

The Substance LUTs

They can be downloaded from my GitHub repository. They are bundled in one .zip file and should be unpacked before importing them in Substance Painter.

The code

#export LD_LIBRARY_PATH=/home/michel/ocio/lib
#export OCIO=/home/michel/Downloads/blender-2.78-b94a433ca34-linux-glibc219-x86_64/2.78/datafiles/colormanagement/config.ocio
#python 2.7
#
# run as
# python transformlook.py
#
# expects linear_to_linear.exr in the current directory and will write the transform there too

import OpenImageIO as OIIO  #  already installed using Ubuntu pkg manager
from sys import path
from array import array
path.append('/home/michel/ocio/lib/python2.7/site-packages/')
import PyOpenColorIO as OCIO

config = OCIO.GetCurrentConfig()

for look in config.getLooks():
 if look.getProcessSpace() == 'Filmic Log':
  lookname = look.getName()
  print(lookname)

  transform = OCIO.DisplayTransform()
  transform.setInputColorSpaceName(OCIO.Constants.ROLE_SCENE_LINEAR)
  transform.setView('Filmic')
  transform.setLooksOverrideEnabled(True)
  transform.setLooksOverride(lookname)
  transform.setDisplay('sRGB')
  processor = config.getProcessor(transform)

  # indentiy transform from https://support.allegorithmic.com/documentation/display/SPDOC/Color+Profile
  img = OIIO.ImageInput.open('linear_to_linear.exr')
  spec = img.spec()
  spec.set_format(OIIO.FLOAT) # for some reason this is not extracted from the image
  pixels = img.read_image()
  img.close()

  outfile = lookname + '.exr'
  transformedpixels = processor.applyRGB(pixels)
  imgout = OIIO.ImageOutput.create(outfile)
  ok=imgout.open(outfile, spec, OIIO.Create)
  if not ok:
   print(OIIO.geterror())
   break
  # ImageInput.read_image() returns a list of floats, and applyRGB(0 returns one too, but ImgOutput.write_image
  # expects an array of float and will die when passed a list. Bit inconsistent I think.
  a = array('d')
  a.fromlist(transformedpixels)
  imgout.write_image(a)
  imgout.close()