Showing posts with label node. Show all posts

NodeSet Pro: 2018 Spring Edition

A month ago I introduced the NodeSet Pro add-on on BlenderMarket, an add-on that allows you to quickly create complete node setups from texture sets. In the new Spring 2018 edition I have added significant enhancements, like the options to manipulate collections of textures sets, saving and loading of preference presets and some smaller features like a color ramp node to control the roughness and options to specify your preferred projection mode (when for example you want to work with blended box mapping instead of UV-mapped meshes).

The new features are highlighted in this short video:

The most visible addition is a panel in the tool region that lets you manage collections of textures sets:

If you have additional suggestions to enhance the usability even more, don't hesitate to contact me.

NodeSet Pro available on BlenderMarket

I am pleased to announce that NodeSet Pro is available from my BlenderMarket store.

NodeSet Pro is based on my original free NodeSet add-on published in 2017 but was completely rewritten to ease maintenance. The configuration options and functionality where also greatly enhanced, notably with possibilities to work with custom, packed maps, connect to arbitrary nodegroups instead of just the principled shader, add UVMap nodes and Flip Normal nodes and more. Basically you should be able to configure it to your specific workflow needs, regardless what texturing software you are using.

NodeSet Pro will reduce material creation to a few simple clicks while still allowing you to fully tweak the resulting material. Out of the box it will work with texture sets created with Substance Painter's Metallic/Roughness work flow and its Specular/Gloss workflow but almost every node generation feature can be tweaked to fit your specific workflow and texturing software.

Instead of importing textures like basecolor, normalmap, roughness, etc. one by one, with NodeSet Pro you will only need to select a single texture and textures with the same base name will be loaded as well. NodeSet Pro will also apply non-color data options to texture maps that need this, create normal map and bump nodes and wire everything up to a shader.

This shader can be Blender's principled shader

or any other shader node group.

You can even connect any height map automatically to the micro displacement socket.

You can use custom maps that for example pack different maps like height, roughness and metallic into the channels of a single color map

I you want to know more, watch the video or check out my BlenderMarket store.

Nodeset: better heightmap adjustment

NodeSet is now also available in a Pro version. Read all about it in this article or check out my BlenderMarket shop if you are interested.

A new version of Nodeset is available that adds a subtract node if you use the option to link a heightmap to the displacement output.
The reason is that most often the values in a heightmap are between 0 and 1, which will result in a bloated mesh unless you subtract 0.5 first.

Availability

The current version (201801031529) is available for download (right click and save as ...) from my GitHub repository.

Previous nodeset articles

I wrote several articles on this tiny add-on that you might want to read. They are (newest first):

Nodeset: additional features and clean-up

NodeSet is now also available in a Pro version. Read all about it in this article or check out my BlenderMarket shop if you are interested.

In a reply on a previous post monari suggested some additional functionality and in the true spirit of open source even supplied a new implementation.

So in this version I incorporated most of his new code: if you now import a texture set with an associated shader you get a height map correctly wired to a normal node with the help of a bump node.

In addition I added the option to create a nodeset that is suitable for use with microdisplacement, i.e. that wires the height map with a multiply to the displacement socket of the material output (the option is available on the left side of the fileselector).


The two variants of the node setup are shown below:


As usual the add-on is available from my GitHub repository.

Avoiding repetition artifacts with chaos mosaic

Chaos mosaic or chaos mapping is a method to extend limited size textures to huge uv-mapped surfaces while avoiding repetition artifacts.
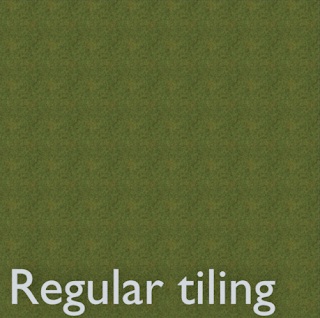
You might have for example a grass covered ground texture that is detailed and would map to a 2 x 2 meter square quite well. If you would apply this to a 10 x 10 meter field and scale to its proper size, obvious repetition artifacts would be visible:

A chaos mosaic on the other hand would take randomly selected squares from a texture giving the appearance of an endless texture without repetition:

At close range you would still be able to make out the seams but for large objects seen from a distance this probably wouldn't be noticeable.
This technique only gives good results for non-patterned textures like groundcover, asphalt, plaster etc. but in those cases it might be just what you are looking for and it is quite fast.
In an older article I showed a chaos mosaic implementation in Open Shading Language but I like to work with the GPU as much as possible so I implemented the same technique in just nodes.

Node group


The noodle takes the uv-coordinates and then you can plug in the transformed coordinates into you texture. The scale can then be adjusted as needed. The rotation gives an additional amount of randomness to the final material but depending on the texture this might not always improve the visual quality.
The .blend file with the node group is available from my GitGub repository. Just download the chaosmap.blend and then in your own .blend use File → Append to select the nodegroup Chaosmap. It will then become available in the Add → Group menu of the node editor.

Improvements

To reduce the visibility of the seams between the tiles you can mix two chaos mosaics: the second one should use slightly offset and rotated uv-coordinates and then you can use for example a noise texture with a scale comparable to the actual textures to mix the two:

The result has less visible seams but is also somewhat blurred:

The highlighted area shows a visible seam:


Especially at close range:


Some details

You can examine the details of the nodegroup if you like but the basic principle is that it takes the original uv-coordinate, determines in which grid section this falls and then maps the relative position of the point inside this grid to a relative position inside randomly selected square in the unit uv-map. (This square is randomly selected but always the same square for the same grid section)

Nodeset: add a principled shader

NodeSet is now also available in a Pro version. Read all about it in this article or check out my BlenderMarket shop if you are interested.

Even though there are better paid and free PBR nodegroups/shaders available for Blender (for example from Jeffrey Hepburn or Remington Graphics) the new Principled BSDF (a.k.a. Disney shader or PBR shader) will no doubt prove popular with Blenderheads because it is so simple to use and gives decent results.

So I added an option to add this shader along with all the imported texture sets as well as a normal map node, basically giving you a one-click (almost) option to add a PBR material based on a set of textures from your favorite texturing tool. The new functionality is a available from Add -> Texture menu in the Node editor and sits alongside the original Set of images entry:

The resulting node setup (after selecting a set of textures) will look like this:
Note that this will of course only work with the new Blender 2.79 or with a recent daily build. If the Principled BSDF is not available in your version of Blender it will simply be omitted.

Code availability

The latest version of the code (201706251223) is available on GitHub (right click and select save as ... , then in Blender File -> user preferences ... -> Add-ons -> Install from file .... Don't forget to remove the previously installed version first!)

A short video demo:

Previous articles

Previous articles about the Nodeset add-on:
NODESET: IMPORT SUBSTANCE PAINTER TEXTURES INTO BLENDER
NODESET: TINY UPDATE MIGHT SAVE EVEN SOME MORE TIME
NODESET: SUPPORT FOR AMBIENT OCCLUSION MAPS
NODESET: MORE FLEXIBILITY

ColorRampPicker, a new Blender add-on

Got this idea from Substance Designer which offers an option to sample a whole palette of colors from a reference image for their gradient node. Now you can do the same for Blender's color ramp node. With a color ramp node selected, just go to the Node menu and select Color Ramp Picker. An eye dropper will appear and you can sample from anywhere within your Blender window by clicking and dragging. Unfortunately it is not possible to sample outside the Blender window so you should have your reference image loaded in BlendeÅ› uv-image editor.

I have also made a small video that illustrates the proces:

Availability

You can download the add-on from GitHub. (click right on the Raw button and save the python file anywhere you like and then in Blender select File->User preference, Add-ons, Install from file... Don't forget to enable the add-on as well after installing it.)

check this update article for the latest version.

If you would like to write add-ons yourself, you might want to take a look a my books on BlenderMarket.

Alternative

After publication I learned about a similar and much more versatile tool to generate (and sample) gradients. Check this BlenderArtists thread to learn more.

NodeSet: tiny update might save even some more time

NodeSet is now also available in a Pro version. Read all about it in this article or check out my BlenderMarket shop if you are interested.

In a previous article I showed a small add-on that lets you import a set of textures with a common base name (like the ones typically exported by Substance Painter). It not only groups them in a frame but also gives the individual textures proper labels and sets the non color data attribute accordingly. On top of that you only have to select one textures from a set and all corresponding textures will be loaded anyway.

This should save you quite a lot of time but I found that in real life a complex model or scene can easily have several tens of texture sets, maybe even a hundred or so and multiplied by 5 textures in a typical PBR Metal Rough export (BaseCOlor, Metallic, Height, Normal and Roughness) this results in hundreds of textures and a very cluttered file selector.

Now becuase you only need to select one of them to load the whole set, I made a small change the set the default filter to *Color* so that the file selector will only show the base color files (which happen to be the most distinct ones when you are looking at thumbnails). This reduces the list of files greatly, making it easier to pick the texture set you need (because as sais, clicking just BaseColor will load the others just the same). You can of course always uncheck the filter icon (at the top of the file selector) if necessary.

Code availability

The update is available from GitHub

Check the previous article for info on how to use the add-on. It includes a small tutorial video.

How to add a new node to the Cycles source code

I created a page where I documented each file that needed to be changed or added to create the VoronoiCrackle node that I would like to get included in Blender. It documents what is what and contains a link to the actual patch. It is certainly not perfect but might serve as a good starting point for people how want to give it a try (and for myself as a cheat sheet because adding a node involves many, many files :-)
The page is listed in the pages widget on the top right of the blog or via this link.