Showing posts with label 3D printing. Show all posts

MicroTiles - uniform subdivision of selected faces

Introduction

I often use Blender to model railway scenery in H0 scale for 3D printing. While Blender is not a CAD program, it proves to be a very useful tool in cases where artistic considerations are just as important as exact tolerances.

Problem with Tunnel Portals

Recently, I was working on some tunnel portals and wanted to create a rough surface on certain faces. Using fuzzing settings in a slicer did not yield the results I was looking for, so I decided to use a displacement modifier with Musgrave noise to achieve this effect.

Vertex Groups and Subdivision Modifier

By defining a vertex group, the displacement modifier can be restricted to just the faces that need the rough texture. However, there must be enough geometry to see any details.
The subdivision modifier, however, cannot be restricted with a vertex group. It also suffers from the same drawbacks as manual subdivision: all faces are subdivided uniformly, meaning the new faces will be proportional to the size of the original faces. Larger faces result in larger new faces, and smaller faces result in smaller new faces. Additionally, n-gons are often not subdivided properly, as shown in the next image, where the rectangular bricks each have six edges.

MicroTile Add-on

What I wanted was a way to create a dense grid of uniformly sized faces on any selected face, and this is exactly what the MicroTile add-on does.
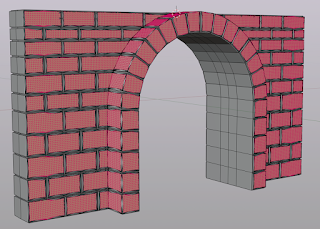
Simply select any faces you want to subdivide, then choose Add → Tile selected faces. The default setting creates faces with sides of 1 cm, but the Size option can be adjusted to any value. In the image above, the large stones are approximately 2 x 4 cm and were subdivided into 1 mm tiles.

Availability

The add-on is available for download from my Github repository.

Click the Download raw file button (near the upper right corner), then install the downloaded file via Preferences → Add-ons → Install from disk. Once installed, a new menu item will appear in Edit mode: Add → Tile selected faces.

Notes

  • The add-on has been optimized for performance, but generating a large number of new faces can still be slow. For instance, on my machine, subdividing 122 selected faces of the tunnel portal down to 1 mm took just over six seconds, adding around 135k Tris in the process. Your experience may vary. The add-on includes a progress indicator to provide a sense of the process's progress.
  • The add-on also creates a new vertex group containing all the newly created vertices (excluding the vertices of the originally selected faces). This feature suits my particular use case, as I can then add a displacement modifier restricted to these vertices.
  • The add-on supports undo functionality. However, for some reason, any created vertex groups are not removed during undo. I'm not sure why this happens.


  • 3D printing an H0 scale stone bridge: the result

    I sent my bridge design to the printers and I am quite pleased with the result as it came back from Shapeways, especially the detailing. Even though it's done in Strong and Flexible (as opposed to Frosted detail) the stonework shows up nicely. I will be painting it the coming weeks but as that has nothing much to do with Blender I'll probably will document that on my model train blog.


    3D printing an H0 scale stone bridge: detailing

    Added all the brickwork and some randomness along with an ornament on the cap stone:


    Full book review: Blender 3D printing essentials

    Last weekend I had the pleasure to read Blender 3D printing esentials by Gordon Fisher.

    Gordon previously authored Blender 3D Basics and his experience and subject skill is clearly shown in this new short book 3D printing. The book is Blender specific of course but pretty much 3d-printer agnostic, so it's useful not only for printer owners but also for people who want to use online print shops.

    Pros:

    short
    about 100 pages real content. Clear language as well, so you won't need much time to get up to speed

    to the point
    it won't tell you much about modelling as such but does show what elements of modelling need extra care when preparing a model for printing and how to fix problems

    complete
    all you need to know for most common printing materials and printing techniques but of course with new materials becoming available every day you'll have to check the material specifications for things like minimum wall thickness if you want to try a new material but that is not a critique on the book. On the contrary, it does an excellent job of describing things like what influences surface detail, why wall thickness is important and when and how to deal with overhang.

    good description of essential tools
    Blender's 3D printing toolkit and mesh analysis tools are covered well and the use of the protractor tool (to measure distance and angles in your model) is explained very clearly.

    Cons:

    uv-unwrapping and texture painting
    (for printers that support multicolored models) would have benefited from more in depth attention as these subjects are generally considered difficult by beginners

    the price
    I personally feel that the €13,56 list price for a 100 page e-book is steep, not to mention the almost €26,- price tag for the print version, but of course online retailers may give you a better deal.

    Conclusion

    Good book, well written. Based on the content alone I would give it 4.5 out of 5 stars but the unrealistic price tags lowers that to 4.

    If you would like to know more about programming OSL you might be interested in my book "Open Shading Language for Blender". More on the availability of this book and a sample can be found on this page.

    Book Review: Blender 3D printing essentials

    The next few days I will be reading Blender 3D printing esentials and I hope to write up a full review shortly.

    If you would like to know more about programming OSL you might be interested in my book "Open Shading Language for Blender". More on the availability of this book and a sample can be found on this page.

    Gears 2.0 (work in progres), part V, a Blender add-on

    I am happy to announce that version 0.0.5 of the Gears 2.0 script is now available on GitGub. Its main new feature is the option the create involute gears, the most widely used tooth shape in modern gearing designs.

    The accuracy of the involute curve can be controlled with the steps parameter and extra space below the dedendum can be created with the fillet parameter. Likewise, extra backlash can be created between the teeth with the backlash parameter. I haven't yet printed any gears so I can't vouch for their actual mechanical behavior but for now I think this is a good start (although the shape of the fillet/undercut could be better I guess). [edit: v0.0.6 now has a shift parameter which for positive values gives a taller addendum and a shallower dedendum and for negative values the opposite. This is useful to tweak the load a gear can bear. Obviously these values should best match on adjacent gears but that is not yet done automatically]

    Although I do not approximate the involute curve of the tooth with splines, this article was invaluable in getting the equations correct without trying to find it out all by myself. An example set of parameter settings is shown at the end.

    Gears 2.0, a work in progress

    The script is discussed on this thread on Blenderartists, feel free to comment there. It also has its own entry in Blenders upload tracker.
    The code is available from GitHub, install it in the usual way from

    File->User preferences->Addons->Install from file and don't forget to check the checkbox to actually activate it.

    As the example below shows for a 44 teeth gear of radius 1, the fillet/undercut needs some work (it's too wide/deep) but the shape of the involute tooth itself seems ok. The read circle is the pitch radius, the blue circle the base radius (that is pitch radius * cosine( pressure angle )).

    The settings to produce the gear shown above were:

    3D Printing Blueprints Full Review

    3D Printing Blueprints by Joe Larson, Packt Publishing
    (click to go to the publisher's website)

    Impressions

    With literally dozens of books on 3d printing on the market yet another one has to be something of quality to be able to compete and indeed 3D Printing Blueprints does offer quality.

    It has many pros:

    • clear writing style
    • good illustrations, in color, illustrating each step
    • good coverage of concepts; modelling, material constraints, copying real life objects, designing reusable components, creating multiple component designs

    Of course there are some cons:

    • it's a bit short, more examples would help getting key concepts across even better
    • focus is almost exclusively on makerbot and plastics (I.e home printing) while outsourcing the printing itself to an external printshop which might do materials like glass or metal is glossed over
    • sometimes the illustrations are too wide for the format (I read the epub version with Aldiko on a 10" tablet so that shouldn't have occured)

    What I didn't get entirely is why Blender was chosen as a modelling program. Yes it is great at modelling but many really useful features for 3d printing where not used, like assigning units (metric or imperial) or using the solidify operator, And while the introduction to basic modeling was adequate, if you keep to simple modelling a program with a gentler learning curve than Blender like for example Wings3d might have been a better choice. Of course the newest Blender revisions have addons specifically designed to help in getting your model ready for 3D printing but these are not covered in the book.

    On the other hand the chapter on designing a posable teddy bear is very in depth indeed and does make use of the fairly new skin operator and some of the dynamic topology features in sculpting. It is a good introduction to skinning a stick figure and sculpting the result (and the result is cute :-).

    Conlusion

    So in the end, not a bad book at all if you want to give 3d printing a go and want to do more than just download and print stuff other people have designed.

    Packt publishing asked me to read 3D Printing Blueprints and to write a review about it. First impressions are promising and I hope to complete reading it soon.

    The software used is mainly Blender (otherwise I wouldn't discuss it here) and although the projects are focussed on printing at home on a Makerbot printer, a quick scan seems to indicate the principles will apply just as well to producing stuff at an online 3D print outfit like Shapeways.

    Anyway, watch these pages for a full review somewhere next week or so.