A new tree addon, part V: bug fixes and user contributions

The latest version (0.2.11) fixes several bugs and adds a a very nice collection of fruit objects to the bundled library.

Vitamins are good for you

BlenderArtists member Piet not only contributed a new bark material that adds the impression of snow lying on the branches but also provided a collection of several fruits: Apples, pears, plums, peaches, cherries as well as mistletoe and a birds nest. Thank you Piet! Now all we need is leaf materials to go with these fruits. I'll try to source some Creative Commons leaf textures but now that spring is getting underway (at least here in the Netherlands) I might create some of my own.

Bug fixes

This release also features some bug fixes: If you were using groups of objects to shape a crown and an object within this group wasn't a mesh object, the addon would throw an exception. Likewise, if you had an object selected before creating a tree, an exception was thrown if this object didn't have an edit mode (like the camera or an empty).

Observations


  • The bundled library is getting quite big, I am thinking about zipping it and uncompressing it on the fly.
  • The fruit objects (and the leaves as well) are not positioned perfectly (Most of the time they do not quite connect to a branch). I'll have to check if there origins are set correctly or if we need something else (fruit tree for example grow their fruits generally on small protrusion called spurs)
  • It might be sensible to add more than one object group from the library (for example acorns and mistletoe)

References

The space tree addon itself is introduced in a few articles on this blog and is available on GitHub. Relevant links are listed below:

A new tree addon, Part IV: volume rendering experiments with OSL

With the new volume shading options offered by Blenders OSL implementation it is tempting to try this on the trees generated by the space tree addon. Without adding any extra geometry or particles apart form a basic ahape a volume shader might give the impression of a much denser crown as shown in the image below:

This effect was achieved by inserting a scaled icosphere that covers about 90% of the crown interior (see below) and adding a volume shader to this icosphere that scatters and absorbs light in a non-uniform manner, i.e. the shader mimics a bunch of small scattered disks, which when seen from the distance add to the illusion of leaves. Note that we cannot do without all the leaves because volume scattering adds no specular reflections as real leaves might do.

If you would like to know more about programming OSL you might be interested in my book "Open Shading Language for Blender". More on the availability of this book and a sample can be found on this page.

Shader code and example node setup

The code for this shader consists of the shader proper, which merely checks which randomly scattered point we are closest to and then calls the indisk function with the position of this closest point and a random direction. indisk checks whether we are inside a disk with its axis in some direction and returns 1 if this is indeed so. Note that the include at the start of the code refers to a file that is distriubted with Blender and contains a number of useful functions, including a number of Voronoi/Worley related ones.
#include "node_texture.h"

int indisk(
  point p,
  point c, float r, float h, vector d
){
  vector v = p - c;
  float a = dot(v,d);
  float lh = abs(length(a * d));
  if(lh > h){ return 0;}
  float lv = length(v);
  float lp = sqrt(lv*lv - lh*lh);
  if(lp > r){ return 0;}
  return 1;
}

vector randomdirection(point p){
  float t = M_2PI*noise("cell",p,1);  
  float u = 2*noise("cell",p,2)-1;  
  float s,c,a;  
  sincos(t,s,c);  
  a = sqrt(1-u*u);  
  float x = a*c;  
  float y = a*s;  
  float z = u;  
  return vector(x,y,z);
}

shader bits(
  point Pos = P,
  float Scale = 1,
  float Size = 1,
  float Height = 0.05,

  output float Fac = 0
){
  point p = Pos * Scale;
  point centers[4];
  float distances[4];
  voronoi(p, "Distance Squared", 0, distances, centers);
  if(indisk(p,centers[0],Size,Height,randomdirection(p))){
    Fac = 1;
  }
}
The node setup to use this shader as seen in the opening image of this article looks like this:

Discussion

Whether using a volume shader this way is really useful remains to be seen: rendering this way is still rather slow. Of course, getting a comparable dense crown with extra particles also slows down rendering: in my tests doubling the number of particles from 1000 to 2000 resulted in a render time that was actually slower than adding the volume shader. In other words, your mileage may vary but it might be worth to experiment.

References

The space tree addon itself is introduced in a few articles on this blog and is available on GitHub. Relevant links are listed below:

Book review: Blender compositing and post processing


Blender compositing and post processing
by Mythravarun Vepakomma.

pros

  • complete and concise reference of all compositor nodes
  • very clear illustrations explaining each node

cons

  • very few pages (about 100, not counting fringe content like index and front matter)
  • very few task oriented examples, just a short example of each node

I have mixed feelings about this book. Clearly the author knows his stuff and he sure knows how to make clear illustrations that explain each individual building block very well. However the book hardly offers any step by step walkthroughs for more complex, real world tasks. And solving complex tasks by stringing together node networks that each solve a particular task is what Blender's compositor excels at.

So the book is a fine reference but would have offered much more value for money if it had shown for example how to composite an actor in front of a green screen onto background footage from start to finish, including solutions for problems like uneven lighting of the green screen, masking hair, matching color, coping with reflected light, etc. and not just the simple demonstration of tbe alpha over node's options.

Conclusion: not a bad reference, produced quite well but I'm left with the feeling it could have been a lot more.

OSL Bevel Shader

In a BlenderArtists thread about ambient occlusion shaders the question was asked if OSL's ray tracing capabilities coudl be used to create a bevel shader, i.e. a s shader that mimics rounded edges on sharp meshes by manipulating the normal. I think the answer to this question is 'yes' and in this post I'' show a first implementation (Edit: the previous code did normalize the resulting normal, now it does. You can follow the discussion on this thread)

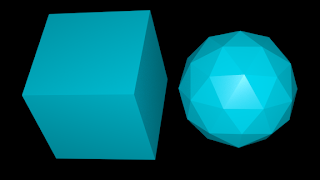
Sample scene, just a cube and an icosphere with sharp edges and some glossy material.

The effect of the bevel shader with Perturb = 0.1. Subtle but clearly noticable.
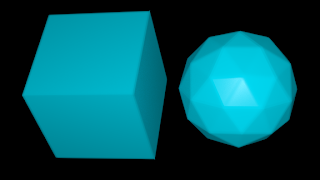
Setting Perturb = 1.0 is far less subtle but shows how much roundedness is possible. All images were produced with Divisions = 3, i.e. 27 sample rays (see below).

Code & theory

To simulate rounded edges choose a point a little below the surface and from this point we cast a set of rays that are all a little bit perturbed from the normal. The we determin the normal at these new intersections and average all normals found. This way when we are close to an edge the normals at the intersection with an adjacent face will be blended in. The illustration below shows what I mean:

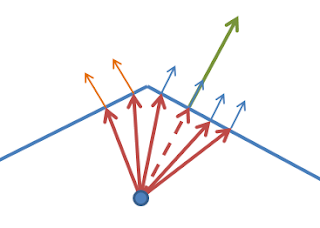
At the shaded point we have a green surface normal. We descend below the surface along this normal (dashed red line) to the blue point. From this point we shoot rays (red) that are slightly perterbed from the normal. Some will hit the same face (and have the same normal as the shaded point (small blue arrows) some will hit the adjacent face with adifferent normal (small orange arraws). The calculated normal is the average of the normals at the hit points.
Note that this algorithm only works well for convex edges, because with concave edges random faces could be hit instead of the adjacent face if the angle between the faces is too sharp.
The code implementing this algorithm is pretty short:
#define BIG 1e6

shader edge(
  float Delta = 0.01,
  float Perturb = 0.001,
  int Divisions = 2,
  output float Fac = 0,
  output normal Normal = N
){
  vector origin = P-Delta*N;
  float count = 1;
  for(int x=0; x < Divisions; x++){
    for(int y=0; y < Divisions; y++){
      for(int z=0; z < Divisions; z++){
        vector d = noise("perlin",vector(x+0.1,y+0.1,z+0.1));
        vector np = N + Perturb * d;    
        if(trace(origin, np)){
            float hdb = 0;
            normal nb = 0;
            getmessage("trace","hitdist",hdb);
            // versions before 2.69.11 4-Mar-2014 crash on next statement
            getmessage("trace","N",nb);
            Normal -= nb;
            count += 1.0;
        }
      }
    }
  }
  Normal = normalize(Normal/count);
  Fac = count/(1+Divisions * Divisions * Divisions);
}
We choose an origin point a bit below the surface by descending along the normal [line 10], generate perturbed normals [line 15-16], trace these normals [line 16] and if we have a hit we retrieve the normal at the hit point [line 22]. Because we are below the surface/ inside the mesh this normal will point inward so we subtract it from our sum of normals (Normal). Finally we divide the sum of normals by the number of hits [line 30]. Note that we also get the hit distance [line 20] but don't use that value. We could check this againt some limit to reduce artifacts on concave meshes for instance.
The generation of perturbed normals is rather awful: just perturbing it by Perlin noise does not give a very uniform distribution of directions, some Halton or Sobel sequence would probably be better but this will do for now. Also not we add a small value too our noise sampling points to avoid the zeo knots in the Perlin noise.
Also note that I got crashes with Blender's daily build version before March 4 (win-64 version) when using the getmessage() function. This appears to be fixed in the latest builds but be aware.

Example node setup

Note that the node does not take a position or normal as input, it gets those from the global P and N respectively but of course if necessary this can be changed quite easily. The setup shown below is the exact setup used for the example images at the start of the page.


If you would like to know more about programming OSL you might be interested in my book "Open Shading Language for Blender". More on the availability of this book and a sample can be found on this page.

A new tree addon, Part III: development continues

The latest version (0.2.10) adds a particle system with acorns to the library (not because it is briliantly modelled but to show an example usage) and adds a shadow density option if you use a shadow group (because no shadow is absolute). I also added an option to change the size of the faces of the emitter mesh. That way leaves and other objects can be made to sit closer to the branches.

Version (0.2.9) of the spacetree addon features cleaner code, the posibility to add two particle systems and an update to the bundled library: it now features a particle system of chestnut leaves as well as an additional bark material. I have also reordered the options in the UI to a somewhat more logical groouping and I am working on an update to the user manual (old version is still available, concepts discussed there are still valid)


Sample image of a tree with the chestnut leaf particle system. The crown was shaped with a crown group consisting of just a couple of icospheres.

References

Future work

Several suggestions have been done to improve the addon (and a few items from the roadmap are still open) but these are the most interesting ones in my opinion, although I am the first to admit that most serve more an academical interest than an artistical one:

    Apical control
    The suppression of side shoots lower down the branch by the growing tip. Is in place but functions unsatisfactorily. Should give straighter branches.
    Branch angle control
    The angle of a side branch is usually more or less fixed for a given species of tree. Having this could add to the believability of the generated tree.
    Branch sheding
    Some trees (e.g. conifers) drop old branches that don't receive enough light, resulting in bare lower trunks.
    Shadow group density
    Currently the shadow group will receive no endpoint markers at all. This should be modulated by some density factor to emulate half shadow (done, see version 0.2.10)
    Tree roots
    Fairly easy to add I think as it is mainly a not so comples upside down tree (at least as an approximation :-). The trick is to match the diameter of the trunk to the top of the root system.
Of course, adding to the bundled library of particle systems and brak materials is very desirable as well, but hopefully the community has something to contribute here (some already have and I you have any good procedural bark material to constribute or maybe good leaf materials (procedural or alphamapped) please post the in the Blender Artist thread. The should be completely your own and have either a Public Domain, CC-0 or GPL license but of course I will credit you in the library notes)

If you really like my addon you might consider having a look at my Amazon wish list :-)