Further Space Tree Pro animation experiments

The trees you create may look alright but they are fairly static. To add realism animated leaves and a swaying trunk skeleton might help.

Therefore I am currently investigating which simple animation techniques could be used. The goal here is to add some life to scenes like architectural fly through, so low wind scenarios is what we aim for.

The general idea is to animate the trunk and branches (and the separate mesh that acts as a leaf emitter) by an armature consisting of just a few bones. The leaves are subsequently animated by adding an extra wave modifier to the leaf emitter that moves the point where a leaf is attached slightly. Additionally we animate the phase of the rotation of the leaf particles slightly.

The overall effect should be a slight swaying motion with some additional movement of the individual leaves. The first result is shown below

i think it would look better with more movement for the individual leaves.

Now the swaying movement itself is still a bit much: larger trees actually need quite some wind before the main trunk starts to move, the outer branches however are much more flexible and bend in low winds for all sizes of trees.

This seems to be be the right balance between sway and leaf movement.

When these experiments are finalised the idea is to add an option to Space Tree Pro to enable all these modifiers and additional settings by simply checking a box. And of course we'll make sure that each tree will get slightly different values so that an animated street full of trees will look as if it is performing some weird choreography.

Blender Conference Discount


During the 2015 Blender Conference (from 23 to 25 October) many products at BlenderMarket will come with a 20% discount. Of course I will participate in that sale as well, so if you were thinking about purchasing either WeightLifter or Space Tree Pro, now is your chance to get an even better deal :-)

Now I wouldn't want to exclude my Open Shading Language for Blender E-book from the fun so even though it is not marketed by BlenderMarket it will carry the same 20% discount during the Blender conference. Get it on Smashwords and enter the coupon code EY53W on checkout.

New option for the floor board add-on

The floor boards add-on now has options to shift the origin of the pattern. This might come in handy when aligning pattern with different features of your architecture.

An example is shown below (the offset options are outlined in red, the pattern on the right has its x-origin moved a bit)

Note that like many options of the floor board generator there is a sensible soft limit on the value. Any soft limit can be overridden id becessary by entering a value by hand.

Code availability

The new version is available on GitHub.

Space Tree Pro: new features

I have updated my Space Tree Pro add-on for Blender. Its latest version (201510041334) comes with additional skinning modes, and option to add some random bumps to the basic crown shape and and option to randomly drop some mature branches from a tree to add 'character'. The new update is of course free to download for people who have previously purchased the Space Tree Pro add-on.

Better skinning

The native skinning option in the add-on left something to be desired, especially for thinner, highly curved branches which may end up looking rather squashed. This new version therefore sports three additional skinning modes, each with it own pros and cons:
Native
The original modifier. An example of the flattened twigs is shown in the image:
Skin modifier
It is now possible to use Blenders built-in skin modifier. It looks better but is really slow:
Convert to curve
Another choice is converting the tree skeleton to a collection of bevelled curves:
Ball and pipe
The final option is to use the conventional ball and pipe approach:
The quality of the new methods is comparable but the time to generate the mesh and and the number of polygons in the mesh differs significantly: For a moderate tree (1000 markers, 400 new markers, branch segment length 0.25, kill distance 1.0) the four skinning methods give the following numbers (on a Intel i7, 4 cores, your mileage may vary)
MethodTime (seconds)Tris
Native1.573,886
Convert to curve1.263,536
Skin modifier35.8415,092
Ball and pipe1.6141,376

A more random crown

It was already possible to vary the branch generation by choosing a different random seed but the overall shape of the crown stayed the same unless you used a crown group. Now with the added bumpiness and size variation for the basic crown shape it has become much simpler to generate unique trees. Compare the three different trees on the top row (diffent branching, same overall shape) with the three trees on the bottom row (which have random bumpiness and shape).

Dropping some mature branches

The final new addition to this version is the option to break away a random number of branch segments after the tree is fully generated. This may add some character to trees think storms etc.). The image below show the same trees where the one on the right has 50 segments removed:

Approximating translucency with inverse ambient occlusion in Blender

Prompted by a question from Superflea if it would be possible to add a translucency map to my WeightLifter add-on I found it was possible to use ambient occlusion baking with inverted normals for this purpose as suggested by this paper. Baking with Blenders built-in baking options is much faster than what is possible using Python and this might be useful for more people so that's why I share it here.

The idea is simple enough: just create a map for each position at the inside of the mesh with a value that represents how much light would be received at that point from nearby surfaces. Sounds a lot like ambient occlusion so the idea is to use ambient occlusion baking but with the normals inverted. The only snag is that inside a mesh it is extremely unlikely that a ray will ever reach the sky (even impossible if the mesh is watertight), resulting in a black map. However, Blenders AO settings have a distance parameter that can be used to tell the AO baking that any ray that does not hit a surface within this distance is considered sky:

(Note that we do not even have to enable AO for our purpose, i.e. baking, just setting the distance to 0.1 or something will suffice)

Now we can create a map that approximates translucency with the following steps:

  • Invert the normals on the mesh (they should all point inward)
  • Bake the ambient occlusion to an image texture (documented here)
  • Make sure you point the normals to the outside again
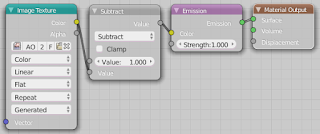
  • Use the inverted values of the image as a translucency map.
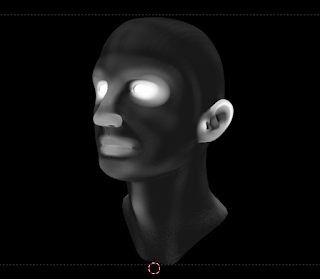
An example image is shown below (the head model is from OscarLeif on BlendSwap)

The noodle that uses this map to illustrate their values with an emission shader is shown below

Now if this is really useful to for example tweak a subsurface scattering shader is up to you :-) If you create a skin shader with it I am eager to see the results.