Even though the number of unique followers has been rising steadily over the years and the number of clicks on adds has grown with it, the already small revenue is getting smaller all the time.
So why bother showing adds? I decided to remove them and hopefully this allows for a even more reading pleasure :-)
PS> i will occasionally draw attention to things like a Blender Market sale, my own products or perhaps a really good add-on by someone else but I trust you guys won't blame me for that.
Black Friday / Cyber Monday Blender Market Sale
It is almost a tradition by now: BlenderMarket will have a sale during the Black Friday/Cyber Monday.
This means serious discounts on participating products and of course my add-ons are on sale too!
Check out BlenderMarket to see if that special product on your wish list now has an orange 'sale' label.
This means serious discounts on participating products and of course my add-ons are on sale too!
Check out BlenderMarket to see if that special product on your wish list now has an orange 'sale' label.
BCon19 BlenderMarket sale
It is almost a tradition by now: BlenderMarket will have a sale during the Blender Conference.
This means serious discounts on participating products and of course my add-ons are on sale too!
Check out BlenderMarket to see if that special product on your wish list now has an orange 'sale' label.
This means serious discounts on participating products and of course my add-ons are on sale too!
Check out BlenderMarket to see if that special product on your wish list now has an orange 'sale' label.
New release of IDMapper
A new release of IDMapper is currently available on BlenderMarket
 This new version is a bugfix release that besides minor fixes also fixes an error that might occur when trying to assign colors based on material ids. Furthermore the manual has been updated to reflect Blender 2.8x layouts and the add-on has been tested against Blender 2.81-beta.

Space Tree Pro ported to Blender 2.80

Blender 2.80
As soon as Blender 2.80 was on the horizon people started asking whether a version of Space Tree Pro would be available for the new Blender. Because I have several add-ons on the market and Space Tree Pro is one of the more complex ones, it ended up last.However, as of today Space Tree Pro 2.80 is available on my BlenderMarket shop!
Existing customers can download the new version free of charge from their BlenderMarket account.
The add-on is fully functional, including support for grease pencil drawn branches and trees created with older versions of Space Tree Pro can be used with the new version. The manual however is still a work in progress and still shows screenshots from the older version. The functionality is the same though so that shouldn't be too much of an issue.
Remarks
While porting I found a bug: a shadow collection (group) only seems to work correctly when you have also configured an exclusion collection (group). I think I can fix this but I am reluctant to do so as it might break backward compatibility so I am hoping for some feedback on this from users.People looking for a more interactive way of drawing trees might want to have a look at NewGrowth: draw trees interactively.
newgrowth exclusion zone (new feature and price drop)
A new exclusion zone has been added to the NewGrowth add-on.
This add-on allows you to design trees in Blender interactively.
And just for fun I lowered the price to just under 30$ Check it out on my BlenderMarket shop while this offer lasts!
This add-on allows you to design trees in Blender interactively.
And just for fun I lowered the price to just under 30$ Check it out on my BlenderMarket shop while this offer lasts!
DumpMesh: 2.80 update
Previously I wrote about a small add-on that can create a small add-on on the fly the will recreate a mesh object with all its associated geometry data.
This add-on is now updated to Blender 2.80 and available from GitHub.
for more details see the post mentioned.
This add-on is now updated to Blender 2.80 and available from GitHub.
for more details see the post mentioned.
NewGrowth Interactive tree design, Blender 2.80 edition
Today I am happy to announce the Blender 2.80 edition of my NewGrowth add-on.
The add-on allows you to design trees interactively and later even adjust some parameters of the generated tree mesh.
An introduction and a feature overview are avaliable in the next two videos (still showing the 2.79 user interface)
The add-on is available on BlenderMarket.
More convenient debug output when compiling Blender 2.80 OpenGL shader programs
Because this might be useful to other people as well, I created a small module that compiles OpenGL shader programs and shows compilation and linking errors in a more convenient manner. On successful compilation it also list all remaining active attributes and uniforms so you can see which ones have been optimized away (and may cause errors when trying to assign values to them with batch_for_shader() or shader.uniform_xxx()
On compiling OpenGL shaders Blender lists errors on the console and (with the --debug-gpu-shaders option) will dump source code into the /temp directory. That is not very convenient because it is not in one place and the source code does not contain line numbers. When you use the debug_program() function form the opengl_debug module the output is all on the console and reorganized for readability.
Nicer error listing
For example, with the code below
    vs_syntax_error = '''
    in vec3  pos;

    void main()
    {
        gl_Position = pos
    }
    '''

    debug_program(vshader=vs_syntax_error, name="Syntax error sample")
The output will be
GL Error: 0 (Syntax error sample:vertexshader)
0(7) : error C1035: assignment of incompatible types
0(8) : error C0000: syntax error, unexpected '}', expecting ',' or ';' at token "}"

[0001] #version 330
[0002]
[0003]     in vec3  pos;
[0004]
[0005]     void main()
[0006]     {
[0007]         gl_Position = pos
[0008]     }
[0009]
Active attributes and uniforms
Also, when there are syntax errors it shows the remaining active attributes and uniforms. For example, with the code below (assuming you have doneimport debug_program from opengl_debug)
    vs_opt = '''
    in vec3  pos;
    in vec3  pos2;
    void main()
    {
        gl_Position = vec4(pos, 1.0);
    }
    '''

    debug_program(vshader=vs_opt, name="Optimized attribute")
The output will be
active attributes
['GL_FLOAT_VEC3'] pos
active uniforms
showing that there are no active uniforms whatsoever and that the
pos2 attribute has been optimized away.
Code availability
The code is available from my GitHub repository.floorboard add-on: Blender 2.80 compatible version available
A new version of the floorboards add-on that is compatible woth Blender 2.80 is available on GitHub. (this is a single python file: select
File->Save As... from your browser and save it somewhere as planks.py. Then in Blender, select File->User preferences->Add-ons->install from file... (don't forget to remove an earlier version if you have one).
It is a pretty minimal port, i.e. I only made the necessary changes to make it run on 2.80 but to be honest, the add-on shows its age. The coding isn't very elegant and there are still a number of known issues. Nevertheless, it's a start, so enjoy!
PS. there are quite a few articles on this blog that talk about this add-on, check here for a list.
Colorramppicker add-on updated to Blender 2.80
Made a small update to the colorramppicker add-on. It is now compatible to Blender 2.80
Read more on its use or watch the video in the original article.
Read more on its use or watch the video in the original article.
Availability
You can download the add-on from GitHub. (click right on the Raw button and save the python file anywhere you like and then in Blender selectEdit->preferences, Add-ons, Install from file... Don't forget to remove the old one first and don't forget to enable the add-on after installing it.)
New version of WeightLifter for Blender 2.80
I has some bug-fixes to keep it compatible to the latest release candidate but more importantly it sports an updated manual and a new feature to combine baked weight maps into one. This feature is useful if you use the maps as density maps in a particle instance and want to prevent frame-to-frame jittering for example. It is illustrated in this video
Exporting a model as a standalone html with webgl
Is is simple enough to export a model or even a complete scene from blender with
This would give you a

). The add-on contains the three.js library which also has a MIT license and a draco decoder which has an Apache license.
The add-on is called webgl-one-click (which is a bit presumptuous, I know, you'll probably need four clicks or so) and can be found in my GitHub repository.
The add-on can be downloaded as a .zip file (right click / save as this link) that can be installed in the usual manner. The individual source files can be found in their own folder but you probably only need that if you want to make changes to the code.
When/if I find the time this weekend I might draw up a quick tutorial, but it is easy enough to use: after installing the addon it is available from the File -> export menu. It basically highjacks the existing gltf exporter (so you are not limited to a single object). Point it to a directory and it exports your model, creates a html file with the same name and copies a bunch of javascript. You should then simple copy the whole dir to your webserver. (Opening the file locally in your browser probably wont work as most browsers consider this unsafe; you could run a local http server of course from this directory e.g. python3 -m http.server)
File -> Export -> glTF 2.0This would give you a
.glb or .gltf file but you would still need to create an html file with a bit of javascript in order to display it on your webpage.The problem
Commercial solutions exist, like Verge3d and Blend4Web, but only Blend4Web offers a free community edition. The latter comes with a rather strange claim with regard to your models considering the code is GPL: you should open source them as well or maybe not if you do not use the whole framework but it is up to them to decide. Both issues are unacceptable to me: I am happy to share code, but not necessarily any models, and someone else having a say over anything I produce, whether code or models, is not even up for discussion.The solution
So what to do? Create my own add-on of courseLegal nonsense
The add-on I present here has an MIT license and if you use it to present your models on a website, you are under no obligation to open source those models. (You cannot prevent people from downloading the gltf version of your model, after all that is what their browser needs to display it, but you can certainly assert your copyright on your model and forbid them from doing anything else apart from viewing it and you certainly don't need to provide your .blend files anymore than Blender requires that: a model is not a derived work from this add-on. If you still uncertain, get legal advice because luckily I am not a lawyer). The add-on contains the three.js library which also has a MIT license and a draco decoder which has an Apache license.Code availability
Enough license talk, where's the add-on?The add-on is called webgl-one-click (which is a bit presumptuous, I know, you'll probably need four clicks or so) and can be found in my GitHub repository.
The add-on can be downloaded as a .zip file (right click / save as this link) that can be installed in the usual manner. The individual source files can be found in their own folder but you probably only need that if you want to make changes to the code.
Example
I have uploaded an example on my site. Textures etc are quite big so it might take a while to load, the background typically shows up fast but the model will take some time as it is current a few tens of MB.When/if I find the time this weekend I might draw up a quick tutorial, but it is easy enough to use: after installing the addon it is available from the File -> export menu. It basically highjacks the existing gltf exporter (so you are not limited to a single object). Point it to a directory and it exports your model, creates a html file with the same name and copies a bunch of javascript. You should then simple copy the whole dir to your webserver. (Opening the file locally in your browser probably wont work as most browsers consider this unsafe; you could run a local http server of course from this directory e.g. python3 -m http.server)
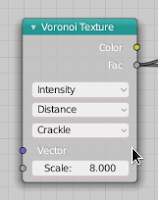
Voronoi crackle in Blender 2.80 rc 1
Yeah, voronoi crackle made it Blender 2.80!

It has taken some time, but now there is nothing that prevents us from creating dragon scales ;-) And yes, it works with Eevee as well. (not the micro-displacement however, that's a whole other story)
Crackle along with many other options is now available in the updated Voronoi Texture node:

It has taken some time, but now there is nothing that prevents us from creating dragon scales ;-) And yes, it works with Eevee as well. (not the micro-displacement however, that's a whole other story)
Crackle along with many other options is now available in the updated Voronoi Texture node:

Snap and transform add-on ported to 2.80
A new version of my small Add and Transform add-on is now available from my GitHub repository.
Note that this is a new file, not just a new revision. Don't forget to remove any old version first before installing the new one.
The functionality is the same: the add-on provides options to move the origin of an object to the lowest point of the mesh (optionally moving it to lie below the center of mass) and (in edit mode) to move the origin to a selected vertex. More details in the original article.
You can download the add-on via this link (right click and select save-as ... ).
Upgrading Blender add-ons from 2.79 to 2.80, part 4
glLineStipple and co are gone, must be replaced by shaders
This popped when working with the bgl module. There is a good shader based alternative however with an example in the docs.
Groups are now collections
which means references to bpy.data.group must be replaced by bpy.data.collection
Setting active object is different
You assign an object to bpy.context.view_layer.objects.active.
In many circumstances the view_layer is now the ultimate arbiter of what we see. This allows for organizing the visibility of objects in a scene but it also offers the link to the active object.
You must use ob.select_set(<bool>) instead of ob.select = <bool>
This is a breaking change change that could have been avoided: if it was necessary to move from a simple assignment to executing some code when the select status changes it would have been possible to use a property instead. Now it is just an annoying change in my opinion
The name of module may not contain a point either
See item on dash being not allowed in an earlier article
INFO_MT_mesh_add menu is now called VIEW3D_MT_mesh_add
Which makes sense because it is part of the VIEW3D area.
use_subsurf_uv no longer available on a subsurf modifier
Too bad, but I guess this wasn used very often anf the new quality settings of the modifier might well server the purpose even better.
no bl_category in Panels
So you cannot decide where your Panel will be located in the Toolbar.
That's what I thought earlier and it is true but only if your region type is TOOLS (visible with Ctrl-T) but you can still have a category if your region type is UI (visible with Ctrl-N)
Working with the new OpenGL functionality in Blender 2.80
For quite some time it has been possible to create draw handlers in Blender that use OpenGL functionality to draw overlays in the 2d view. Until now this functionality has been restricted due to older bindings, limiting the exposed OpenGL functionlity to version 2.0 features. The most noticeable effect of this is slow performance in complex drawings due to the lack of vertex buffer objects.
With Blender 2.80 however all new bindings have been added that expose OpenGL version 3.3 and the Python API has been expanded to not just to expose those bindings but add some convenient extras as well that greatly help you to get started.
In this article I want to highlight some features that are available and that I am using in an add-on that implements some sort of connection editor for game levels. The idea is that on top of an active object you have an overlay where you can point and click to indicate spots where other blocks might connect. This is easier to show than to explain in words so I've put together a small video that illustrates the concept:
The all important includes are the following:
The numpy part is actually not relevant to our current discussion but it speeds up working with lots of geometry quite a bit. More in the gpu module can be found in Blender's online documentation.
With these imports in place the actual drawing is pretty straight forward:
It is necessary to bind the shader (line 3) to assign a value to its uniform color later.
Next we calculate the vertices and indices that make up our geometry (line 5). The positions of the vertices are in uniform coordinates (i.e. 4 components, x,y,z,w with w == 1.0) so the world matrix of the object around which we are drawing can be used transform those coordinates to world space. Because the positions we will pass to our shader need to have 3 coordinates we remove the 4th coordinate after the transformation (line 8).
Next we create a batch, i.e. all necessary information to actually draw our geometry. We tell what shader to use, and that we will be drawing a collection of triangles (TRIS) and we pass it a list of indices (in this case 3 for each triangle) to point to the vertices that make up those triangles (line 10).
Finally we assign a color and do the actual drawing (line 12). Note that we didn't do anything with regard to positioning the camera or calculating a view matrix, this is all setup in Blender's draw handler already so anything we draw in the 3d-view will react to camera changes without us having to do anything.
A BVH tree is a structure that can be used very efficiently to determine whether a ray intersects any of the triangles in the tree, even if we have thousands of them. Note that the first argument to the FromPolugons constructor (line 8) is a Python list of vertices with 3 coordinates, that is why we again drop any 4th coordinate when we calculate the world coordinates (line 5) and convert our numpy array explicitly to a Python list. Every triangle is defined by 3 indices into this list of coordinates so we convert the linear list of indices to a Nx3 array. The Blender implementation can work with other polygons besides triangles but it is more efficient if it knows all polygons are indeed triangles so that is what we indicate when we create the tree.
With the BVH tree in place it is pretty straight forward to convert mouse coordinates to a direction into the scene that is drawn in the 3d view area and use this direction to get the intersected triangle from the BVH tree:
To get the origin and direction of the ray that is coming from the 3d view viewpoint into the scene to the point where you click the mouse, the view3d_utils module provides us with all the necessary components to calculate those if we provide the mosue coordinates and the region data (line 10+11).
We can then use the ray_cast() method of our BVH tree to see if the ray intersects any triangle. Note that the origin and ray are in world coordinates and that is the reason we constructed our BVH tree in world coordinates in the first place.
There is of course a lot more to OpenGL and a good place to start might be to look at the examples provided in the gpu module documentation.
With Blender 2.80 however all new bindings have been added that expose OpenGL version 3.3 and the Python API has been expanded to not just to expose those bindings but add some convenient extras as well that greatly help you to get started.
In this article I want to highlight some features that are available and that I am using in an add-on that implements some sort of connection editor for game levels. The idea is that on top of an active object you have an overlay where you can point and click to indicate spots where other blocks might connect. This is easier to show than to explain in words so I've put together a small video that illustrates the concept:
Drawing code
I haven't uploaded any code yet but I do want to illustrate the important bits with some code snippets.The all important includes are the following:
import gpu
from gpu_extras.batch import batch_for_shader
import numpy as np
The numpy part is actually not relevant to our current discussion but it speeds up working with lots of geometry quite a bit. More in the gpu module can be found in Blender's online documentation.
With these imports in place the actual drawing is pretty straight forward:
bgl.glEnable(bgl.GL_BLEND)
shader = gpu.shader.from_builtin('3D_UNIFORM_COLOR')
shader.bind()

pos, indices = some_function_generating_geometry()

mat = np.array(ob.matrix_world)
pos = np.array([mat @ v for v in pos], np.float32)[:,:3]

batch = batch_for_shader(shader, 'TRIS', {"pos": pos}, indices)

shader.uniform_float("color", (1,0,0,0.5))
batch.draw(shader)
Because we want to draw transparent faces, we enable blending (line 1). We will need a shader to draw our geometry but because the faces will be a uniform color we can use a built-in shader (line 2).It is necessary to bind the shader (line 3) to assign a value to its uniform color later.
Next we calculate the vertices and indices that make up our geometry (line 5). The positions of the vertices are in uniform coordinates (i.e. 4 components, x,y,z,w with w == 1.0) so the world matrix of the object around which we are drawing can be used transform those coordinates to world space. Because the positions we will pass to our shader need to have 3 coordinates we remove the 4th coordinate after the transformation (line 8).
Next we create a batch, i.e. all necessary information to actually draw our geometry. We tell what shader to use, and that we will be drawing a collection of triangles (TRIS) and we pass it a list of indices (in this case 3 for each triangle) to point to the vertices that make up those triangles (line 10).
Finally we assign a color and do the actual drawing (line 12). Note that we didn't do anything with regard to positioning the camera or calculating a view matrix, this is all setup in Blender's draw handler already so anything we draw in the 3d-view will react to camera changes without us having to do anything.
Pointing and clicking
Although in principle OpenGL coudl be used to determine where a mouse click lands on a bit of drawn geometry, implementing it that way would be rather cumbersome. It is easier by far to use other Blender built-in functionality for that.
Before we start interacting with our object we use the same geometry to create a so called BVH tree that contains all our triangles:
from mathutils.bvhtree import BVHTree
pos, indices = some_function_generating_geometry()

mat = np.array(ob.matrix_world)
pos = np.array([mat @ v for v in pos], np.float32)[:,:3]

indices.shape = -1,3
self.tree = BVHTree.FromPolygons(pos.tolist(), indices.tolist(), all_triangles=True)
A BVH tree is a structure that can be used very efficiently to determine whether a ray intersects any of the triangles in the tree, even if we have thousands of them. Note that the first argument to the FromPolugons constructor (line 8) is a Python list of vertices with 3 coordinates, that is why we again drop any 4th coordinate when we calculate the world coordinates (line 5) and convert our numpy array explicitly to a Python list. Every triangle is defined by 3 indices into this list of coordinates so we convert the linear list of indices to a Nx3 array. The Blender implementation can work with other polygons besides triangles but it is more efficient if it knows all polygons are indeed triangles so that is what we indicate when we create the tree.
With the BVH tree in place it is pretty straight forward to convert mouse coordinates to a direction into the scene that is drawn in the 3d view area and use this direction to get the intersected triangle from the BVH tree:
from bpy_extras.view3d_utils import region_2d_to_vector_3d
from bpy_extras.view3d_utils import region_2d_to_origin_3d

def pick_face(self, context, event):
    scene = context.scene
    region = context.region
    rv3d = context.region_data
    coord = event.mouse_region_x, event.mouse_region_y

    direction = region_2d_to_vector_3d(region, rv3d, coord)
    origin = region_2d_to_origin_3d(region, rv3d, coord)
    pos, normal, index, dist = self.tree.ray_cast(origin, direction)
    if pos is not None:
        ... we can now do stuff based on the triangle we have hit ...
To get the origin and direction of the ray that is coming from the 3d view viewpoint into the scene to the point where you click the mouse, the view3d_utils module provides us with all the necessary components to calculate those if we provide the mosue coordinates and the region data (line 10+11).
We can then use the ray_cast() method of our BVH tree to see if the ray intersects any triangle. Note that the origin and ray are in world coordinates and that is the reason we constructed our BVH tree in world coordinates in the first place.
Conclusion
It is quite simple to draw OpenGL overlays in the 3d view and interact with it based on mouse clicks. The new Blender 2.80 Python API for OpenGL provides us with all we need and drawing can be done very efficiently.There is of course a lot more to OpenGL and a good place to start might be to look at the examples provided in the gpu module documentation.
NewGrowth Interactive Trees, detailed feature overview

In a previous post I introduced NewGrowth, a new add-on to draw trees interactively.
In this video a more detailed overview is presented of the features that are available in NewGrowth.
NewGrowth Interactive Trees

This add-on allows you to draw natural trees by painting imaginary light points with a brush towards which branches will grow. This may sound a bit magical so an introduction video might explain more than words:
Ortho ported to Blender 2.80

The fourth add-on in my portfolio to be ported to Blender 2.80 is Ortho.
This add-on relies quite heavily on OpenGL graphics and was therefore a bit more challenging. Be prepared for all sorts of issues including crashes as long as Blender 2.80 is in beta (although to be honest, the beta has proven to be pretty stable already)
Subscribe to:
Posts (Atom)