Sample artwork with ProWood shaders

I started playing around with Karl Andreas Gross' ProWood Shader pack and after some twiddling around I must say I like it:

In this example scene (a scene from Chocofur) I used the beech preset material for the chair (the chair is also from Chocofur. Note that I dropped the bundled textured material and replaced it by the ProWood procedural material). I picked the colors to match and upped the brightness and the reflectivity a bit to get the varnished look of the steam-pressed plywood of the chair. The books were generated by the book wizard cover generator.

For the floor (generated with my floorboard add-on) I used the material preset that is included in the shader pack specifically for the add-on, in this case oak. I just changed the colors. I had to changed the profile in bevel settings of the floor to 0.69 to prevent strange shadows. That has nothing to do with the shaders but everything with the geometry of the planks my add-on is generating, so it might be a good idea to make this the default in future versions.

floorboard add-on: a commercial shader with specific support

My free floorboards add-on has proven to be quite popular and now even a professional shader writer, Karl Andreas Groß, has created a wood shader collection that includes specific settings for use with the add-on. His shaders are available on BlenderMarket and I hope to try them out myself soon.

The floorboard add-on itself can be downloaded from GitHub.

WeightLifter add-on: new features

A new version of the WeightLifter add-on (available on BlenderMarket) adds some functionality based on user feedback. Besides some bug fixes you can now:
  • use an arbitrary reference axis in Height en Slope modes,
  • restrict the range of calculated values interactively, and
  • control the size of the patches when assigning random values to faces.

A tutorial showing this new functionality is available on YouTube:

Black friday / cyber monday sale


During the weekend and next monday (from 27 to 30 November) many products at BlenderMarket will come with a 25% discount. Of course I will participate in that sale as well, so if you were thinking about purchasing either WeightLifter or Space Tree Pro, now is your chance to get an even better deal :-)

Now I wouldn't want to exclude my Open Shading Language for Blender E-book from the fun so even though it is not marketed by BlenderMarket it will carry the same 25% discount during the Black Friday / Cyber Monday weekend. Get it on Smashwords and enter the coupon code QP54E on checkout.

WeightLifter add-on: new feature

I extended the WeightLifter add-on with an extra operator in the Paint menu of the vertex paint mode: VertexColorCombine. It lets you combine color channels from different vertex color layers into a combined vertex color layer.

Combining this kind of information into a single vertex color layer might save considerable space when using large meshes. A small tutorial on a possible workflow to combine different attributes calculated with WeightLifter into a single vertex color layer is available on YouTube:

Floorboard add-on gets Versaille pattern

From time to time I keep on developing my floorboards add-on an I am happy to present a new option: the Versaille pattern.

(click to enlarge)

It was quite fiddly to get it right but now it looks fine. (Thank you Spirou4D for pointing out the issues with the center configuration).

This pattern offers the same options as the other pattern: you can add randomness to the planks, gaps between them, shift the origin, etc. etc. The generated uv-map (in Shuffle and Packed modes) aligns the uv coordinates in such a way that all are aligned along the longest axis of a plank. This means that if you have a single wood texture with the grain running in a certain direction, planks that are rotated still have a uv parallel to the grain, as it would probably be in reality. An example with a simple stripe material is shown below (note that each plank also has a different color in a vertex color layer that you can use to slightly randomize the material of each individual plank)

The pattern has border planks that are arranged in a symmetrical manner: 2 short horizontal ones,2 slightly longer vertical ones. Selecting the Switch option will change this to 4 identical planks arrange in a clockwise fashion.

An overview of the different articles that highlight all the options of the add-on can be found here.

Availability

The latest version is as always available on GitHub.

WIP: versaille pattern for floorboard add-on

I am currently working on an addition to my floor boards add-on for blender, the pattern often referred to as Versaille parquet.

I have implemented the simplest variant and am looking for a way to align the uv so the grain runs along with the length of the planks. With some manual tweaking it is already possible to get a decent result:

Further Space Tree Pro animation experiments

The trees you create may look alright but they are fairly static. To add realism animated leaves and a swaying trunk skeleton might help.

Therefore I am currently investigating which simple animation techniques could be used. The goal here is to add some life to scenes like architectural fly through, so low wind scenarios is what we aim for.

The general idea is to animate the trunk and branches (and the separate mesh that acts as a leaf emitter) by an armature consisting of just a few bones. The leaves are subsequently animated by adding an extra wave modifier to the leaf emitter that moves the point where a leaf is attached slightly. Additionally we animate the phase of the rotation of the leaf particles slightly.

The overall effect should be a slight swaying motion with some additional movement of the individual leaves. The first result is shown below

i think it would look better with more movement for the individual leaves.

Now the swaying movement itself is still a bit much: larger trees actually need quite some wind before the main trunk starts to move, the outer branches however are much more flexible and bend in low winds for all sizes of trees.

This seems to be be the right balance between sway and leaf movement.

When these experiments are finalised the idea is to add an option to Space Tree Pro to enable all these modifiers and additional settings by simply checking a box. And of course we'll make sure that each tree will get slightly different values so that an animated street full of trees will look as if it is performing some weird choreography.

Blender Conference Discount


During the 2015 Blender Conference (from 23 to 25 October) many products at BlenderMarket will come with a 20% discount. Of course I will participate in that sale as well, so if you were thinking about purchasing either WeightLifter or Space Tree Pro, now is your chance to get an even better deal :-)

Now I wouldn't want to exclude my Open Shading Language for Blender E-book from the fun so even though it is not marketed by BlenderMarket it will carry the same 20% discount during the Blender conference. Get it on Smashwords and enter the coupon code EY53W on checkout.

New option for the floor board add-on

The floor boards add-on now has options to shift the origin of the pattern. This might come in handy when aligning pattern with different features of your architecture.

An example is shown below (the offset options are outlined in red, the pattern on the right has its x-origin moved a bit)

Note that like many options of the floor board generator there is a sensible soft limit on the value. Any soft limit can be overridden id becessary by entering a value by hand.

Code availability

The new version is available on GitHub.

Space Tree Pro: new features

I have updated my Space Tree Pro add-on for Blender. Its latest version (201510041334) comes with additional skinning modes, and option to add some random bumps to the basic crown shape and and option to randomly drop some mature branches from a tree to add 'character'. The new update is of course free to download for people who have previously purchased the Space Tree Pro add-on.

Better skinning

The native skinning option in the add-on left something to be desired, especially for thinner, highly curved branches which may end up looking rather squashed. This new version therefore sports three additional skinning modes, each with it own pros and cons:
Native
The original modifier. An example of the flattened twigs is shown in the image:
Skin modifier
It is now possible to use Blenders built-in skin modifier. It looks better but is really slow:
Convert to curve
Another choice is converting the tree skeleton to a collection of bevelled curves:
Ball and pipe
The final option is to use the conventional ball and pipe approach:
The quality of the new methods is comparable but the time to generate the mesh and and the number of polygons in the mesh differs significantly: For a moderate tree (1000 markers, 400 new markers, branch segment length 0.25, kill distance 1.0) the four skinning methods give the following numbers (on a Intel i7, 4 cores, your mileage may vary)
MethodTime (seconds)Tris
Native1.573,886
Convert to curve1.263,536
Skin modifier35.8415,092
Ball and pipe1.6141,376

A more random crown

It was already possible to vary the branch generation by choosing a different random seed but the overall shape of the crown stayed the same unless you used a crown group. Now with the added bumpiness and size variation for the basic crown shape it has become much simpler to generate unique trees. Compare the three different trees on the top row (diffent branching, same overall shape) with the three trees on the bottom row (which have random bumpiness and shape).

Dropping some mature branches

The final new addition to this version is the option to break away a random number of branch segments after the tree is fully generated. This may add some character to trees think storms etc.). The image below show the same trees where the one on the right has 50 segments removed:

Approximating translucency with inverse ambient occlusion in Blender

Prompted by a question from Superflea if it would be possible to add a translucency map to my WeightLifter add-on I found it was possible to use ambient occlusion baking with inverted normals for this purpose as suggested by this paper. Baking with Blenders built-in baking options is much faster than what is possible using Python and this might be useful for more people so that's why I share it here.

The idea is simple enough: just create a map for each position at the inside of the mesh with a value that represents how much light would be received at that point from nearby surfaces. Sounds a lot like ambient occlusion so the idea is to use ambient occlusion baking but with the normals inverted. The only snag is that inside a mesh it is extremely unlikely that a ray will ever reach the sky (even impossible if the mesh is watertight), resulting in a black map. However, Blenders AO settings have a distance parameter that can be used to tell the AO baking that any ray that does not hit a surface within this distance is considered sky:

(Note that we do not even have to enable AO for our purpose, i.e. baking, just setting the distance to 0.1 or something will suffice)

Now we can create a map that approximates translucency with the following steps:

  • Invert the normals on the mesh (they should all point inward)
  • Bake the ambient occlusion to an image texture (documented here)
  • Make sure you point the normals to the outside again
  • Use the inverted values of the image as a translucency map.
An example image is shown below (the head model is from OscarLeif on BlendSwap)

The noodle that uses this map to illustrate their values with an emission shader is shown below

Now if this is really useful to for example tweak a subsurface scattering shader is up to you :-) If you create a skin shader with it I am eager to see the results.

Space Tree Pro: new features WIP

My Space Tree Pro add-on for Blender is doing quite well. However, any piece of software needs contineous attention and that is what I am giving it at the moment.

The features I am working on right now need some internal testing before I release them but you can expect them in a few weeks or so. The main focus is on the quality of the tree mesh. The algorithm I use now is pretty fast but the results are not optimal, especially for thin branches connected to thicker ones and for highly curved branches.

The improvements in the works are threefold:

  • Crease the branch forks. This gives a tighter look for small branches connected to thick stems with a negliable impact on speed,
  • An option to use Blenders skin modifier. Looks great but is much slower (5-10x),
  • An option to convert the skeleton to a beveled curve (a la Sapling). Is actually faster and although thin branches look better, the branch forks are somewhat inferior to the skin modifier
The last two options look a lot cleaner but there's no control of the uv-map, which means procedural or box-mapped textures only. (images will follow)

WeightLifter add-on: new feature

Version 201509040905 adds a new option to the view from camera mode: a height offset. It add allows you to add weight to vertices even if they are in a valley on not directly visible from the camera. A tree for example might have a top that is visible if it is longer than the valley is deep at that point. Using this feature when populating an area with tree particles still reduces the number of particles needed but adds an extra bit of realism, especially on ridges seen side-on. This is illustrated in the image below:

In the bottom image you can see that the tiips of some trees peak above the ridge. The generated weight maps used are shown below, with the default on the left and the one with a slight height offset to the right:

The new version is of course available free of charge to people who have already purchased the add-on. Check the BlenderMarket page for more details.

Extending the Voronoi node in Cycles: a progress report

In a previous post I reported on a small project to extend the functionality of the voronoi noise node in Cycles. After some discussion with developers and users, I spent some time on it and the basic code is done.

Basically the Cycles Voronoi texture node will have all the functionality of its Blender Internal counterpart: you can choose different metrics (= ways to define what a distance is) including the manhattan and chebychev metrics and you can choose whether you want to closest neighbor, the 2nd closest (and 3rd, 4th) or the difference between the 2dn and the 1st closest (a.k.a. Voronoi Crackle). A sample is shown below:

The node has the same outputs as before and just has two extra buttons and an extra input socket (E, which controls the exponent of the Minkovski metric):

The node defaults to the old options and produces output that is pixel for pixel identical to the old output (with a distance metric of Distance squared). The downside of all this extra functionality is that it is slightly slower (because it now has to choose between different metrics and has to keep around more data). So currently I am checking if or where it makes sense to optimize the code some more. I don't want to complicate the code too much because that would make both maintaining and reviewing the code harder, so at this point it might be more sensible to let it be and accept a few percent penalty for now.

Small additions to the floor board generator add-on for Blender

The floor boards add-on most recently described in this article got a minor update: by request I added options to rotate and scale the generated uv-map. Although this might done in the uv image editor as well, any actions there would be overwritten when changing the floor boards mesh again with the add-on. Of course a uv map can be tweaked in the material just as well with a vector mapping node for example, so which method you prefer is a matter of taste. The defaults are such that it shouldn't break existing objects/materials.

Another option that is now visible is 'Keep materials'. This was on by default but not exposed in the options. You can now uncheck it if you like in which case any associated materials will be removed from the object. This is of questionable utility, but I'd rather not keep an option hidden.

The UV randomization drop down now offers a Packed option: instead of randomizing uvs it lets all the uv coordinates of planks start at (0,0) without altering the scale. This might come in handy when texturing planks with small and non tileable images. (It will look repetitive but that way it won't show seams)

I also fixed a rather embarrassing normal problem. Thank you maraCZ for pointing it out so clearly.

Known bugs

Under certain circumstances the generated mesh will contain doubled vertices. I think this is caused by Blenders boolean modifier. (To simplify the code we generate a pattern that is guaranteed to be big enough and then cut it to size with a boolean modifier). For now, if you see strange lighting artifacts, go to edit mode, select all and choose remove doubles. I will look into this later.

Availability

The code is a single file, available on GitHub.

How to add a new node to the Cycles source code

I created a page where I documented each file that needed to be changed or added to create the VoronoiCrackle node that I would like to get included in Blender. It documents what is what and contains a link to the actual patch. It is certainly not perfect but might serve as a good starting point for people how want to give it a try (and for myself as a cheat sheet because adding a node involves many, many files :-)
The page is listed in the pages widget on the top right of the blog or via this link.

Space Tree Pro: Hazel tree freebie

The hazel tree that was used in the promotional image I created for this article is now available for free. You can download it from here. The materials are Cycles ready.

It serves as an example of what can be created with my Space Tree Pro add-on for Blender (available on Blender Market). It can be used as is or (if you have the Space Tree Pro add-on) as a starting point for other trees. (It has all the Space Tree Pro settings stored as object attributes, which will be recognized by the add-on)

Hexagon shader texture for Blender Cycles on GPU and CPU

First stab at adding a hexagon pattern to Cycles that can be used on the GPU as well as the CPU and that is not based on OSL.

The image was created with the following noodle:

As you can see, the hexagon node provide both a color and two float outputs. The first is the distance squared to the centre of the hexagon, the second one the distance squared to the centre of the nearest neighbour. Having both output allows for the easy creation of an edge, as shown in the noodle.

Code

The code follows the implementation of the OSL version closely and might be sub-optimal. My first steps will be to document my steps in creating a completely new node (because no less than 15(!) files needed to be changed or added to implement a single node. After that I want to optimize the code a bit and wait for feedback on my previous patch before submitting this one.

Voronoi noise with cyclic metrics, an experiment

While working on adding more functionality on voronoi nodes in OSL I was wondering if we could vary the metric in some interesting way. The result of one of those experiments is shown below:

The noodle used to generate this image looks like this:

Note the number 7 in de metric drop down.

Observations

The pattern looks decidedly different from other cell like patterns and depending on the value of E can be made to look like anything from x-ray diffraction pattern(? at E=28) to stylized models of atoms (E=2.6):

The code for this metric(*) is this:
length(d) + (1 + sin(e * length(d)))/2;
i.e. we basically add a sine component to the distance. If E is zero this metric reduces to a plain distance metric. (*) Note that this isn't a true metric in the mathematical sense as it does not satisfy the triangle inequality.

Code

The code is a minor adaptation of my previous script and is available on GitHub.
If you would like to know more about programming OSL you might be interested in my book "Open Shading Language for Blender". More on the availability of this book and a sample can be found on this page.

Fast Voronoi F2F1 in Blender Cycles on GPU and CPU

The voronoi noise texture in Blender Cyles is rather limited: it is only based on the distance to the nearest point while many interesting patterns need the distance to the next nearest points as well (or the difference F2 - F1). Also there is no way to vary the distance metric, everything is based on the distances squared while for example so called manhattan metrics yield squarish patterns that can be quite useful.

I did submit the path for review just now, if you're interested you can follow its fate here.

All of this can be overcome by using Open Shading Language, but the Cycles OSL implementation is limited to the CPU and cannot benefit from a much faster GPU. I therefore decided to try and implement it in the Blender source code and that went rather well (but see my rants below):

As you can see I added a second value output to the Voronoi node that yields the distance to the next nearest neighbour and added a dropdown to select the distance metric. Currently I have implemented the distance, distance squared (the default), manhattan and chebychev metrics, I might add the generalized minkowsky metric as well. The images show the F2 - F1 noise for the distance squared and manhattan metrics respectively:


The code works on GPU and on CPU but I only tested it on 64bits Linux (Ubuntu 15.04 to be precise) although there is no reason to believe it will work differently on antoher OS.

Can I haz codez?

The diff to the Blender source code as of 8/8/2015 is for the time being available via DropBox. If there is enough positive feedback I will try to get the patch accepted for inclusion in the source code. Note that the diff shows also some changes to files that have nothing to do with the node itself, notably device_cuda.cpp, which i need to tweak because although I have a GTX970 (= SM_52 capable) card, I didn't upgrade my cuda drivers so i needed to hack the source to restrict the cuda compiler to sm_50. This is irrelevant to the patch itself.

Some remarks about the code: coding this was not all pleasure and that is an understatement. No less than 8 files needed to be changed to alter a single node type. That isn't a bad thing in itself but there is duplicated code, a lot of redundant constants defined in different places and I could find no decent documentation on the stack based virtual machine (svm) that is used by Cycles. It took me way longer to fathom the ins and outs of the code than it took to write the code itself and I am still not 100% certain that I did not miss something. Blender is a wonderful piece of software but it certainly would benefit from a set of decent architecture docs :-)

Space Tree Pro,another showcase

Currently I am working on a next release of my Space Tree Pro addon. This picture shows off the ease of adding trees to provide a suitable backdrop. It also shows off the new hazel tree example. The next release will probably be available around the end of august.

Currently I am working on a next release of my Space Tree Pro addon. One of the things it will feature is randomization of the basic ellipsoid crown shape and some additional bundled tree examples. The one shown below is has photo realistic hazel leaves and has is crown slightly randomized.

I know of course that hazel trees or bushes normaly don't grow in a prairie like environment :-)

Features that will probably make it into the next release:

  • Randomized crown outline
  • Randomzied shape, offset and distortion of the crown shape, making it easier to create unique but similar trees
  • A better looking trunk mesh
  • The possibility to remove random branches, adding character to trees
  • Several new, ready to use example trees
This new revision will of course be free of charge for people who already bought the addon.

Pro-Lighting: Skies Demo

I am working on some additional sample trees for my Space Tree Pro add-on and one of the things I really wanted is some easy yet professional lighting setup and guess what, out of the blue comes BlenderGuru with a very handy addon :-) It works really well and makes cycling between different HDRi setups pretty simple. just a sample from a WIP promo piece:

Renderman for Blender vs. OSL

Everybody is thrilled because of Pixar's decision to offer a version of Renderman that is free for non-commercial use, and rightly so because it will enable a lot of people to get acquainted with this industry standard.
Even better is the support by Pixar for a tight integration of Renderman with Blender, in the form of an open source add-on. This add-on may not be production quality yet, but once you have installed Renderman it works out of the box:

Open Shading Language

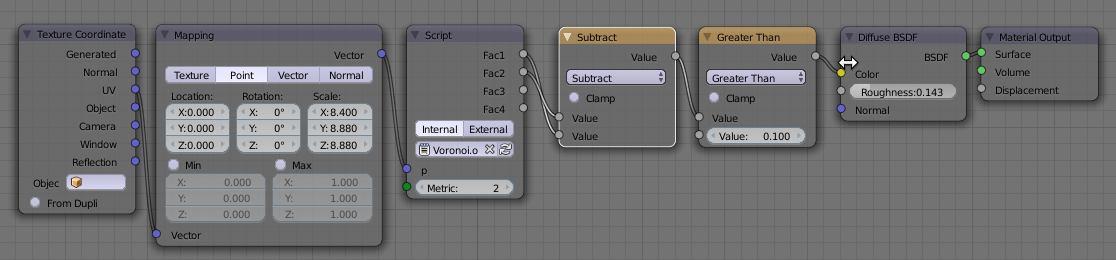
From my point of view Renderman is extra interesting because it supports shaders written in Open Shading Language (OSL) which means that we should be able to port OSL shaders written for Cycles to Renderman. In the image of Susanne the patterning on her head was actually done by plugging in this simple OSL shader:
shader marble (color Cin = .5,
               float freq = 1.0,
               output color result = 0)
{
    float sum = 0;
    float freqVal = freq;

    point Pshad = transform ("object", P);
    for (int i = 0; i < 6; i++) 
    {
        sum = sum + 1/freqVal * abs(.5 - noise( 4 * freqVal * Pshad)) ;
        freqVal = 2 * freqVal;
    }
    result = Cin * sum;
}

Workflow

There are a couple of restrictions and quirks so let me walk you through the steps I took to get this shader running.

Compile the shader

Renderman will not compile OSL shaders automatically for you like Cycles does, so you will have to do that yourself. If you do not have the oslc compiler installed separately the easiest way to do this is to create a Cycles material first that contains a Script node. When you refer this Script node to an external .osl file it gets compiled immediately to an .oso file and this .oso file can be used as is by Renderman.

Link it to the diffuse color

First select a PxrOSL pattern by clicking the dot next to the baseColor, and then type in the full path to the shader, but without the .oso externsion! (circled in red)

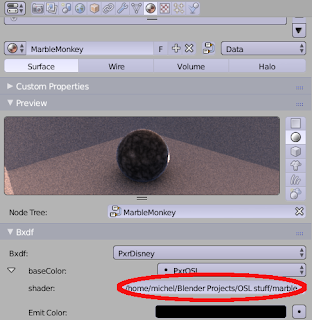
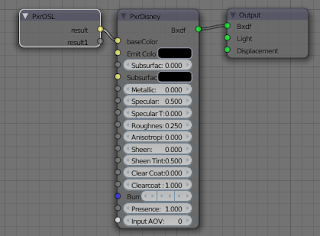
You will notice in the node editor that a PxrOSL node is wired up to the PxrDisney shader.

At this point you can render your scene.

Quirks

If you look closely at the PxrOSL node and at the code for the shader you see that the input and output sockets correspond just partially to the input and output parameters of the shader. Indeed, all input parameters are completely ignored and there is an extra float output socket called result1. The types and names of the input and output sockets are it seems defined in the file /opt/pixar/RenderManProServer-20.0/lib/RIS/pattern/Args/PxrOSL.args and are the same for all OSL shaders. So as far as I understand it, you can use different shaders but they all should use the same names for their input and output sockets (I think this is in line with other Renderman patterns). For this example it meant that I had to rename the output color from Cout to result to get it working (otherwise you get a rendertime error complaining it cannot link to the result socket). Maybe I am looking at it from the wrong perspective as I know next to nothing about Renderman, It is workable of course, just define enough suitable input and output parameters and use those predefined names in your shader but it feels a bit restrictive. Anyway, it is a very promising step. I am studying the add-on to see if I can tweak the OSL node part and maybe help out the original author.
If you would like to know more about programming OSL you might be interested in my book "Open Shading Language for Blender". More on the availability of this book and a sample can be found on this page.

Space Tree Pro pine tree WIP

Yes it is possible, you can create pine trees with Space Tree Pro as well:

The relevant settings are shown below.
The trick is in the Straight Weight setting and the tapering (the Shape parameter). And of course a particle system based on scanned twigs. For now it's just a single twig based on an image from wikipedia but I will scan soem more form the trees in our backyard (because even if it is cc0 I only want to distribute my original work ).

The branch distribution is not optimal in the sense that real pine trees hardly have any branches that point upward but ill try to tweak it some more.
Space Tree Pro is available on Blender Market.

Scenic view made with Space Tree Pro

Just another image to promote my new addon Space Tree Pro.

Animating a Space Tree Pro tree

The animation is not the best in the world but it does show how easy it is to animate a tree that was generate with my Space Tree Pro add-on.
The steps that were take were simple:
  • Create a lattice object and move/scale it so it enfolds the tree and its leaves
  • Add a lattice modifier to the tree: select the tree and then the lattice, type Ctrl-P, choose lattice
  • Add a lattice modifier to the leaf emitter: add modifier, select the same lattice object
  • Add a shape key to the lattice and let it deform the objects
  • Keyframe the shape key on the lattice
  • Optionally: keyframe the rotation on the Leaves particle system

Sunset

I am working on some additional images to promote my new addon Space Tree Pro and although primarily intended for trees in the middle distance you can create hero trees as well.
The tree was created by distributing a group of icospheres to shape the crown and the rock and the wall are part of an exclusion group, so growing branches did not penetrate them. All branches drop a bit below the volume set by the icospheres because of tropism. The scene looks like this:

Space Tree Pro, a new way to create trees in Blender

I like to announce my new tree creation addon Space Tree Pro that will appear on Blender Market on June 25.

A teaser video is already on YouTube:

The add-on is a natural evolution of my free space tree addon, with a vastly improved user interface, the possibility to influence the shape of the trees with the grease pencil, better tree trunks that are uv-unwrapped and generated faster, and a nice starter set of ready to use trees (that can be used as is, but are even better suited as a starting point for your own trees). Combined with the tutorial videos and a comprehensive manual I hope it will help people create many trees quickly with minimal effort, without sacrificing the individual character of each generated tree and offering great flexibility in blending trees with their environment.

Of course the add-on still has all the features of its free counterpart as well, like the possibility to shape the crown with groups of objects, defines shadow groups and exclusion zones and create trees or hedgerows with multiple trunks. Another new feature is that all configuration parameters are stored with the generated tree, which means you can create libraries of trees in separate .blend files and those trees can be loaded and tweaked again with the add-on.

Check Blender Market soon and I hope you will find the offer worthwhile.

WeightLifter discount

Today my WeightLifter addon, together with lots of other nice offerings, is on discount at BlenderMarket.

They are celebrating their first anniversary and offer 20% off on over a hundred products. It's only for a day (june 10) so grab it before it is too late.

Voronoi playtime, redux

In a previous article I showed how some hidden functionality in Blender's distributed OSL headers could be used to create all sorts of Voronoi/Worley noise. At that point I left out the choice of distance metric because there wasn't a nice way to implement choices in OSL.

There still isn't but prompted by a question I decided to implement it in an ugly way; after all, if it works that is all that matters :-). All the necessary code to implement different distance metrics is already in node_texture.h but for some reason it was commented out. I therefore lifted the necessary part from this file and combined it with a a small shader that lets you choose the distance metric with an integer. An example for the Manhattan metric is shown below.

Node setup and code availability

The node setup used to generate the image above looks like this:

The code for the shader is available on GitHub. The node it generates may look a bit different than in the noodle shown here because I added an exponent input E that can be used for the generalized Minkovsky metric (metric == 6).
If you would like to know more about programming OSL you might be interested in my book "Open Shading Language for Blender". More on the availability of this book and a sample can be found on this page.

Greebles in OSL

The shader that is presented here basically takes as input a set of uv coordinates and produces a set of rectangles, each with their own uv coordinates. These rectangles are randomly distributed and rotated and do not necessarily cover everything: the fac output signals whether there is a rectangle or not.

With this set-up you can for instance cover a surface with random hull plates or similar:


The noodle used to produce the image looks like this:


There are two OSL shaders in this noodle: the first one on the left is called Greebles and is the one that divides up the coordinate space, the second one is called Rivets and is part of the green Rivets material layout. That last one simply distributes small circles around the edges of a rectangle.

Both shaders are available on GitHub, Greebles here, and Rivets here.

If you would like to know more about programming OSL you might be interested in my book "Open Shading Language for Blender". More on the availability of this book and a sample can be found on this page.

WeightLifter add-on: new feature release

Version 20150501170240 adds two new modes: one that assigns values based on the average area of the faces sharing a vertex and another mode that assigns values based on the variance of the lengths of edges that share a vertex. The first one I find useful in creating materials on organic shapes that vary in a subtle but correlated manner while the latter offers a complement to the curvature mode, highlighting certain vertices in a different way. Of course you might find a completely different use for it, that's why I include it in the add-on :-)

The new version is of course available free of charge to people who have already purchased the add-on. Check the BlenderMarket page for more details.

Updating version ids in Blender addons automatically with Notepad++

Blender addons use a version identifier that consists of three numbers, for example:
bl_info = {
 "name": "Awesome object generator",
 "author": "Me",
 "version": (1, 0, 20150425140302),
 "blender": (2, 74, 0),
 "location": "View3D > Add > Mesh",
 "description": "Adds an awesome object at the 3d cursor",
 "warning": "",
 "wiki_url": "",
 "tracker_url": "",
 "category": "Add Mesh"}
I do virtually all addon development with the help of Notepad++ and I really wanted to have a way to automatically update this version information when I change something. Cvs (and svn) have functionality to update specific strings but I wanted to use this addon version information because having two different tags doesn't sound logical to me. Fortunately with the help of the Python Script plugin for Notepad++ it is quite simple to create a save event listener that does exactly what I want:
from datetime import datetime

# Just in case, we'll clear all the existing callbacks for FILEBEFORESAVE
notepad.clearCallbacks([NOTIFICATION.FILEBEFORESAVE])

def ts(m):
 dt=datetime.now()
 ds=dt.strftime("%Y%m%d%H%M%S")
 return m.group(1)+ds+m.group(3)
 
# Define the function to call just before the file is saved
def addSaveStamp(args):
 currentBufferID = notepad.getCurrentBufferID()
 notepad.activateBufferID(args["bufferID"])
 editor.rereplace(r"(version.*?\(\s*?\d+\s*,\s*\d+\s*,\s*)(\d+)(\s*\))", ts)
 notepad.activateBufferID(currentBufferID)
    
# ... and register the callback 
notepad.callback(addSaveStamp, [NOTIFICATION.FILEBEFORESAVE])
If you place that code in the startup.py file (typically in your roaming profile, for example: C:\Users\Michel\AppData\Roaming\Notepad++\plugins\config\PythonScript\scripts\startup.py ) and make sure the Python Script plugin is activated on startup (by selecting Plugins -> Python script -> Configuration -> Initialization = ATSTARTUP and restarting Notepad++) then any subsequent save will look for a version identifier and will replace the third number with a timestamp.

WeightLifter add-on: small bugfix release

Version 20150418 fixes a small bug that could show an error when using WeightLifter on a mesh with an associated particle system. The new version is of course available free of charge to people who have already purchased the add-on. Check the BlenderMarket page for more details.

Floor boards: additional pattern

The latest version (20150404) of the floor board addon adds a border option to the square pattern. Besides parquetry this might come in handy for wooden patio tiles and the like

Overview

The floor boards addon has quite some history on this blog and elsewhere so for convienience I've gathered the most important links here.

Download

The addon is available on GitHub. (Click to download it to any location on your PC, then in Blender go to File->User Preferences->Addons and choose Install from file. If you have a previous version of this addon you should not forget to remove the addon first by locating it in the list of addons and clicking Remove. The addon can be found under the Add Mesh category.)

Discussion

If you like you can give feedback on this addon in this blog or in this BlenderArtists thread.

History

Full Review: Blender Cycles Materials and Textures Cookbook, 3rd edition

Bigger and better


many revised editions of books offer just minor improvements but this book offers much, much more. Expanded to just under 400 pages it covers everything about Cycles in a clear and extremely detailed manner.

(click to go to publisher's site)
The author clearly knows what he is talking about and explains in a structured manner how Cycles works, how to set up node based materials and to design materials from the bottom up. That last part is crucial: in order to create a material that is believable or even photorealistic a lot of detail is needed. The best way to get results is to design from the bottom up and add layers of detail step by step and in this book this is illustrated in minute detail.

Another great addition to this edition is attention for special effects: features like fog, fire, global illumination or shadeless materials. Cycles is quite capable to create those effects but these are not always easy to configure. The new sections in this edition do an excellent job in explaining them.

pros:
  • up to date
  • detailed description of general concepts and specific materials
  • well structured
  • featurmaterials (like leather, stone) as well as effects (like fog, fire)
  • downloadable materials are a good starting library
  • quality of materials is excellent
cons:
  • hi-res illustrations must be downloaded separately (there are only lo-res ones in the pdf. This distracts greatly from the reading experience)
  • some more information on lighting would have been useful. This could easily fill a whole book itself but some information on this subject would make it easier to get the most out of these materials.
Conclusion:

Good value for your money.