The rigify add-on that is bundled with Blender is a great way the generate easy-to-use armatures for any kind of mesh, but it took me a while to figure out how to assign custom colors that always turned out correctly.
The important bit is understanding which bone layers in your metarig (that is used to generate the Rigify rig later) correspond to which layers in the generated rig and how you can control that.
Preparing the metarig
Start with a new armature and switch to edit mode. Create your metarig as you would normally do. This is not a complete Rigify tutorial ( check this playlist by CGDive for a great start) but the things you have to think of while building your metarig if you want to use custom bone colors later are highlighted in the steps below.
add bone chains from samples

We use a simple metarig with a head, a spine, and two arms in this example. It is not necessarily a stellar example of a rig, but it serves to illustrate the relevant steps. The result looks like this

move start-of-chain bones to a bone layer
After your metarig is complete and aligned with your mesh, you should make sure that the start bones of the rigify samples are in the correct bone layer. The is no need to move any of the other bones in a chain. Do make sure that each limb, spine, or head chain starts on a layer that is at least 3 layers removed from any other layer. So if say the start of the right arm is in layer 4, the start of the left arm should go to layer 7.
The reason for this is that Rigify will put the IK controller bones in the final Rigify rig in the same layer and will put corresponding tweak and FK bones in the next two layers. If you don allow room for this, different kinds of bones will end up in the same layers, which is not an issue in itself (the armature will function ok), but will mess up all the nice customization!

Don't forget to make the layers visible in the armature as well (in the Skeleton panel of the Armature properties) otherwise your bones might become invisible when you move them to another layer).
set tweak and fk layers for start bones

Preparing the custom bone groups
This is done with the metarig in Pose mode.
Create a color palette

If you don like the bright colors of the standard, you can add individual colors from theme packs. Here we have clicked Add Standard.
Configure bone layer customization
This bit is the essence of creating the correct colorful bones. We have to assign names, button positions, and colors to the bone layers in the metarig. Once we generate the Rigify rig, these will result in colors and a tool panel with meaningful names.The rows that are mentioned in the Rigify Layer Names panel correspond to the bone layers in our metarig, but they are off by one! So row 1. refers to bone layer zero.
In our example we have the start of the Head chain in bone layer zero, so we label row 1 as 'Head'
We also configured that any tweak bones for the head will be generated in the next layer, so we can put the label 'Head (tweak)' in row one. There will be no FK bones generate for the head so we ignore row 3.
The start bone of the spine chain is in bone layer 3 in our example, and tweak and FK bones will be generated in the next two layers, so we label rows 4,5 and 6 with 'Spine', 'Spine (tweak)' and 'Spine (FK)' respectively.
We also set the Bone Groups for each set of bones: The chain head to Bone Group 2, because those are the IK bones (and will be shown in red in the final rig if you use the standard colors), and any FK bones to Bone group 5 so they'll turn up in green in the final rig.
Tweak bone layers are mostly assigned to Bone Group 4 except. The Spine is the exception here: we assigned it to Bone Group 4 so it will show up as yellow. This all follows the coloring of the Human Basic rig.
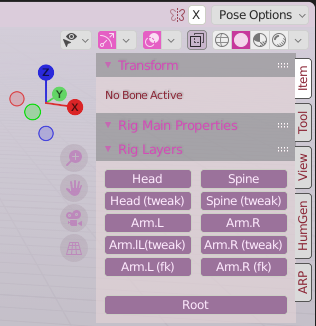
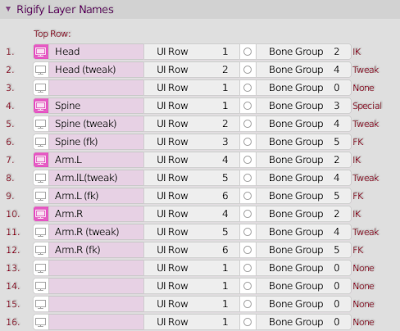 The UI row of a Rigify Layer determines where the hide/unhide buttons go that will be generated for those layers. Those buttons will show up in the Rig Layers panel in the toolbar once you have generated the Rigify rig.


 The UI row of a Rigify Layer determines where the hide/unhide buttons go that will be generated for those layers. Those buttons will show up in the Rig Layers panel in the toolbar once you have generated the Rigify rig.
Generate the Rigify rig


It makes sense to hide the original metarig and move the Rigify rig to the same collection as the mesh

Parent the mesh to the rigify rig
You are done now, but just to make that there are no loose ends, we parent the mesh to the Rigify rig (not the metarig!).
In object mode, select the mesh and then the Rigify rig and then parent the mesh to the rig.
Note that we parent with empty groups here, because that often makes more sense when rigging hard surface models than parenting with automated weights.
We get a list of empty vertex groups, one for each deform bone in the Rigify rig.

For this simple puppet mesh I assigned all head vertices to the DEF-head vertex group (i.e. I did not assign any vertices to the neck groups); all body vertices to the DEF-spine group and the arms and hands to the DEF-upper_arm and DEF-hand groups respectively. But all this is up to you.
Bye

PS> And what about custom bone shapes?
All the custom shapes that the Rigify rig uses are part of a generated collection WGTS_rig (where the last part corresponds to the name of your rigify rig).
These are hidden, but you can edit them in place, or, if you have a ready-made collection of widgets you want to use, you can change the shape of each bone in the Viewport Display panel of the Bone properties (in Pose mode!) by assigning it there.

(you may want to move that whole collection as a sub-collection to your mesh collection as well)
No comments:
Post a Comment