MicroTiles - uniform subdivision of selected faces

Introduction

I often use Blender to model railway scenery in H0 scale for 3D printing. While Blender is not a CAD program, it proves to be a very useful tool in cases where artistic considerations are just as important as exact tolerances.

Problem with Tunnel Portals

Recently, I was working on some tunnel portals and wanted to create a rough surface on certain faces. Using fuzzing settings in a slicer did not yield the results I was looking for, so I decided to use a displacement modifier with Musgrave noise to achieve this effect.

Vertex Groups and Subdivision Modifier

By defining a vertex group, the displacement modifier can be restricted to just the faces that need the rough texture. However, there must be enough geometry to see any details.
The subdivision modifier, however, cannot be restricted with a vertex group. It also suffers from the same drawbacks as manual subdivision: all faces are subdivided uniformly, meaning the new faces will be proportional to the size of the original faces. Larger faces result in larger new faces, and smaller faces result in smaller new faces. Additionally, n-gons are often not subdivided properly, as shown in the next image, where the rectangular bricks each have six edges.

MicroTile Add-on

What I wanted was a way to create a dense grid of uniformly sized faces on any selected face, and this is exactly what the MicroTile add-on does.
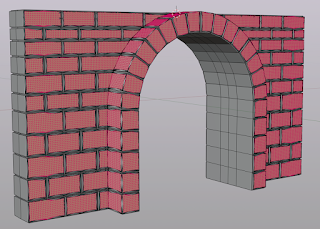
Simply select any faces you want to subdivide, then choose Add → Tile selected faces. The default setting creates faces with sides of 1 cm, but the Size option can be adjusted to any value. In the image above, the large stones are approximately 2 x 4 cm and were subdivided into 1 mm tiles.

Availability

The add-on is available for download from my Github repository.

Click the Download raw file button (near the upper right corner), then install the downloaded file via Preferences → Add-ons → Install from disk. Once installed, a new menu item will appear in Edit mode: Add → Tile selected faces.

Notes

  • The add-on has been optimized for performance, but generating a large number of new faces can still be slow. For instance, on my machine, subdividing 122 selected faces of the tunnel portal down to 1 mm took just over six seconds, adding around 135k Tris in the process. Your experience may vary. The add-on includes a progress indicator to provide a sense of the process's progress.
  • The add-on also creates a new vertex group containing all the newly created vertices (excluding the vertices of the originally selected faces). This feature suits my particular use case, as I can then add a displacement modifier restricted to these vertices.
  • The add-on supports undo functionality. However, for some reason, any created vertex groups are not removed during undo. I'm not sure why this happens.


  • Minor tweak to Facemap Select

    In a previous article I wrote about some new functionality in the Facemap Select add-on.

    I just added a minor tweak to it: now all Facemap actions, like select and unselect can be undone, just like any other selection in Blender.

    The updated version can be downloaded from my github repository.


    Updated version of Facemap Select


    In this article we introduced a small add-on to work face maps, and explained why such an add on is needed in Blender 4.0 and later.

    Recently contributor Yann submitted a pull request that adds a nice, dedicated panel to manage any number of face maps. This offers an way to interact with face maps that is similar to how you would work with vertex groups.

    I removed the now redundant entries in the select menu because I don´t want to clutter the interface more than needed.

    The new version of the add on can be downloaded from Github. Simply click on the "download raw file" button (near the top right) and the install the file as an add-on in the usual manner.


    Blender Market, the end?


    I decided to discontinue selling add-ons and books on Blender Market.

    Sales have been declining for a while now, and I had set myself a hard minimum on the average monthly revenue, and that minimum was reached last month.

    I have been active for more than 10 years on Blender Market, my Weightlifter add-on was first published in August 2014, so the decision does hurt a bit, but in the end several factors added up to this final decision: It is not just the declining income, but costs have been increasing too. Both the fees to Blender Market (which are fair, but are still increasing nevertheless), as well as the time investment in maintaining add-ons and providing support, are no longer in balance with the income. 

    I was never in it for the money anyway, it was just a hobby, and by doing this I hope to be able to spend more time on things I enjoy more, like creating completely free add-ons, and using Blender for my personal artwork.

    I am not completely gone from Blender Market though; I like modelling too, and I will continue adding some if I think that they are good.

    Export .obj file with the name of the active object preselected

    When you select export .obj from the File menu the name of the file will typically be preselected as the name of your Blender file but with the .obj extension or just object.obj if you haven't named your Blender file yet.

    That's fine, you can change the name of course, but when I am working on a collection of object variants, I typically want to export them one a time and to be able to recognize them easily, I typically name the file after the name of the object.

    Can this be simplified?

    The Export Active Obj add-on

    Yes, this can be simplified because we can add the export obj operator to the File menu again, but with the filename prefilled with the name of the active object.

    The code is shown below, and it sets some common options I use all the time as well, but the essence is in line 7 (there is some more code in the add-on to set things up). 


    def menu_func(self, context):
        self.layout.separator()
        op = self.layout.operator(
            "wm.obj_export",
            text="Export Active Obj",
        )
        op.filepath = context.active_object.name + ".obj"
        op.forward_axis = "Y"
        op.up_axis = "Z"
        op.export_selected_objects = True
    
    
    def register():
        bpy.types.TOPBAR_MT_file_export.append(menu_func)
    

    The code can be downloaded from my GitHub repo [file: export_active_obj.py] or directly from this link.


    Tiny add-on to match data-block names to object names

    I often find myself starting with a simple cube mesh, changing it a lot and then only after a while I give the object a meaningful name. I am pretty structured about this so even if my file ends up with a lot of objects, all objects will generally have a descriptive name.

    However, the data blocks will at some point have names like Cube, Cube.001, Cube.002, etc., or even worse, have names that reflect other variants. Not a big deal  per se, but it might get confusing after a while so I'd like to rename all data blocks to match the name of the object.

    The Name Match add-on

    Renaming tens or even hundreds of objects can get tedious so I created a small add-on that when installed adds an item to the Object menu in the 3d-View.

    The code is really simple indeed (see below, line 14 , the complete add-on has some extra code to create the menu entry): it assigns the name of the data-block for each selected object to the name property of the object itself. No need to check for objects with the same name because Blender will already take care of that.

    When a data-block is linked to more than one object, the objects get names with numerical suffixes.

    class NameMatchOperator(bpy.types.Operator):
        """Rename datablocks to match the name of the objects they are linked to"""
    
        bl_idname = "object.name_match"
        bl_label = "Name match"
        bl_options = {"REGISTER", "UNDO"}
    
        @classmethod
        def poll(cls, context):
            return len(context.selected_objects)
    
        def execute(self, context):
            for obj in context.selected_objects:
                obj.data.name = obj.name
            return {"FINISHED"}
    

    Code availability

    You can download it from my GitHub repo, or click this link to go to the code directly.


    Spring sale is on at BlenderMarket ! They are having a sale starting tomorrow, May 21


    This means serious discounts on participating products and of course my add-ons are on sale too, including Snap!

    Check out BlenderMarket to see if that special product on your wish list now has an 'on sale' label.

    Spur gears with geometry nodes: demo

    IDMapper add-on verified for Blender 4.1


    I am pleased to announce that IDMapper is now verified for Blender 4.1. 

    It has been tested against version 4.1.1 of April 16, 2024, and no changes were needed.

    Blender 4.0 introduced quite a few breaking changes, so this version is not backwards compatible with 3.x

    Although no new functionality was introduced in this release, please be aware of the following:

    • IDMapper can currently not work with facemaps, because they are no longer supported in 4.0. This may change in the future (hopefully, see this discussion) and if possible I will try to get this back into IDMapper. Meanwhile, I did create a small, free add-on to make selecting faces from facemaps possible in 4.0 which may be useful in some workflows.
    • Color picking in Face Paint Mode (with the S-key) is no longer restricted to the 3d-View area, so colors can be picked from anywhere in the Blender application (although still not outside of it).

    IDMapper simplifies creation and editing of vertex color layers that can be used as ID-maps in texturing software like Substance Painter or Quixel. It aims to reduce the time it takes to create an ID-map significantly, especially for complex hard surface models. It uses powerful heuristics to create an ID-map from scratch and lets you interactively adjust the results. It offers options to use existing information, like uv-seams, but can also intelligently assign the same color to similar mesh parts. 

    The new version is available on BlenderMarket.

    This previous article showcases some of IDMapper's functionality.

    WeightLifter add-on verified for Blender 4.1


    WeightLifter has been verified for 4.1 compatibility. It has been tested with the 4.1.1 version of April 16, 2024  and no modifications were needed to make it compatible. If you still encounter a bug, please let me know so that I can have a look at it.

    WeightLifter is available on BlenderMarket. This update is free for customers who bought previous versions of WeightLifter.

    WeightLifter is an add-on that can calculate all sorts of information and store this into vertex groups or vertex color layers. It can for example determine the visibility of vertices for a certain camera or the distance to some light source and much, much more (the add-on comes with a 30 page fully illustrated manual), information that can for example be used as a density map in particle systems. You can even bake this information if your scene is animated. 

    The future

    The code in the add-on is very old (10 years, which in Internet terms is ancient) and it does show its age in the way it is structured and also, as I experience myself, it is not very fast, especially on large meshes.

    I was tempted to modernize it, and improve its speed if possible, but this might also be an opportunity to add features. So if you have an idea or suggestion, please drop me a note in the contact box at the top right of the page or via BlenderMarket and I'll be happy to consider it.

    In its current form it is unlikely it will be supported beyond Blender 4.2 LTS

    Floor board add-on (a.k.a. planks) updated for Blender 4.1


    It is always good to hear that people are using an add-on, and this time I got a request to update my floor board generator for Blender 4.1.

    Blender changes all the time and this time 4.1 even broke the old version of the add-on. Fortunately it was pretty easy to fix, so I am happy to announce that a new version is available on GitHub. [click download in the upper left corner]

    If you want to know more about what the add-on can do, check this older article on my blog.

    This version also incorporates a few small tweaks:

    • the bevel modifier now uses percentage as the default. This gives more consistent behavior across different patterns,
    • the bevel modifier now also has the harden normals option checked, which gets rid of quite a few shading artifacts,
    and a new pattern: Chevron


    Add-on to fit a cylinder to vertices

    I previously updated two small add-ons that can fit a line or a plane to a collection of vertices and was asked if it was possible to create an add-on that fits a cylinder.

    That is a bit more challenging though, but luckily there are people who spend some serious time on designing an algorithm and even providing code (see references below).

    Based on that I created a small add-on that can indeed fit a cylinder to a collection of selected vertices. Note that it fits a cylinder where the vertices lie as closely as possible on the surface of the cylinder (see image). If you want to fit a cylinder that encloses all vertices, so more of a solid rod, simply use the linefit add-on and align a cylinder to the best fit line.


    Usage

    Simply download cyclinderfit.zip from the repo and install and enable the add-on from this zip-file.

    Then select the mesh with the vertices you want to fit the cylinder to and select Fit cylinder from the Add menu (in edit mode). The new cylinder object will be added as a separate object that will be in edit mode.

    Code availability

    The code is available in this GitHub repository.

    References

    The cylinder fitting code was adapted from code in Xing Jiepan's repo, which in turn was based on the algorithms described in this paper by David Eberly.

    To remove dependencies on external packages (except numpy, which is included with Blender), we replaced calls to the scikit.optimize.minimize function with a different implementation of Powells' minimization function from the Sherpa code-base of the Chandra project. 


    Planefit.py and linefit.py updated for Blender 4.x

    Always happy to see any of my add-ons being used, even if it's a really old one, so based on a BlenderArtists request I updated planefit.py and linefit.py.


    Planefit adds a plane (=face) to your mesh that fits any selected vertices as well as possible (details in this post), and linefit is similar and adds a line (=edge) (details here). The articles also explain the math involved a bit if you are interested.

    The updated add-ons can be found on GitHub:


    Both add-ons can be downloaded in the same manner: Near the top right of the linked pages is a download button; click it to save the .py file, then (re)install the add-on in the usual manner.

    Technical details

    For any nerds out there: even though the commits seem large, that's mainly because I now use the Black formatter in all my Python projects so lots of whitespace was changed 😁. The actual change to planefit.py was only 1 line (the current line 116): the loop_total property of a polygon is read only nowadays so we cannot (and need not) set it: It is automatically updated when we add the vertex indices.

    The change to linefit.py was a bit more involved, mainly because it was even older: Properties in an Operator are now annotated class variables (and have been since version 2.8 I think), so we had to change line 53 from

    size = bpy.props.FloatProperty( ....

    to

    size : bpy.props.FloatProperty(...

    A small but necessary change that does not even give you a warning anymore, so something to look out for if you revisit very old add-ons.

    Likewise, the function bpy.utils.register_module() doesn't exist anymore and had to be replaced by bpy.utils.register_class()